Connecting an internal Snipe-IT instance to Entra ID via an Entra Application Proxy (for SCIM, SAML, and External Access)
Archived post · originally published · may be out of date
- Shout out to u/bgatesIT who helped me figure out how to deploy my Entra Application Proxy with Snipe-IT properly.
- Here are some additional articles that are provided by Snipe-IT to provide additional context for configuring SCIM and SAML.
TL;DR
- Deploy an internal Snipe-IT instance with a URL based on an external domain that exists within one's Entra ID tenant and make sure that same URL is properly referenced by an internal DNS record
- Deploy an Entra Application Proxy via an Entra ID application
- Configure Snipe-IT to work with the Entra Application Proxy
- Configure Snipe-IT to work with SCIM
- Configure Snipe-IT to work with SAML (for SSO)
- ???
- Profit!
Introduction
I recently had the opportunity to deploy a brand new instance of Snipe-IT which means the company I work for is evolving from an Excel spreadsheet for managing assets to a proper asset management solution. However I knew that in order to make this Snipe-IT deployment successful, I had to make it an effortless experience for the technicians using it as otherwise there would be no buy-in and then instead of having an outdated spreadsheet, we would then have an outdated Snipe-IT instance. Normally deploying a new internal application would mean spinning up a server/container, configuring it with LDAP and handing it off, but I wanted a modern, streamlined experience which meant integration with the cloud (SCIM via Entra ID), SSO (SAML) for users, and being able to access Snipe-IT externally (especially on a phone so if a technician forgot their laptop then at least they could use their phone to look up an asset). The solution to make all of this work? An Entra Application Proxy.
Utilizing an Entra Application Proxy
If you never heard of an Entra Application Proxy before, it is a locally hosted agent that provides the ability to publish an internally self-hosted application to the M365 portal (so it becomes externally available) while being able to integrate with Entra ID with both SCIM and SAML. Microsoft's own documentation has an excellent overview of what an Entra Application Proxy is. Stated differently, with the use of an Entra Application Proxy a locally hosted Snipe-IT instance can connect and sync users with Entra ID (SCIM), utilize quality of life features such as SSO (SAML), and is externally accessible through M365. I should clarify what I mean by "externally accessible", as what I mean is that a user can access the internal application through the M365 web portal by signing in with their Microsoft account (and being subject to any M365 security policies that are in place such as MFA, conditional access policies, etc.).
Why use SCIM?
This next section is optional reading but I figured I would explain why we would want to integrate Snipe-IT with SCIM instead of utilizing LDAP. If you are unsure of what SCIM is (System for Cross-Domain Identity Management), it is similar to LDAP in which it is an identity management protocol to sync users to your application of choice (in our case Snipe-IT) except it is significantly more straightforward and easier to use than LDAP.
SCIM has the following advantages over LDAP in which it requires no services accounts to manage, no certificates to deal with, and there is no server that Snipe-IT must be pointed to. In contrast to LDAP, you simply point your Entra ID SCIM application to your Snipe-IT instance (with a URL and API key) and SCIM will automatically push the selected users to Snipe-IT (no configuration on Snipe-IT required). In terms of choosing which users are synced to Snipe-IT, access is managed through the easy to use Entra ID web portal by selecting the groups (or individual users) of your choice instead of messing around with LDAP filters and what not. Finally when utilizing SCIM, an Entra ID application is created and that same application can be used to deploy a SAML configuration to Snipe-IT for SSO functionality. The only real benefit that LDAP provides over SCIM in the context of Snipe-IT, is if you wish to sync users within a certain OU to a specific Snipe-IT location automatically.
Deployment
Prerequisites
-
Microsoft Entra ID P1 or P2 licenses for the users syncing to and accessing Snipe-IT.
-
A server that already has a Microsoft Entra private network connector installed on it (as this will be used by the Entra Application Proxy).
-
A self-hosted Snipe-IT instance.
- For ease of deployment, make sure the local Snipe-IT instance URL points to an external domain name that is currently within your Entra ID tenant (for example, https://snipe-it.YOURCOMPANY.com) and not an internal domain (such as https://snipe-it.YOURCOMPANY.local). The reason why, is so that the Entra Application Proxy does not need to redirect URLs when connecting to the local Snipe-IT instance and it is also a cleaner user experience as well (as there is only one URL for both internal and external use):
- To reference the Snipe-IT instance internally, you will need to create an internal DNS entry pointing to it. If your internal DNS does not currently reference your external domain name within your local environment, then you can create an internal DNS zone later to get around this problem.
- Later on, you will need to create a CNAME entry on your external domain registrar (GoDaddy for example) that points your Snipe-IT instance's URL to a Entra Application Proxy URL.
- To change the URL of a Snipe-IT instance, you do so by changing the
APP_URLenvironmental variable used by the Environmental Config File.
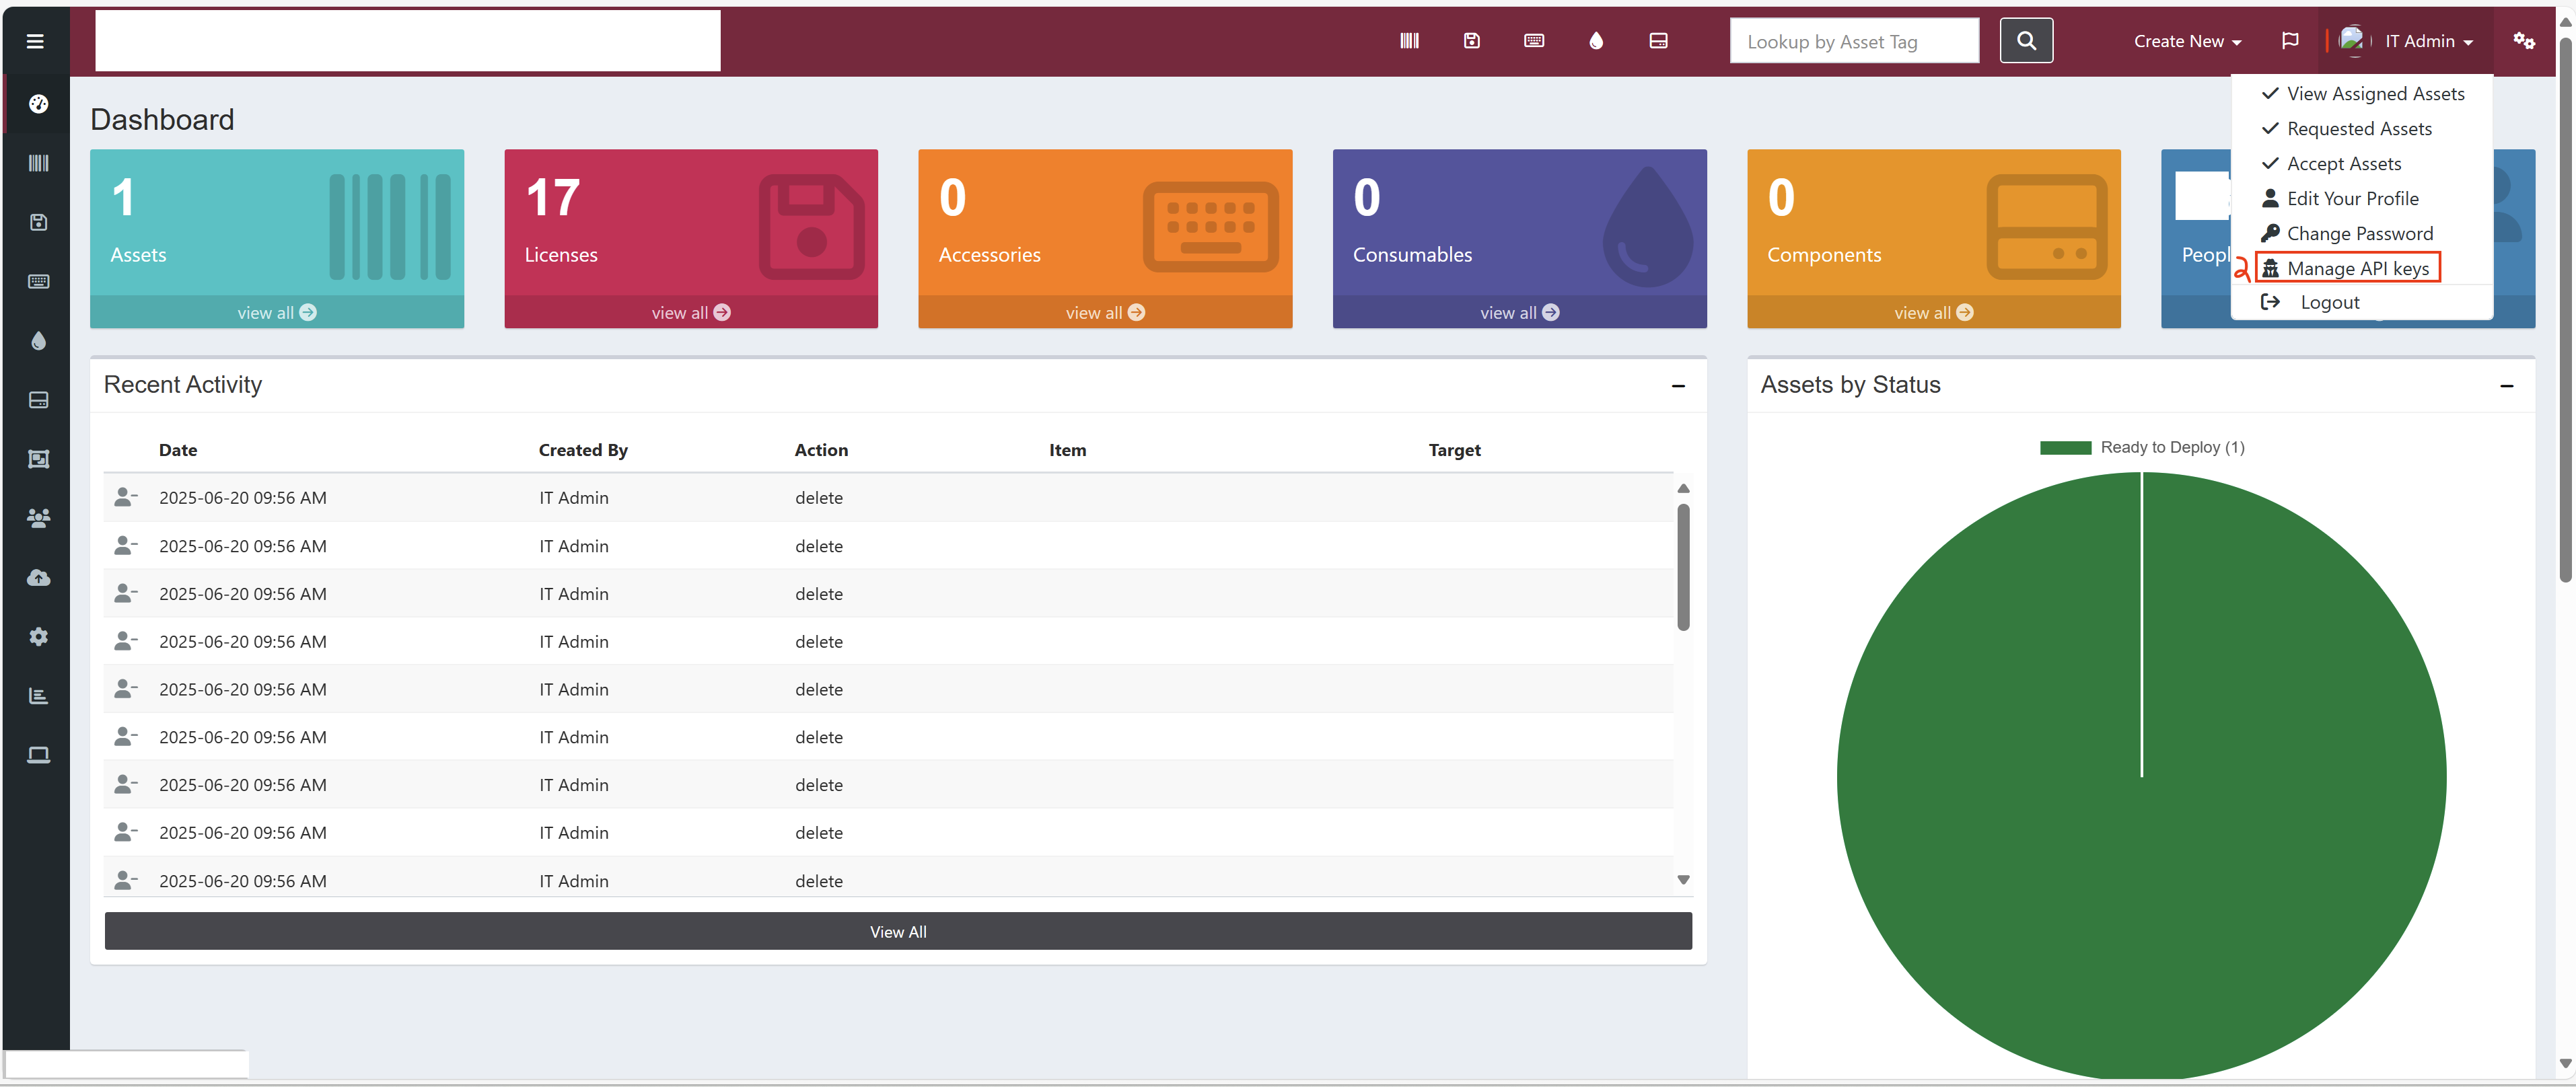
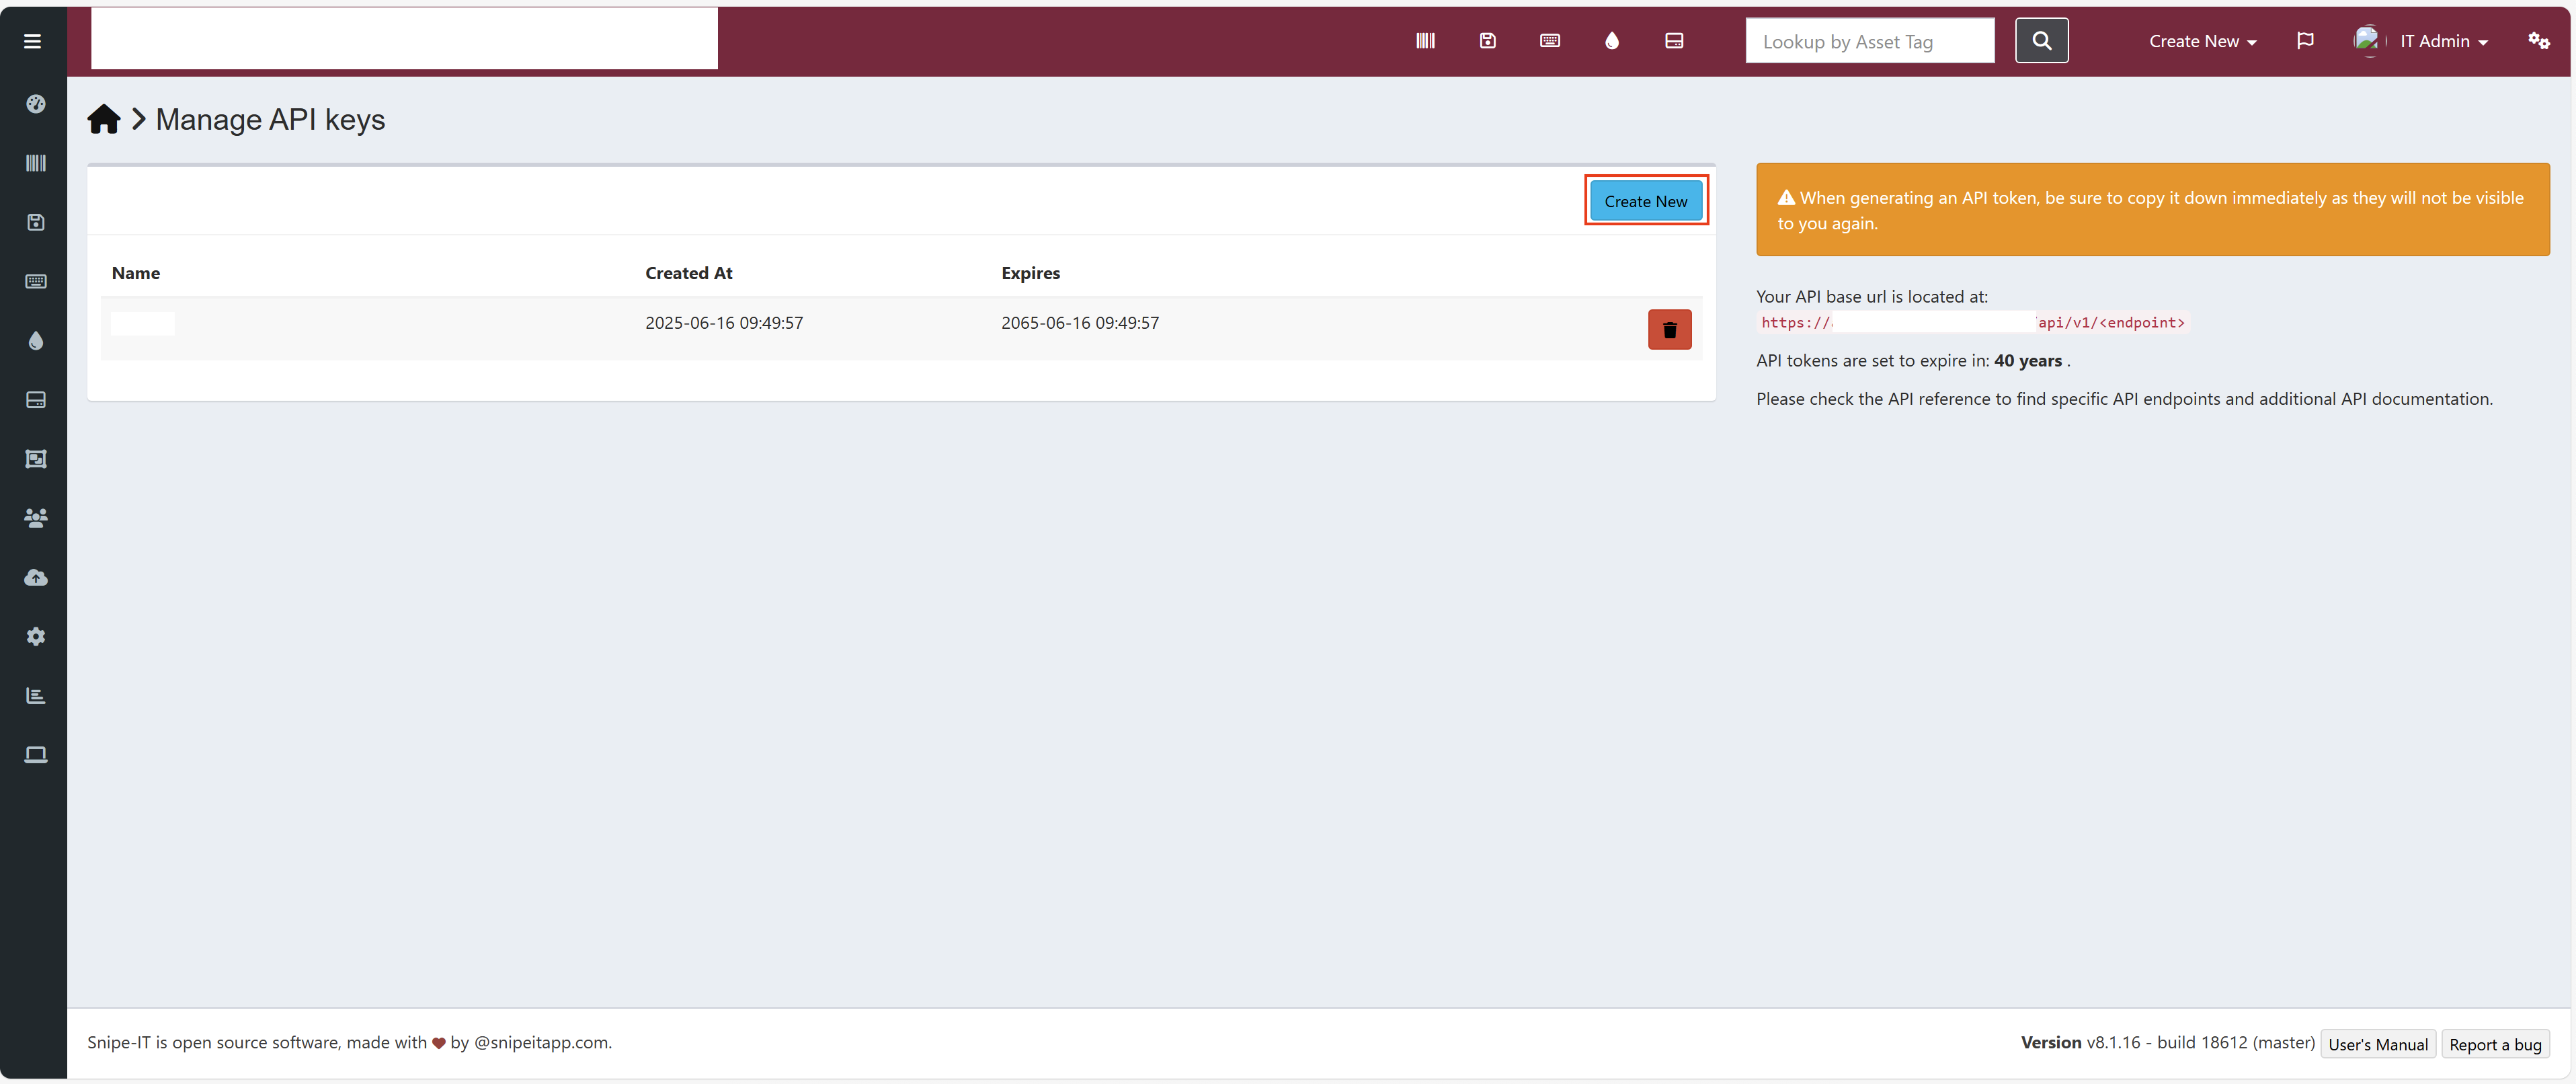
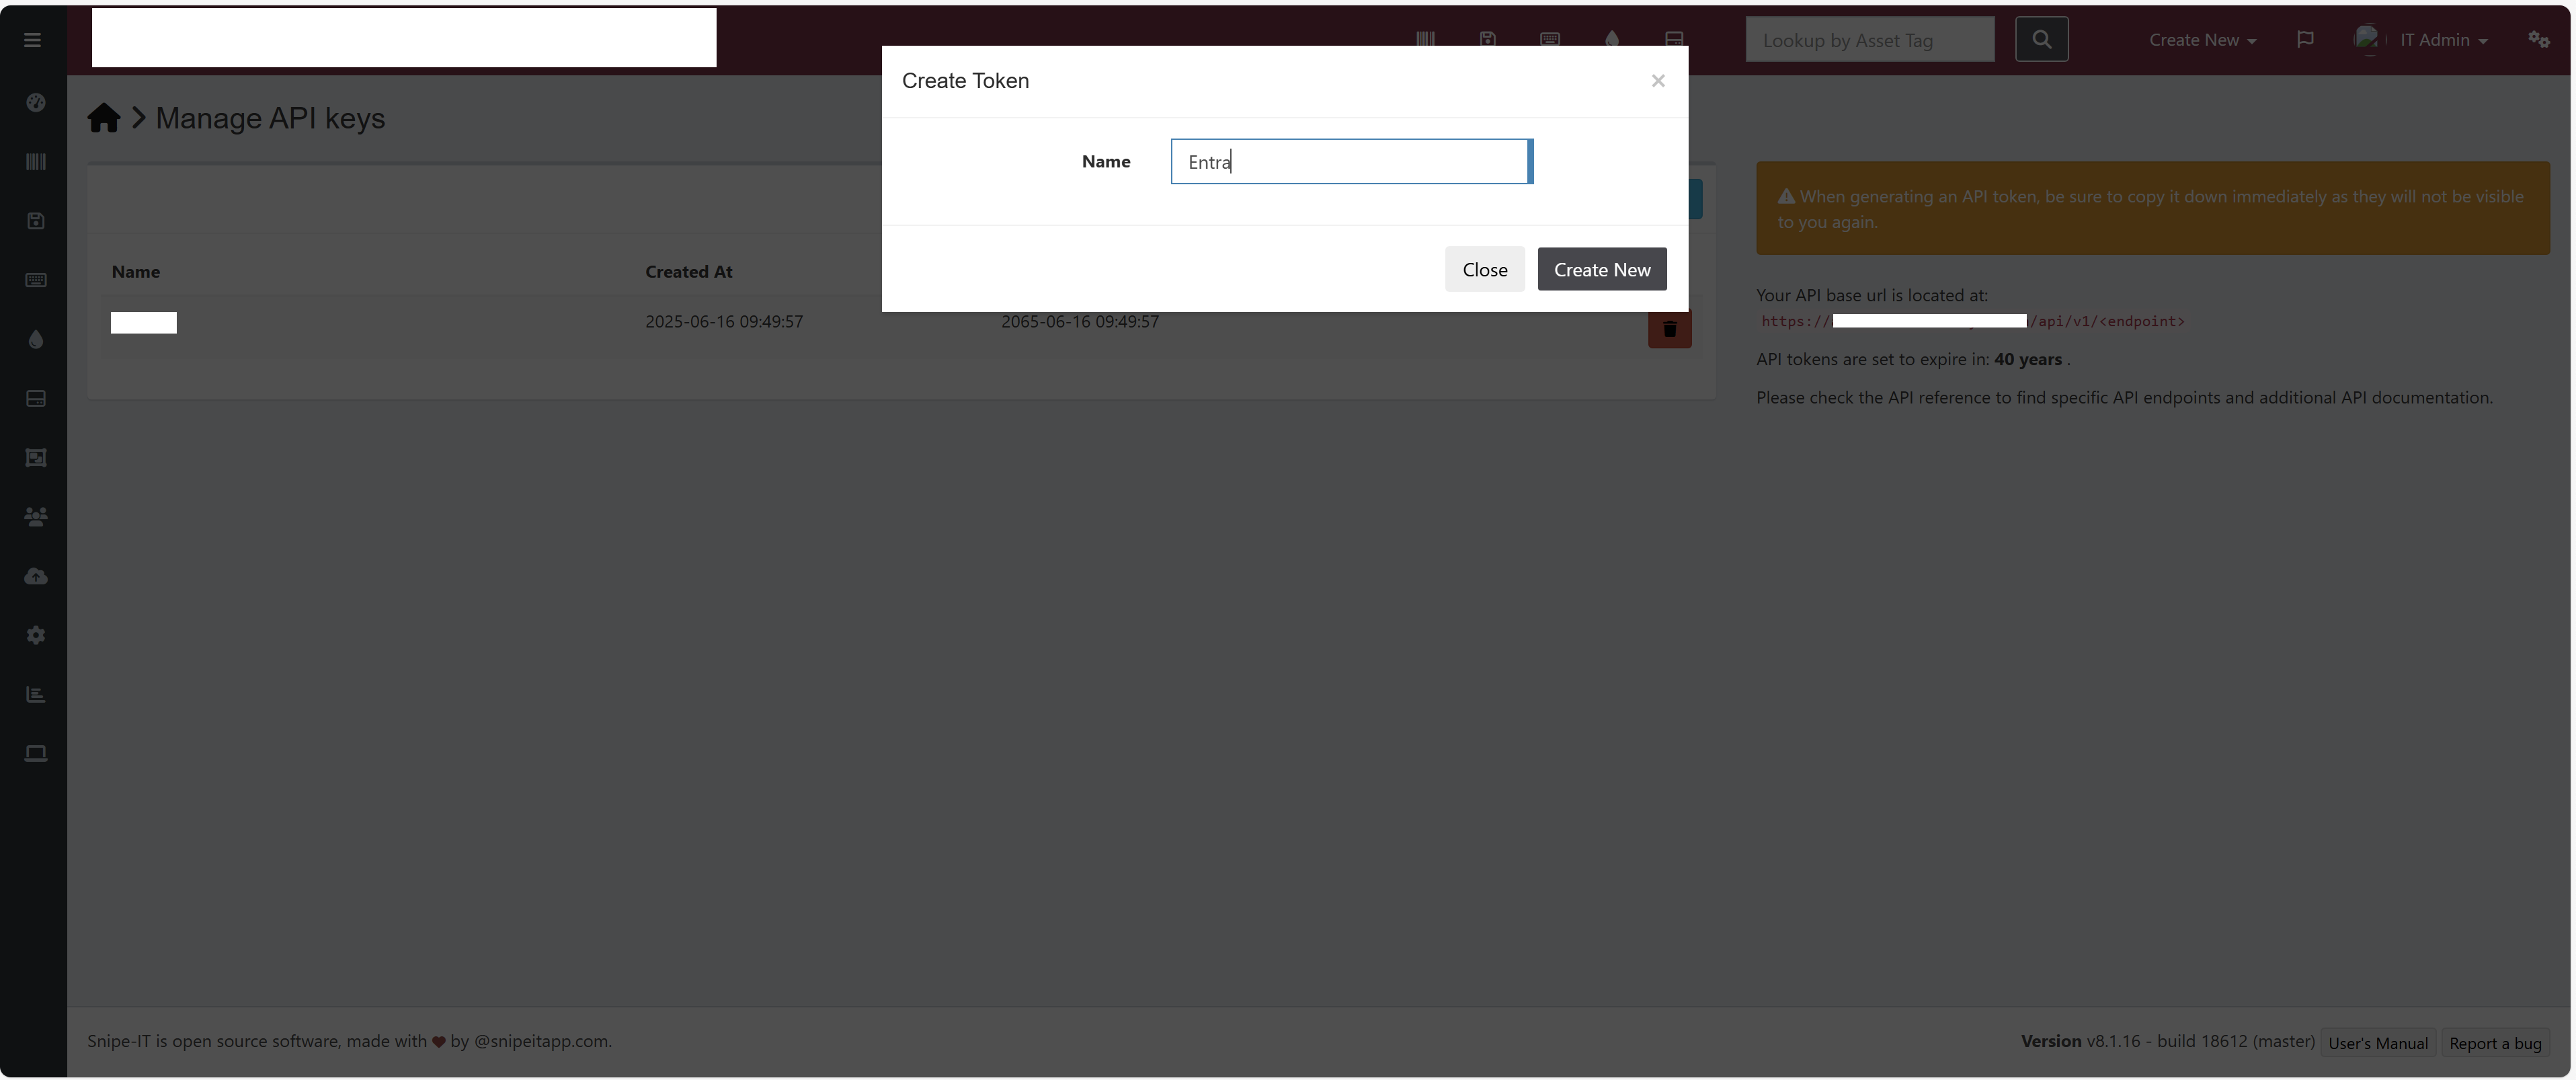
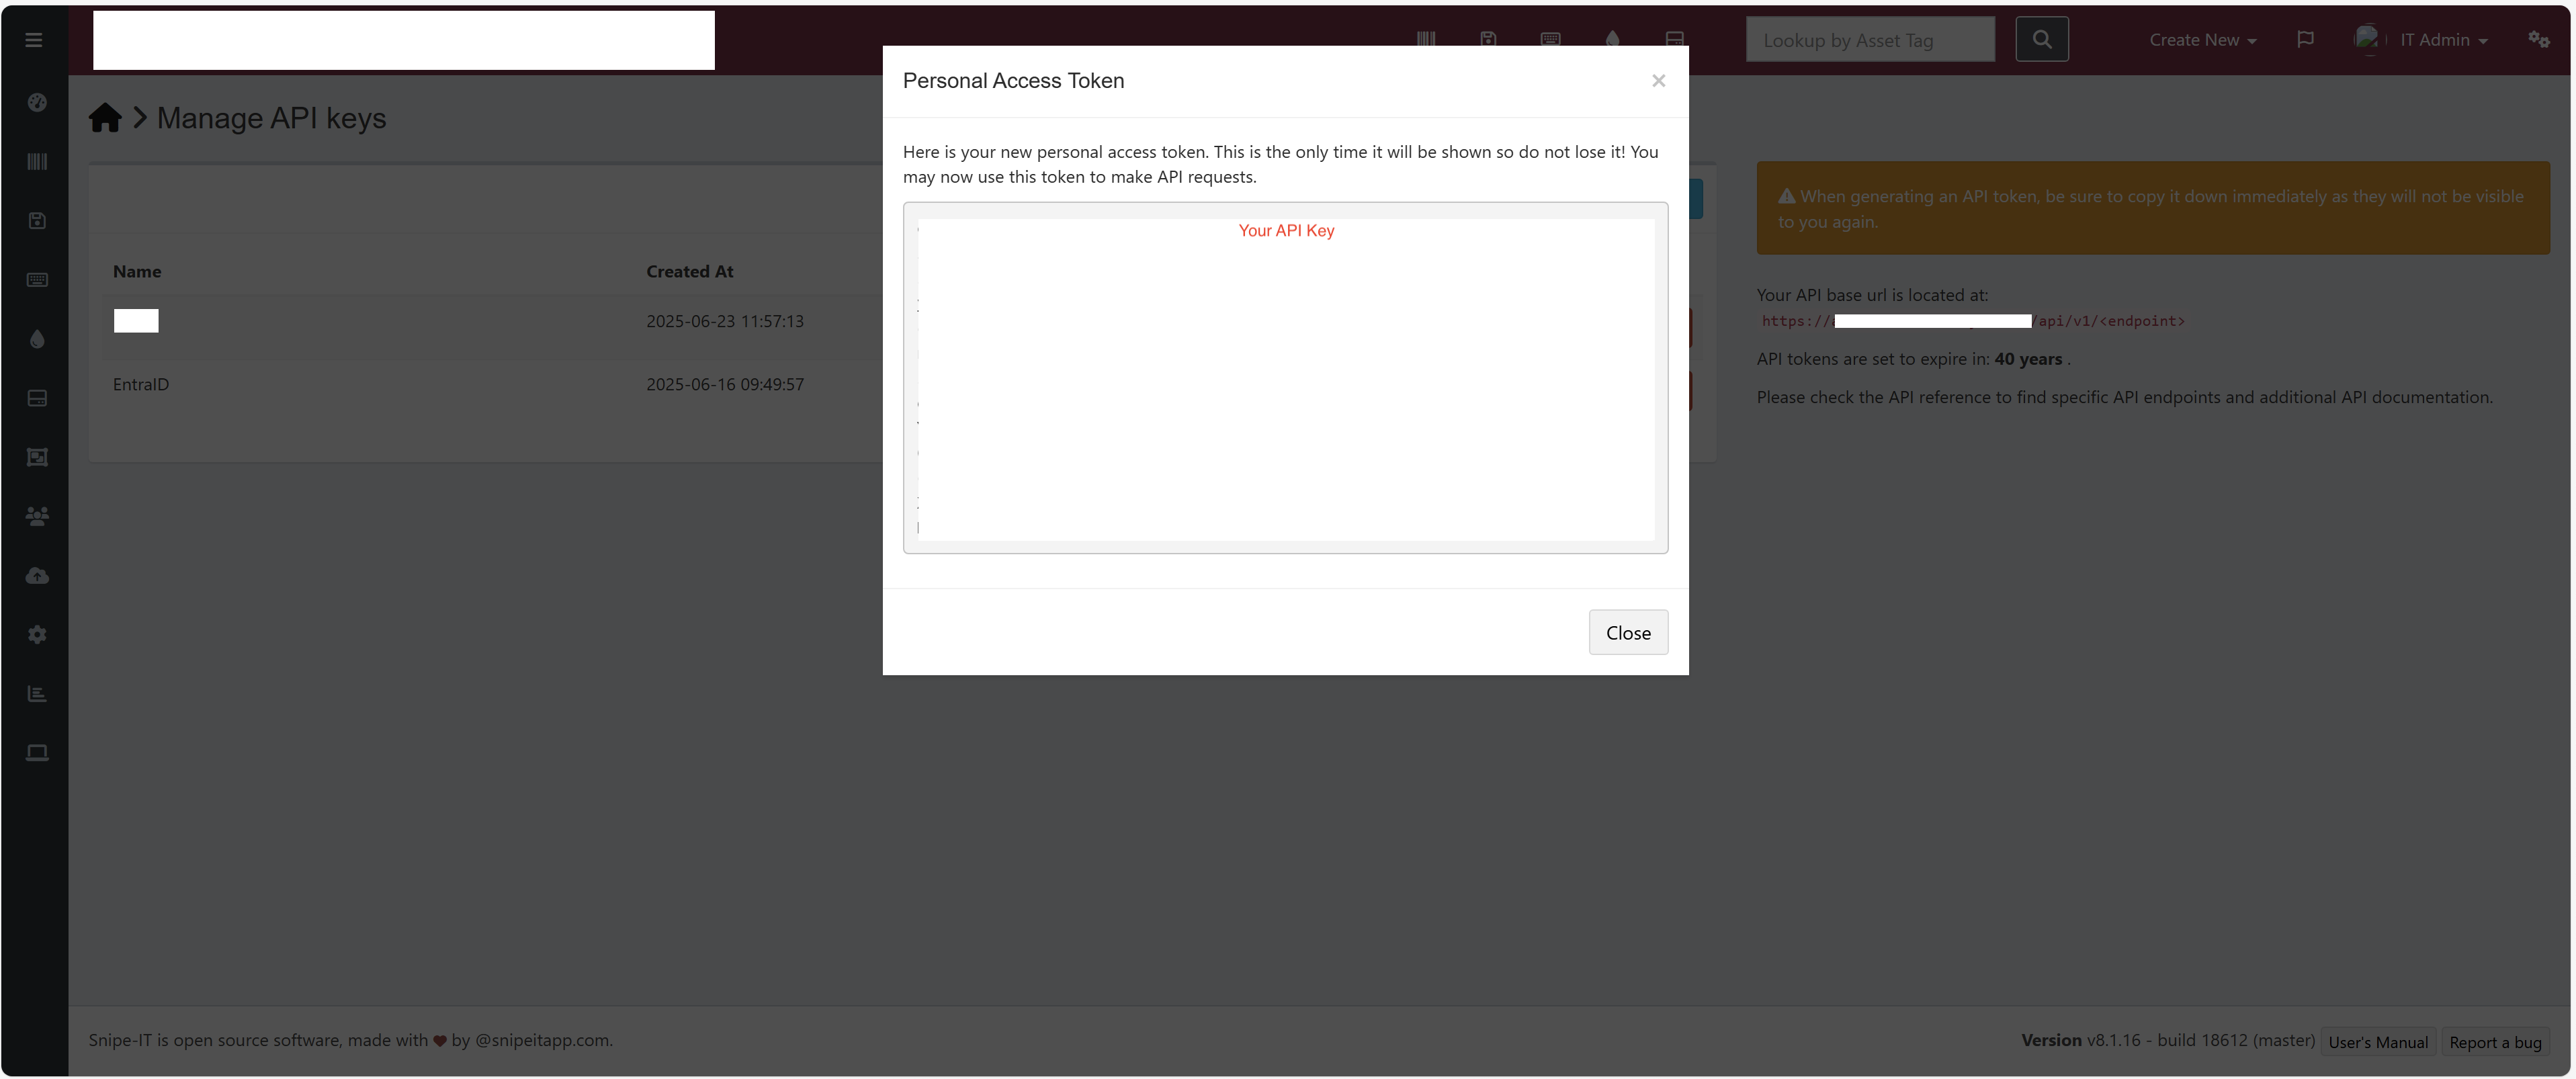
- You need to sign into your Snipe-IT instance as a super user and create an API Key (which you will use later on during the SCIM section):
- As the super user select your signed in username, then select
Manage API keys, and then create an API key (make sure to save the generatedPersonal Access Tokenfor later):
- As the super user select your signed in username, then select
- For ease of deployment, make sure the local Snipe-IT instance URL points to an external domain name that is currently within your Entra ID tenant (for example, https://snipe-it.YOURCOMPANY.com) and not an internal domain (such as https://snipe-it.YOURCOMPANY.local). The reason why, is so that the Entra Application Proxy does not need to redirect URLs when connecting to the local Snipe-IT instance and it is also a cleaner user experience as well (as there is only one URL for both internal and external use):
Creating a DNS Entry
If you have not done so already, create an internal DNS entry within your internal environment that references your Snipe-IT instance. If your environment lacks a proper forward lookup zone for your external domain (as was the case for me), what you will do is create a new forward lookup zone that only references the Snipe-IT instance and its subdomain. In the future you can clean up your DNS zone so that a proper forward lookup zone exists that references the entire external domain (with proper records pointing to the various resources) instead of just the Snipe-IT subdomain.
In my environment, we are utilizing Active Directory for DNS management (which I assume is the case for most people):
-
Launch
DNS Manager, navigate to your DNS server of choice, right clickForward Lookup Zonesand then selectNew Zone: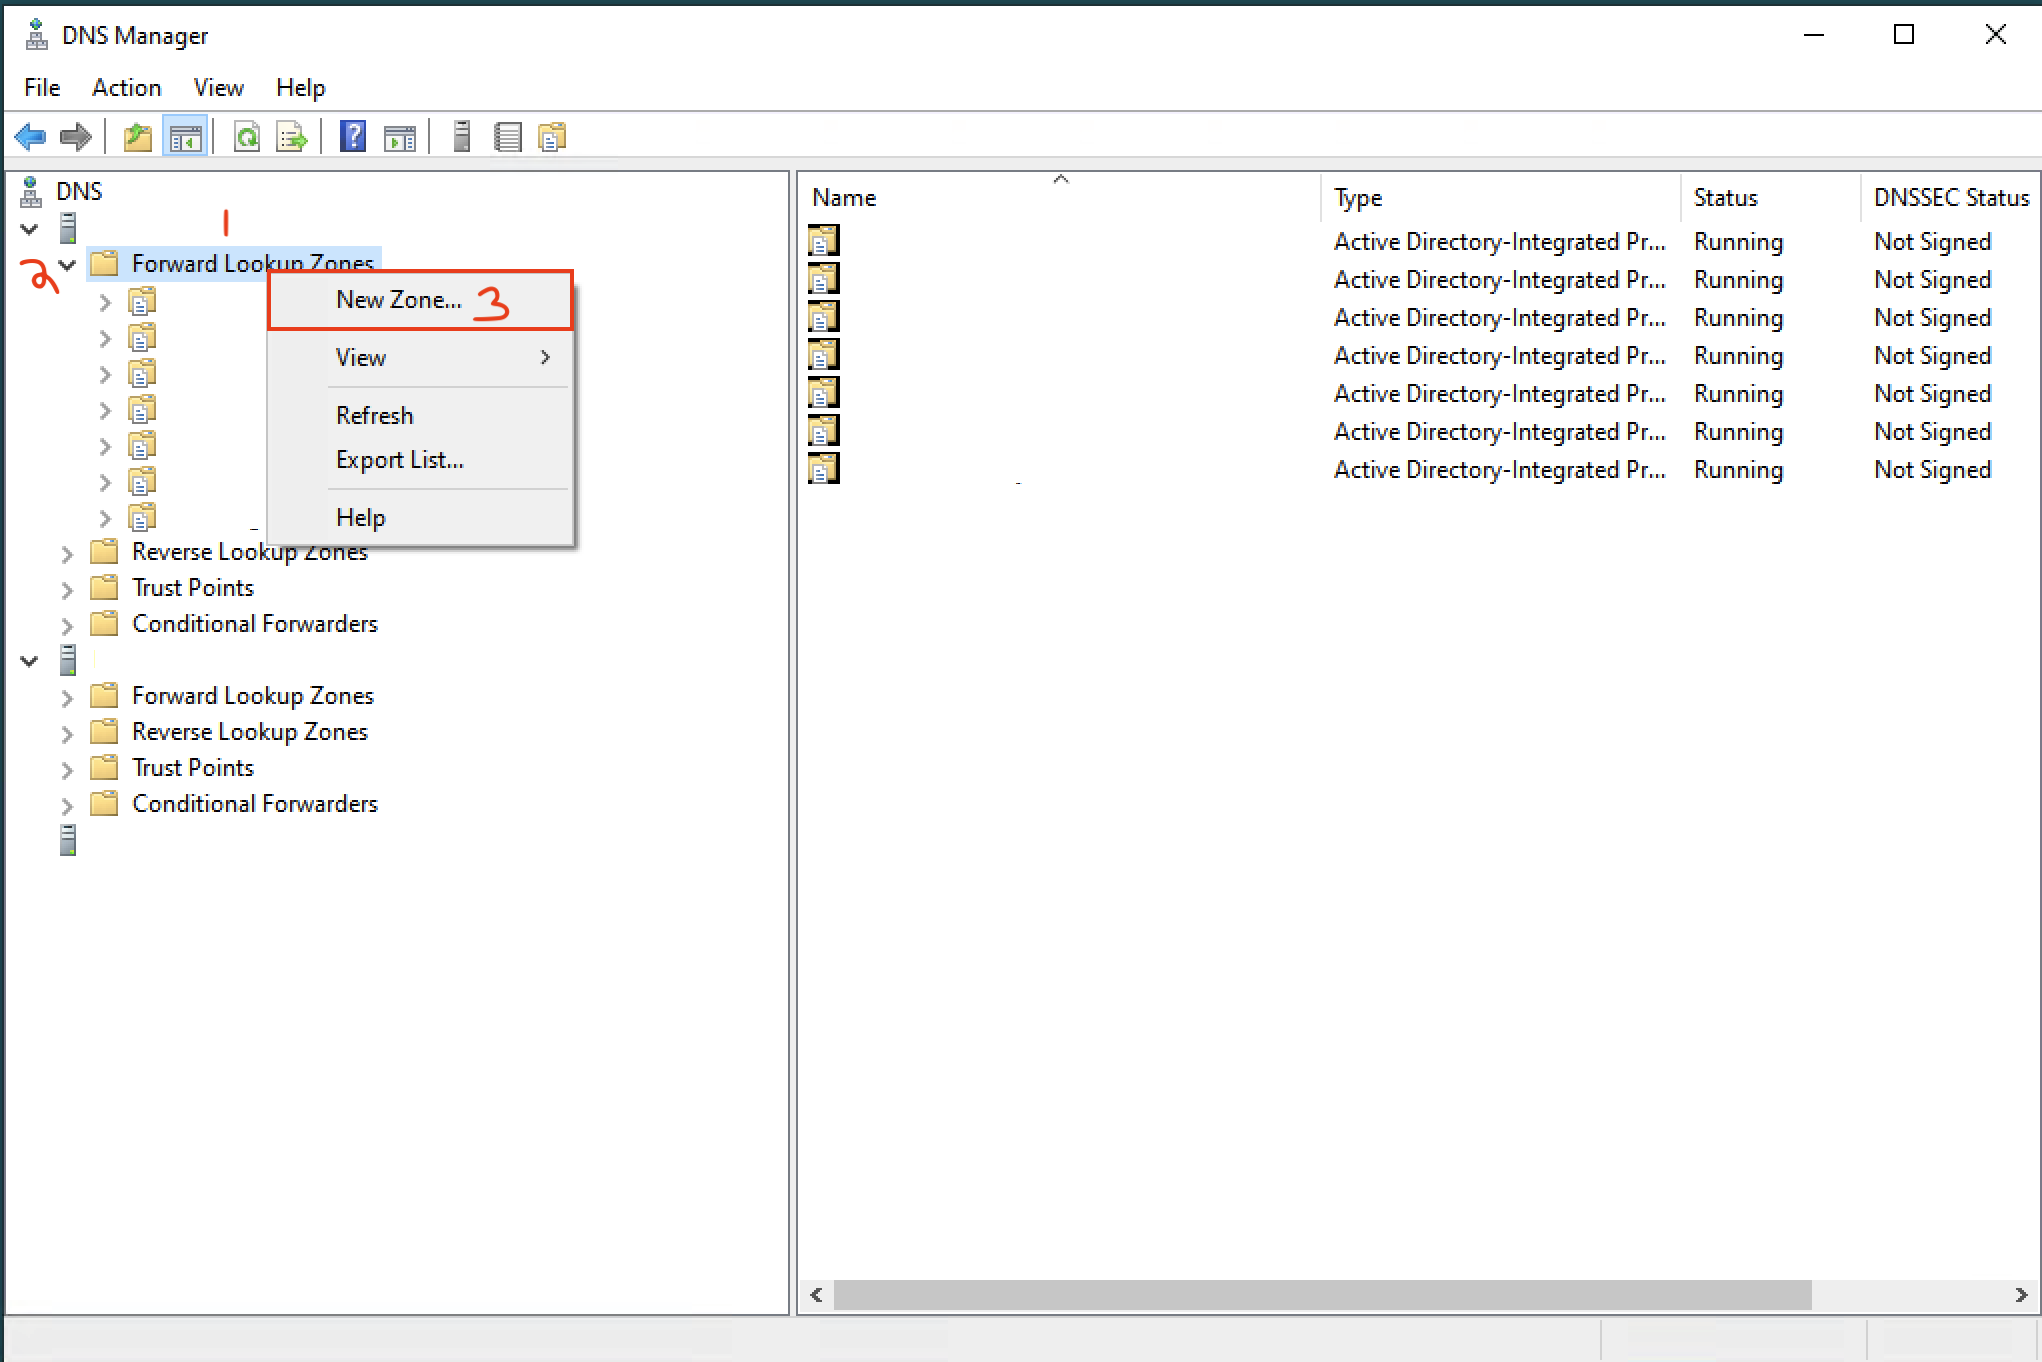
-
Create a new primary zone based off the full DNS name of your Snipe-IT instance utilizing the default settings -> for example
SNIPE-IT.YOURDOMAIN.COM:
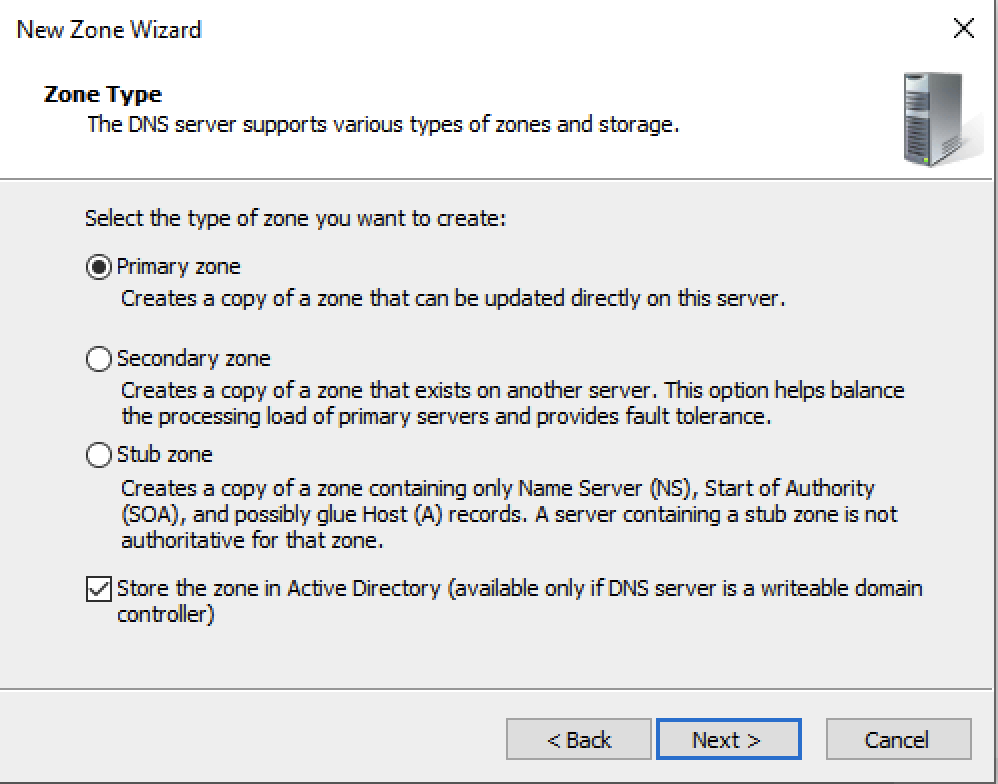
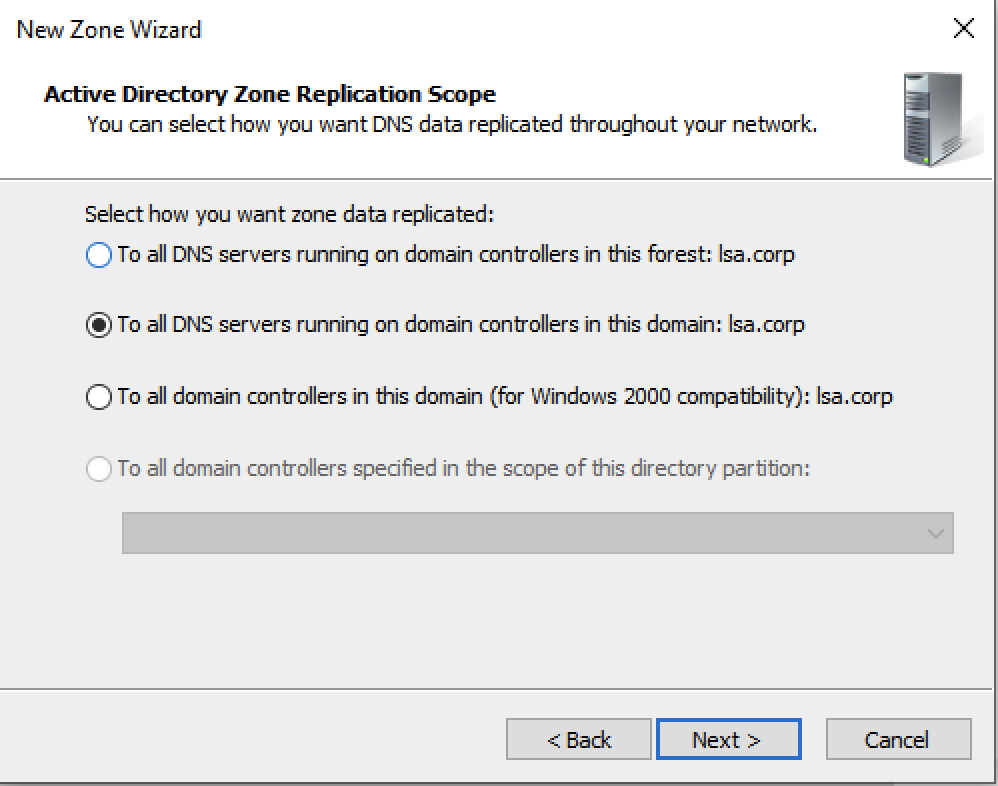
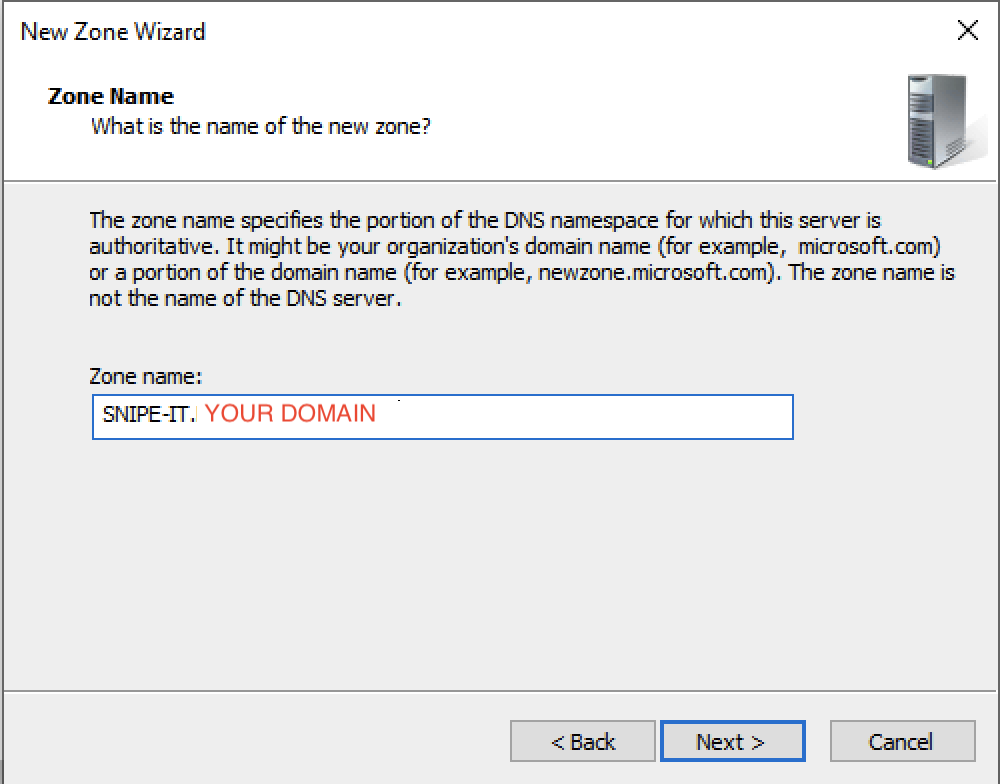
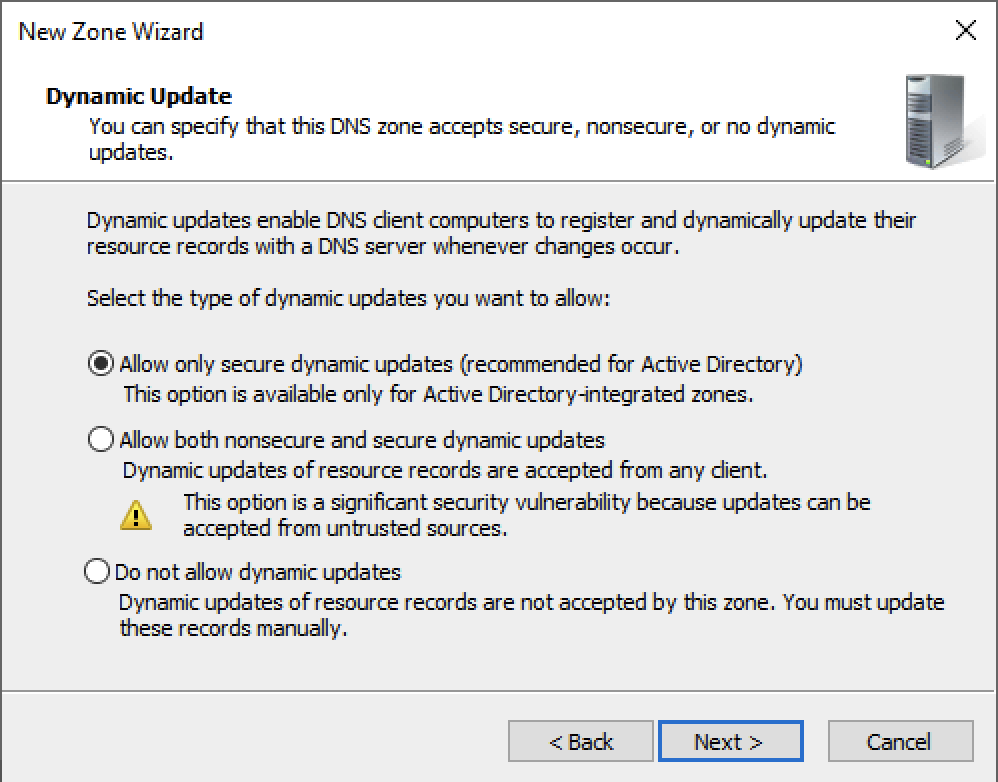
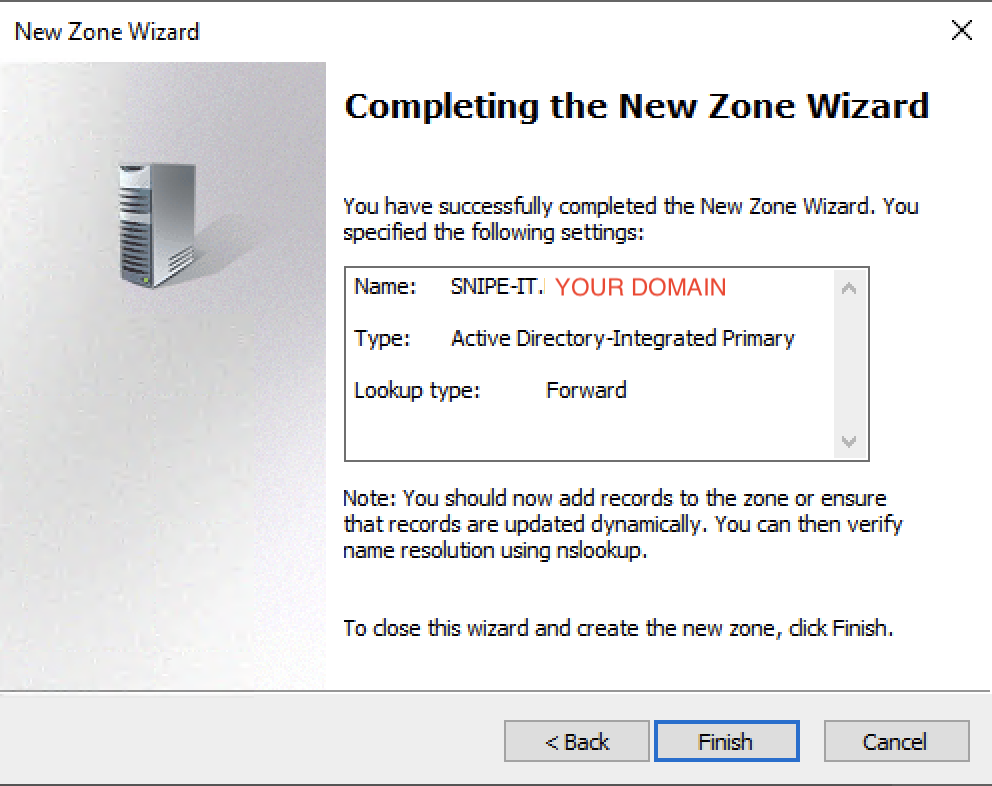
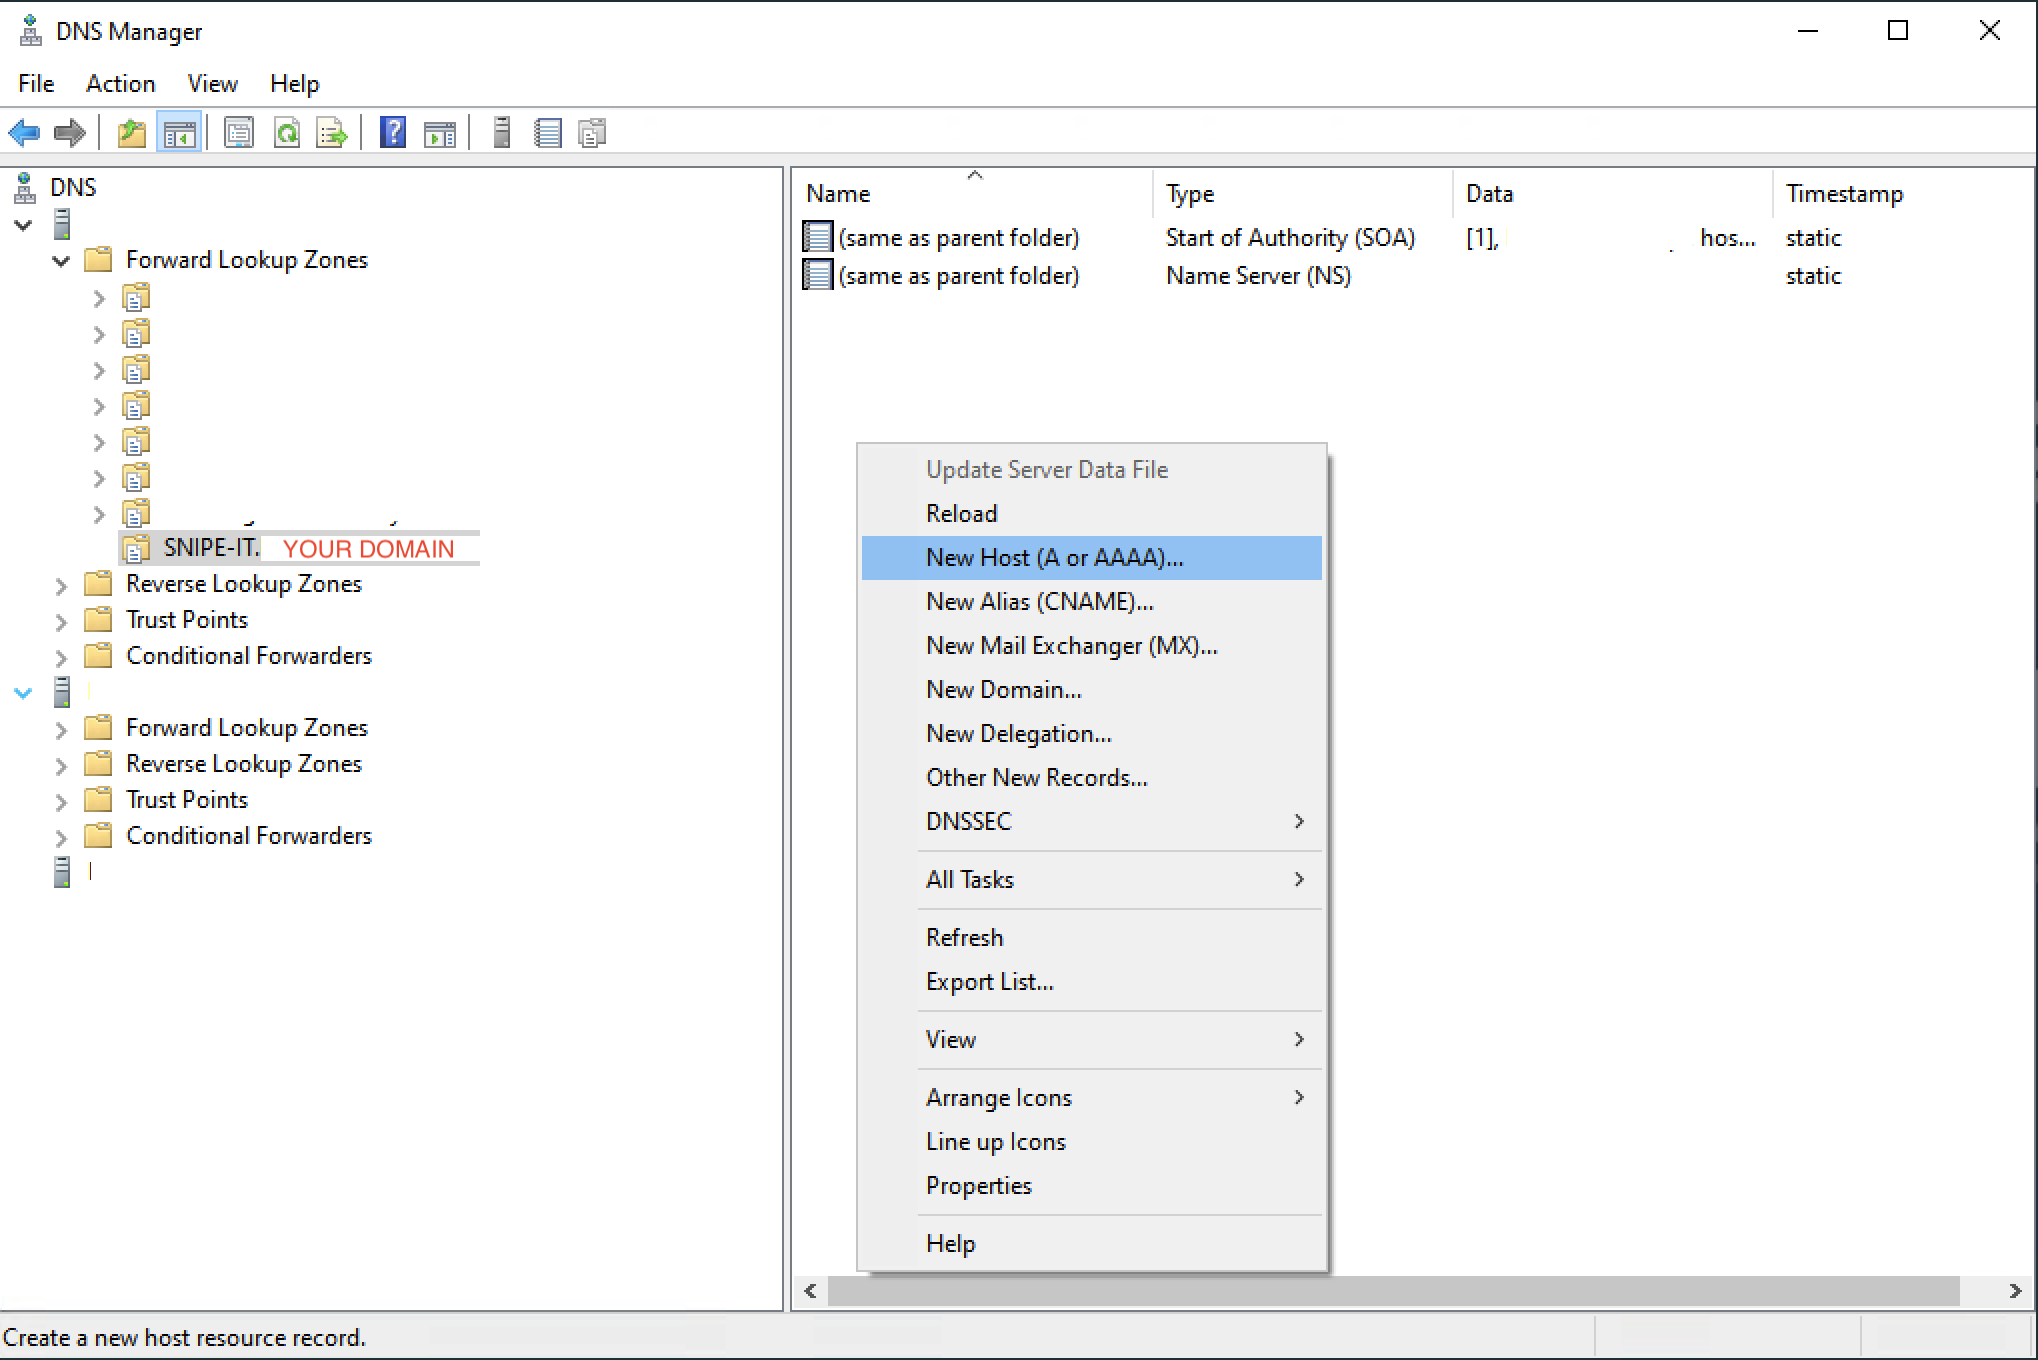
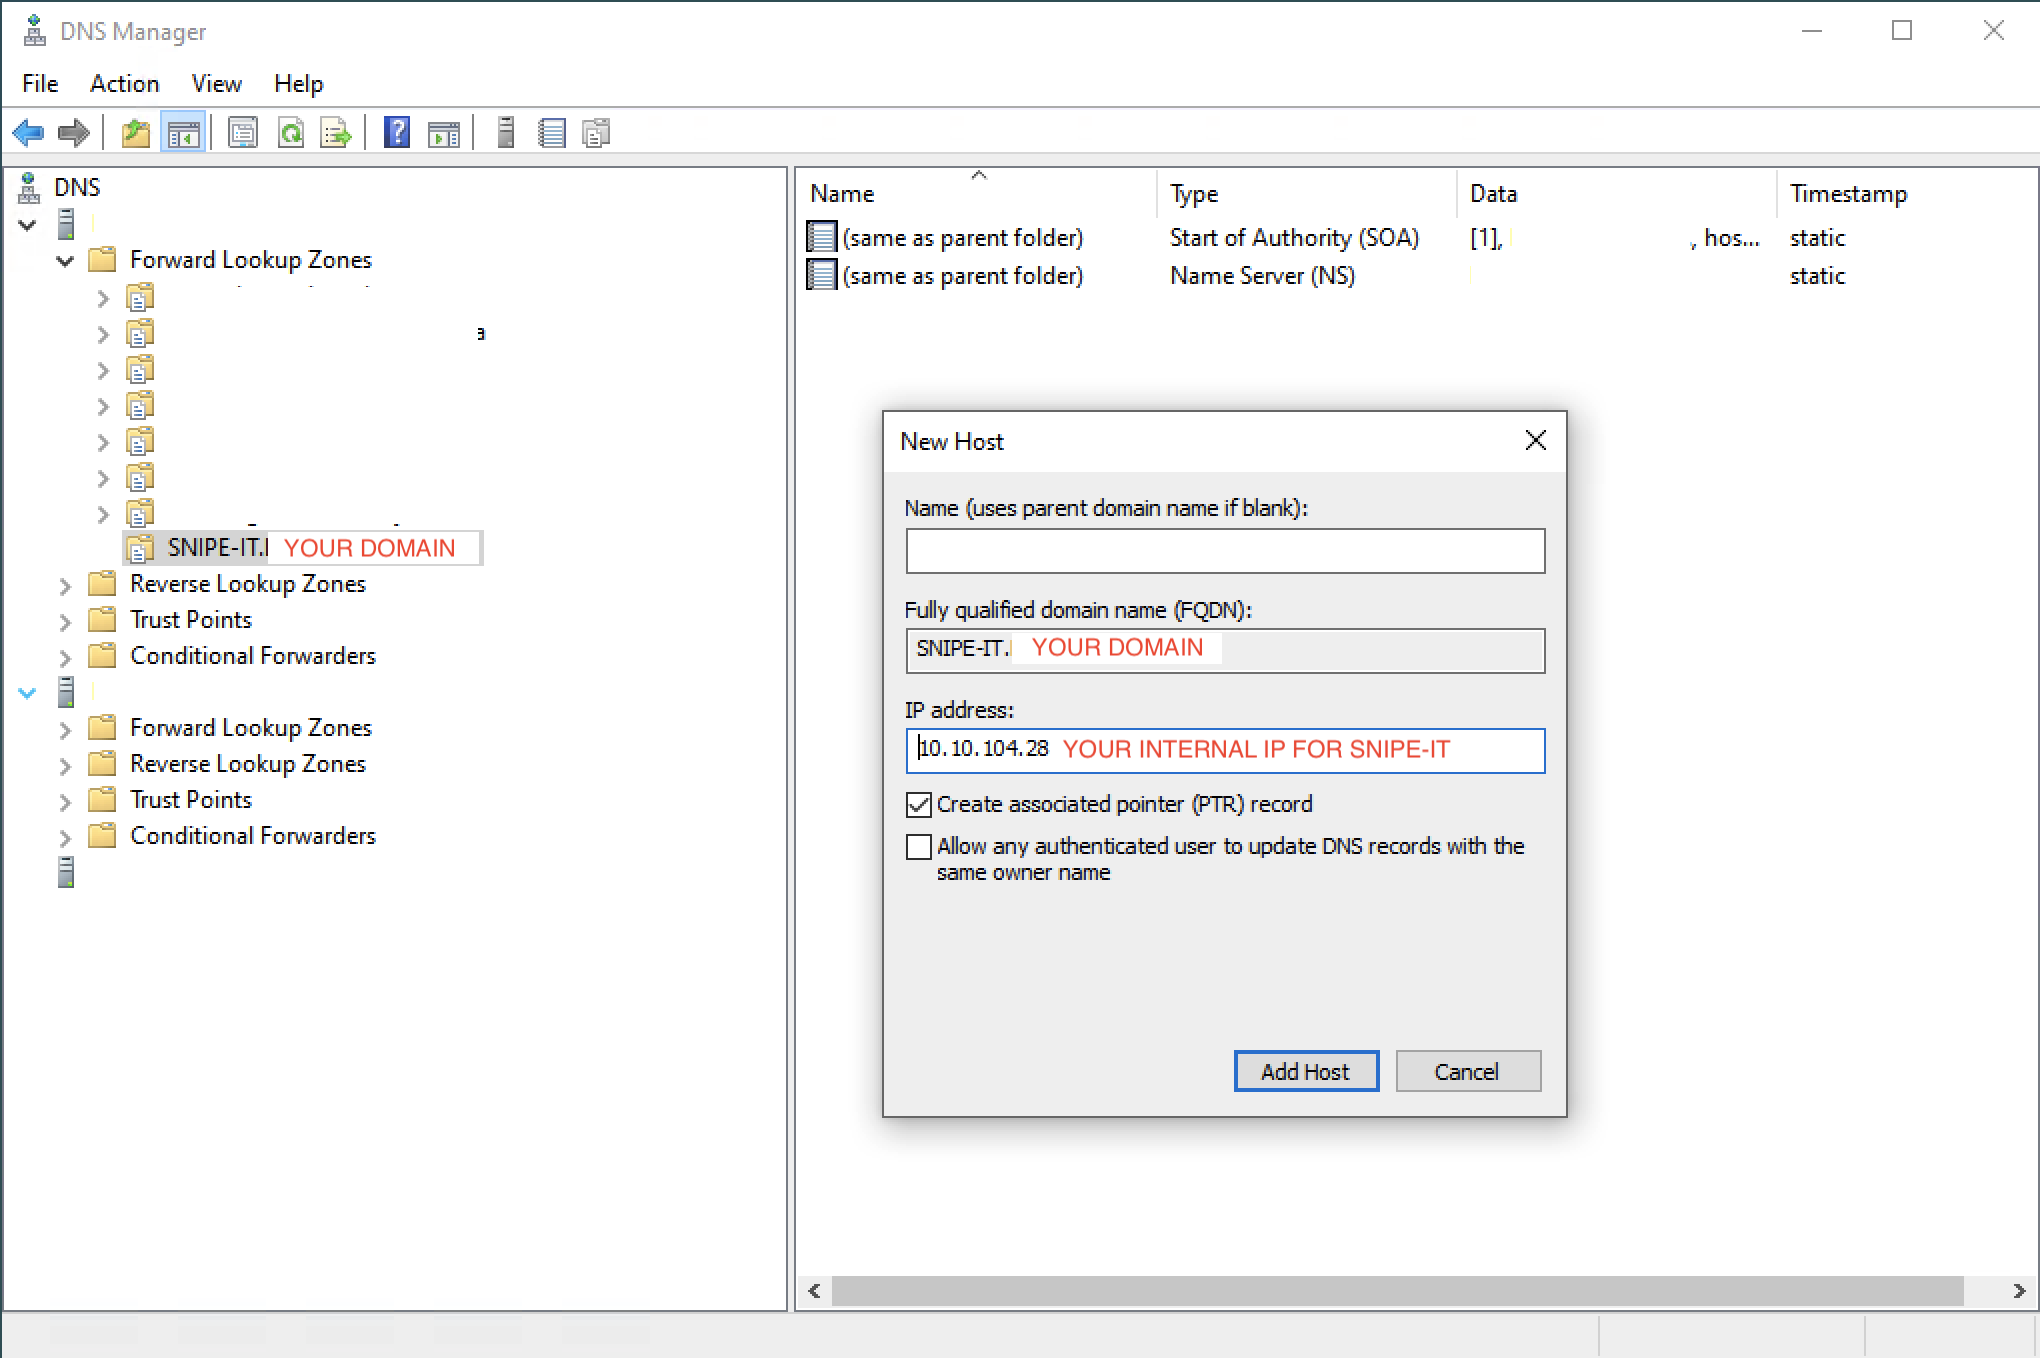
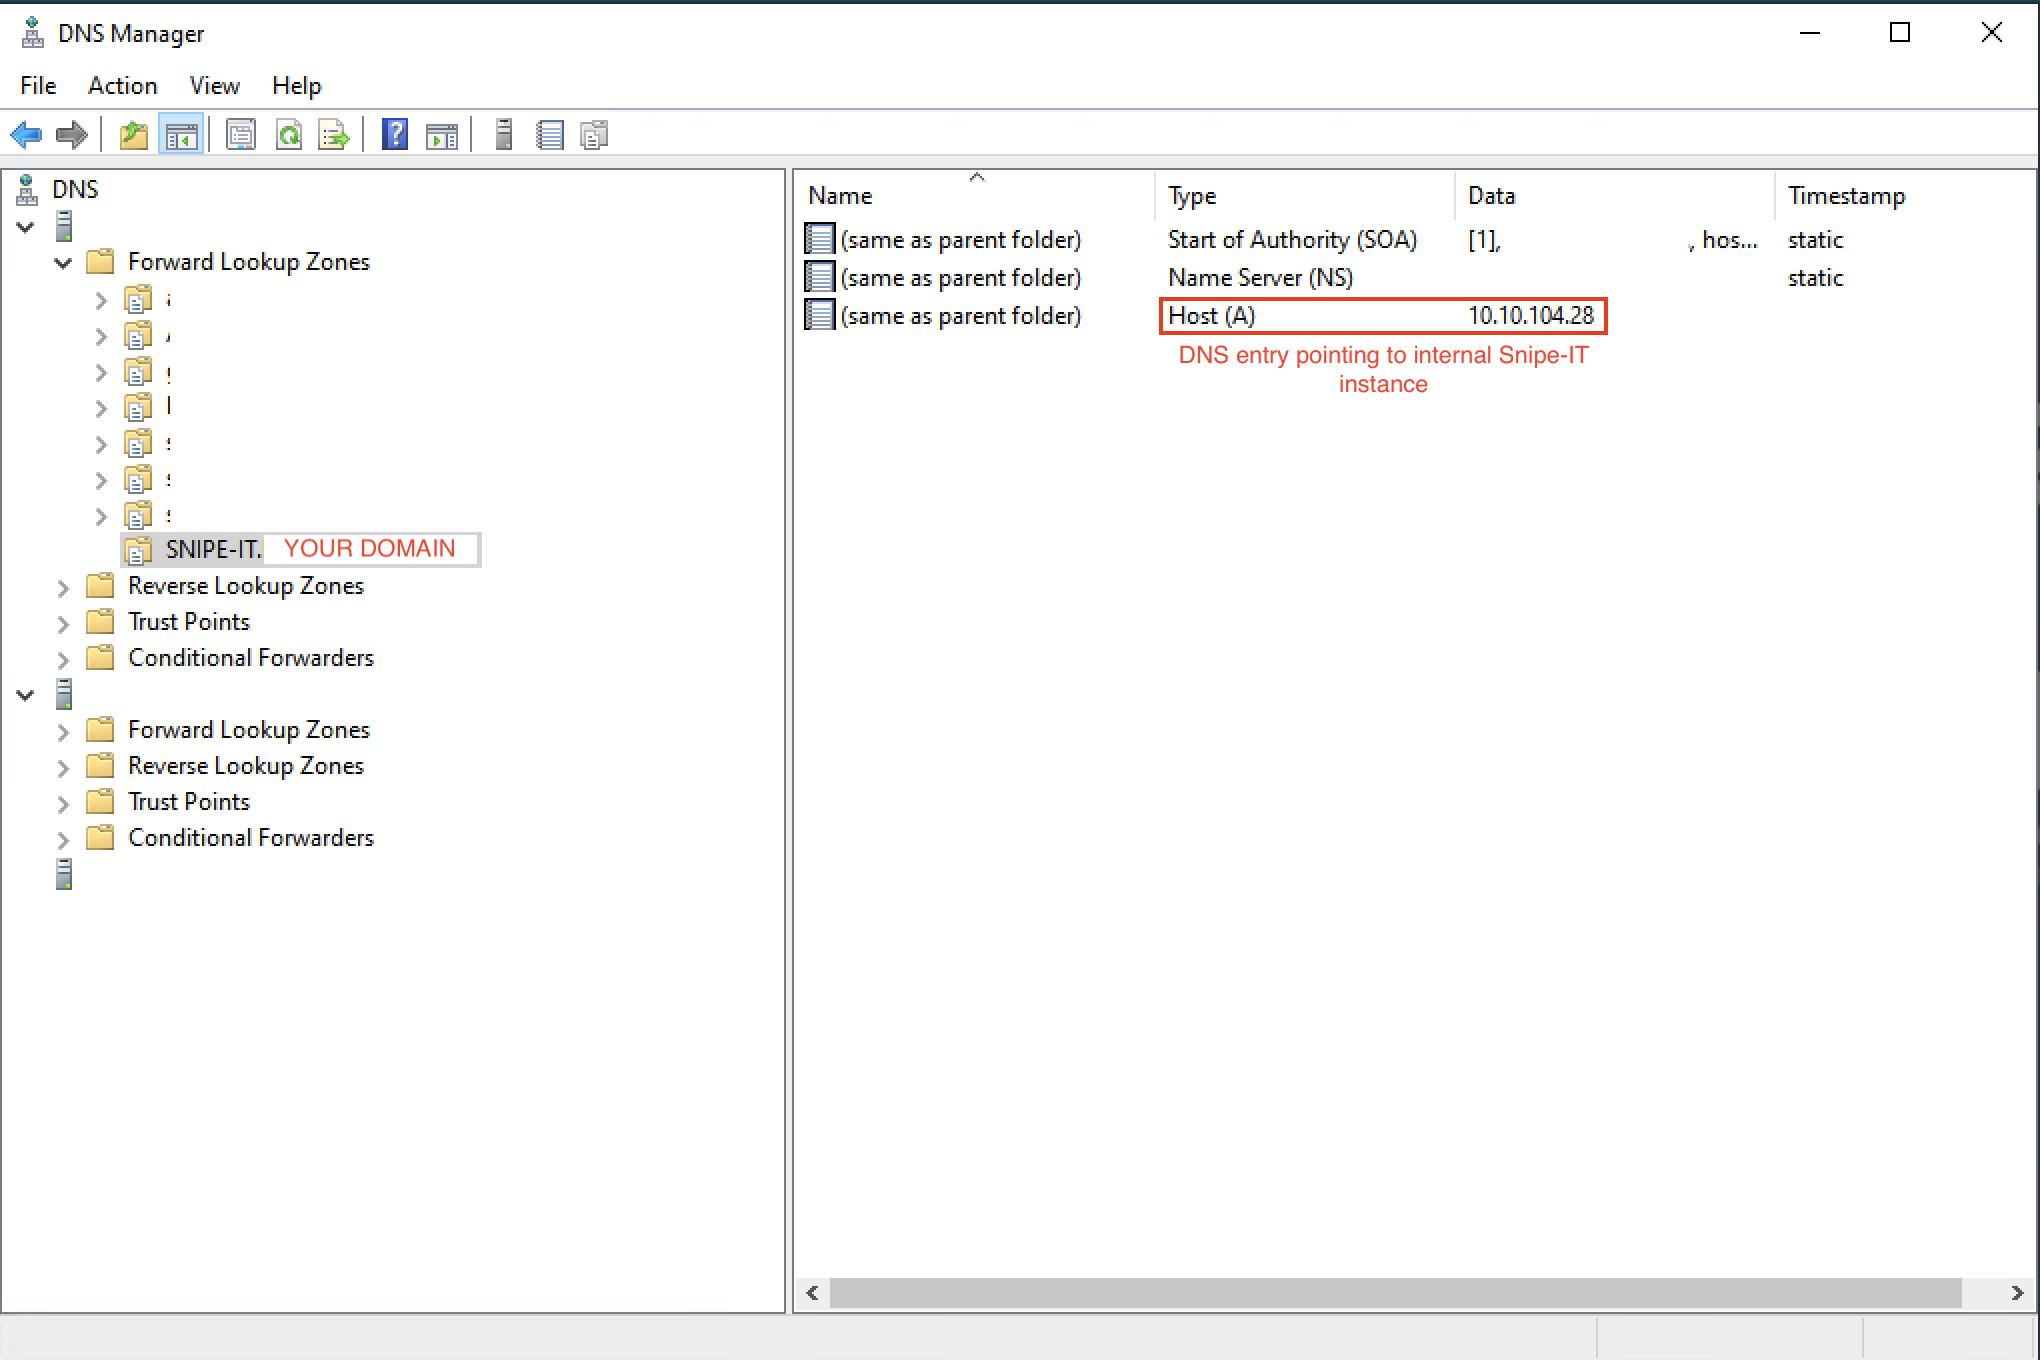
- After the zone has been created, enter into it and create a new A record (blank) that references the IP of the Snipe-IT instance:
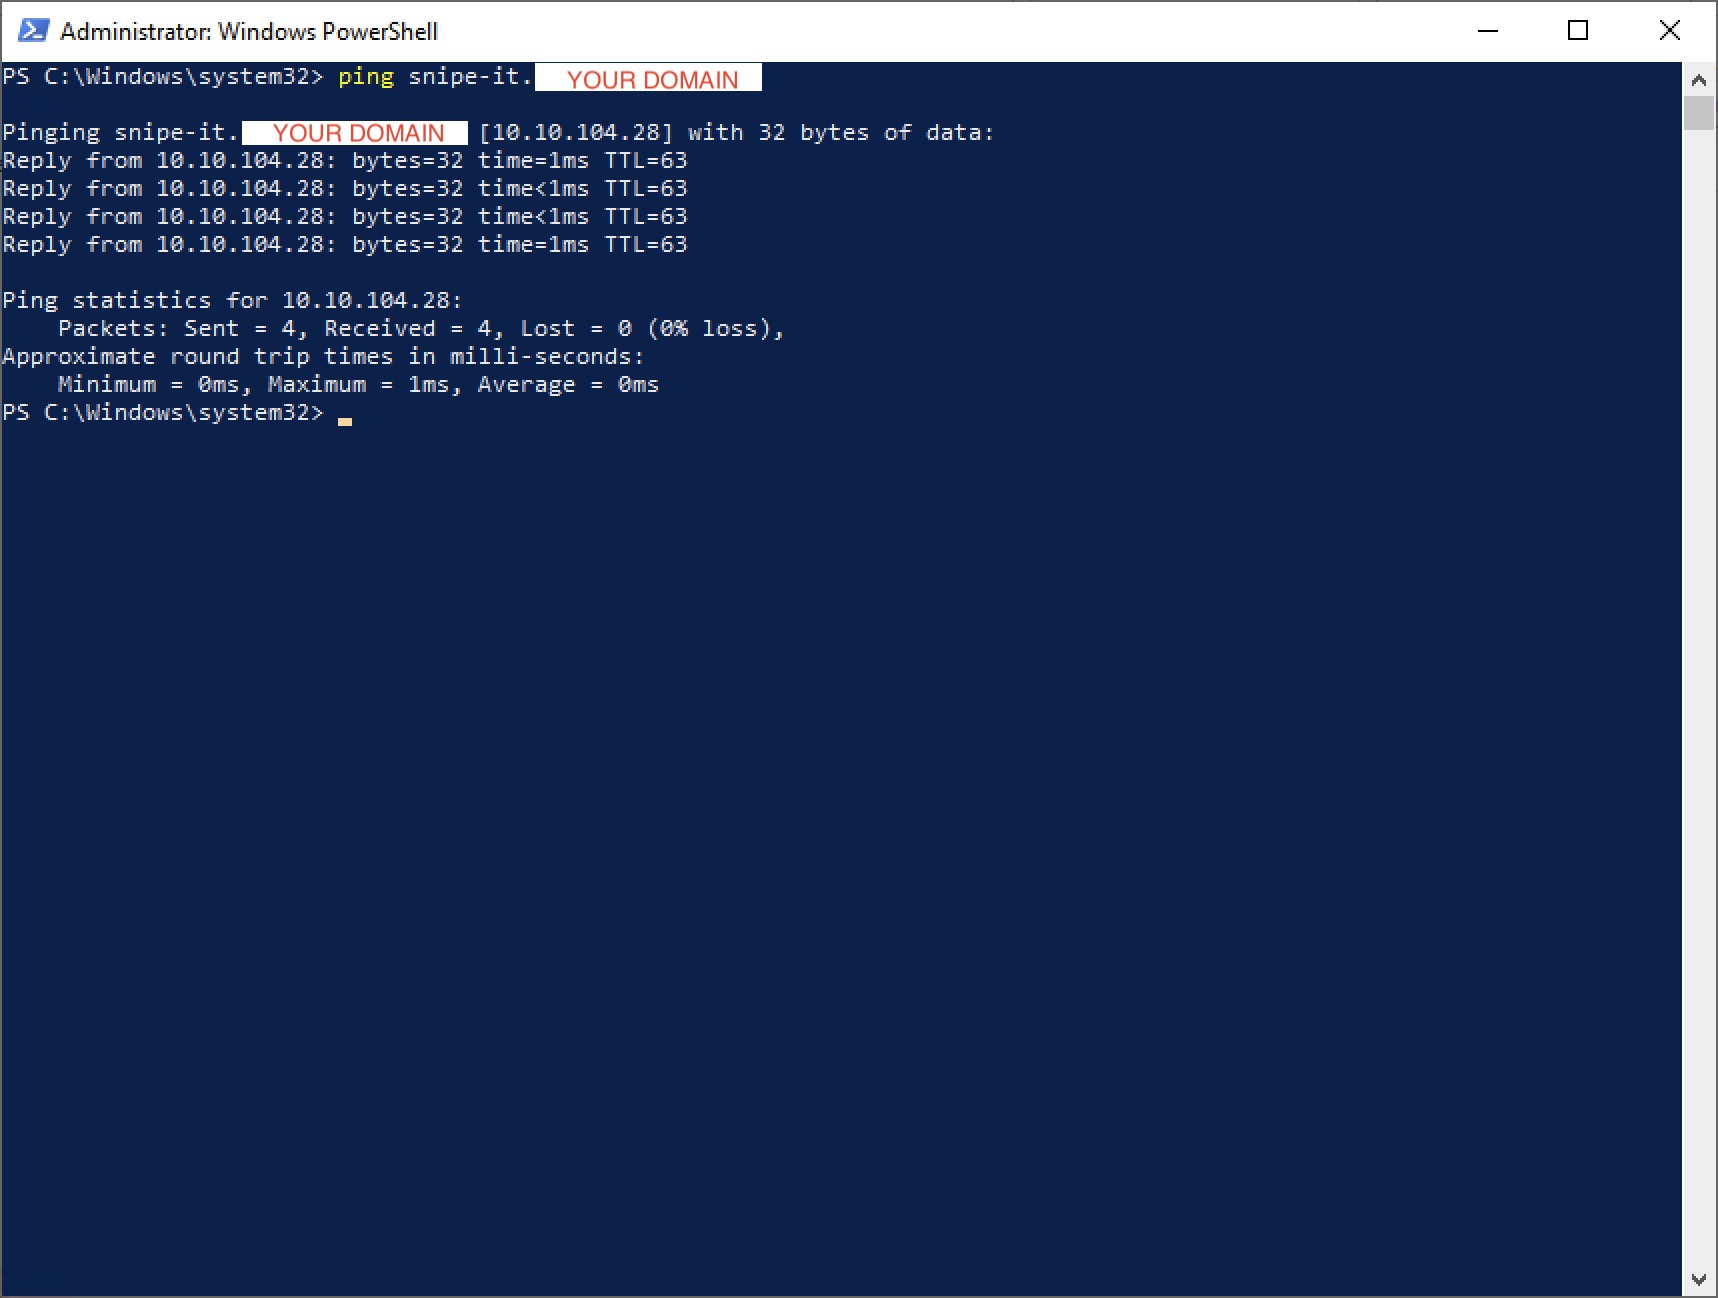
- Finally test to see that the newly created DNS entry properly routes to Snipe-IT's internal IP address:
Creating an Entra ID Application (and configuring the Entra ID App Proxy)
The first step required to connect Entra ID with a local Snipe-IT instance is to create an Entra ID Application (which will be used for all three functionalities used by Snipe-IT which includes SCIM, SAML, and external access).
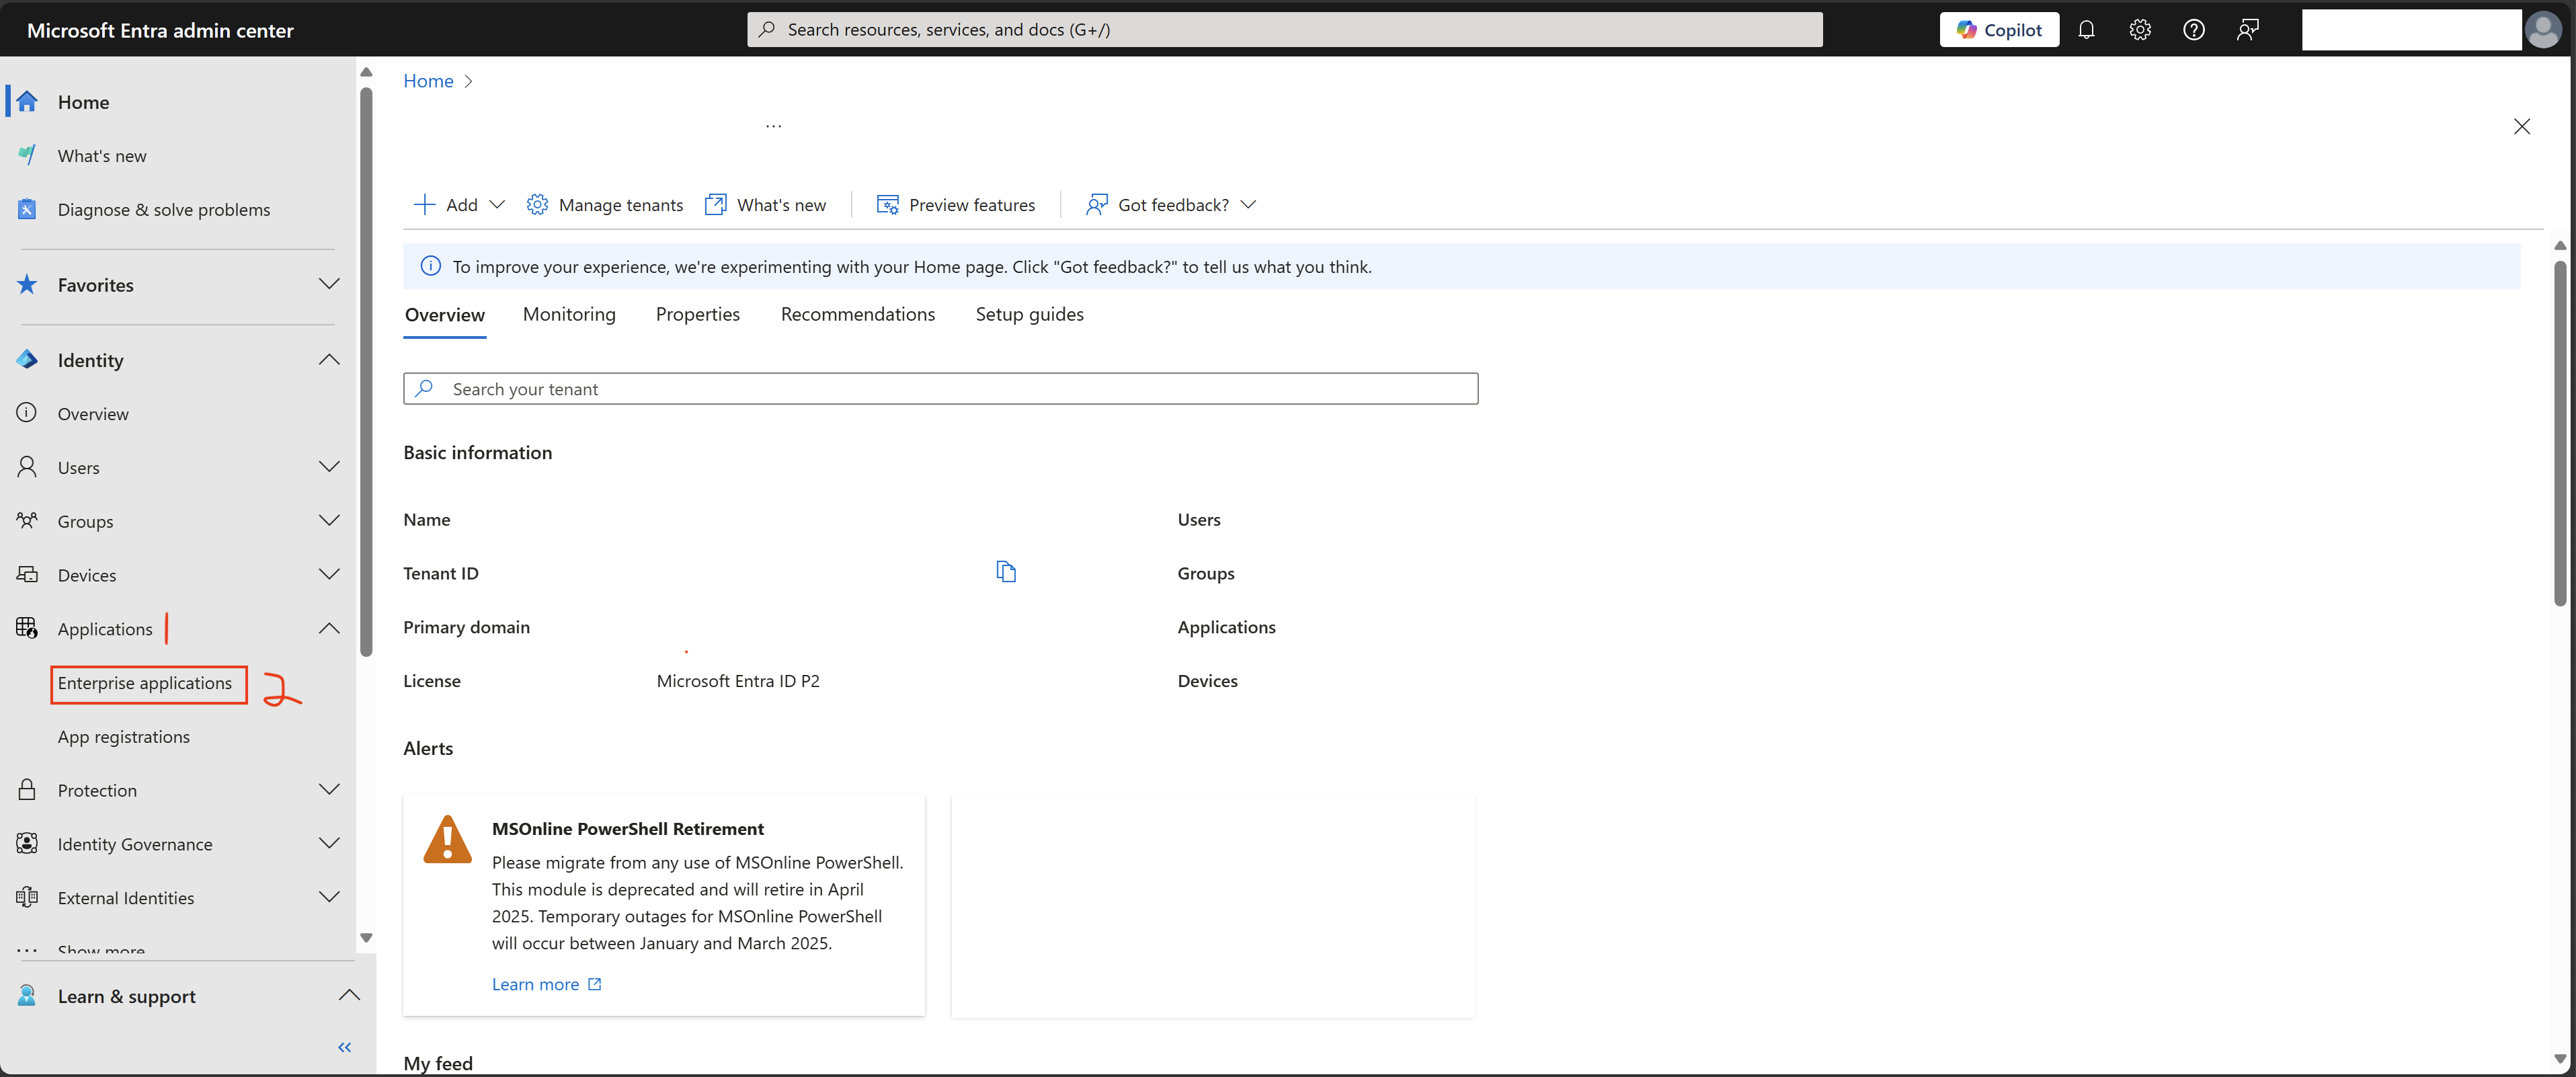
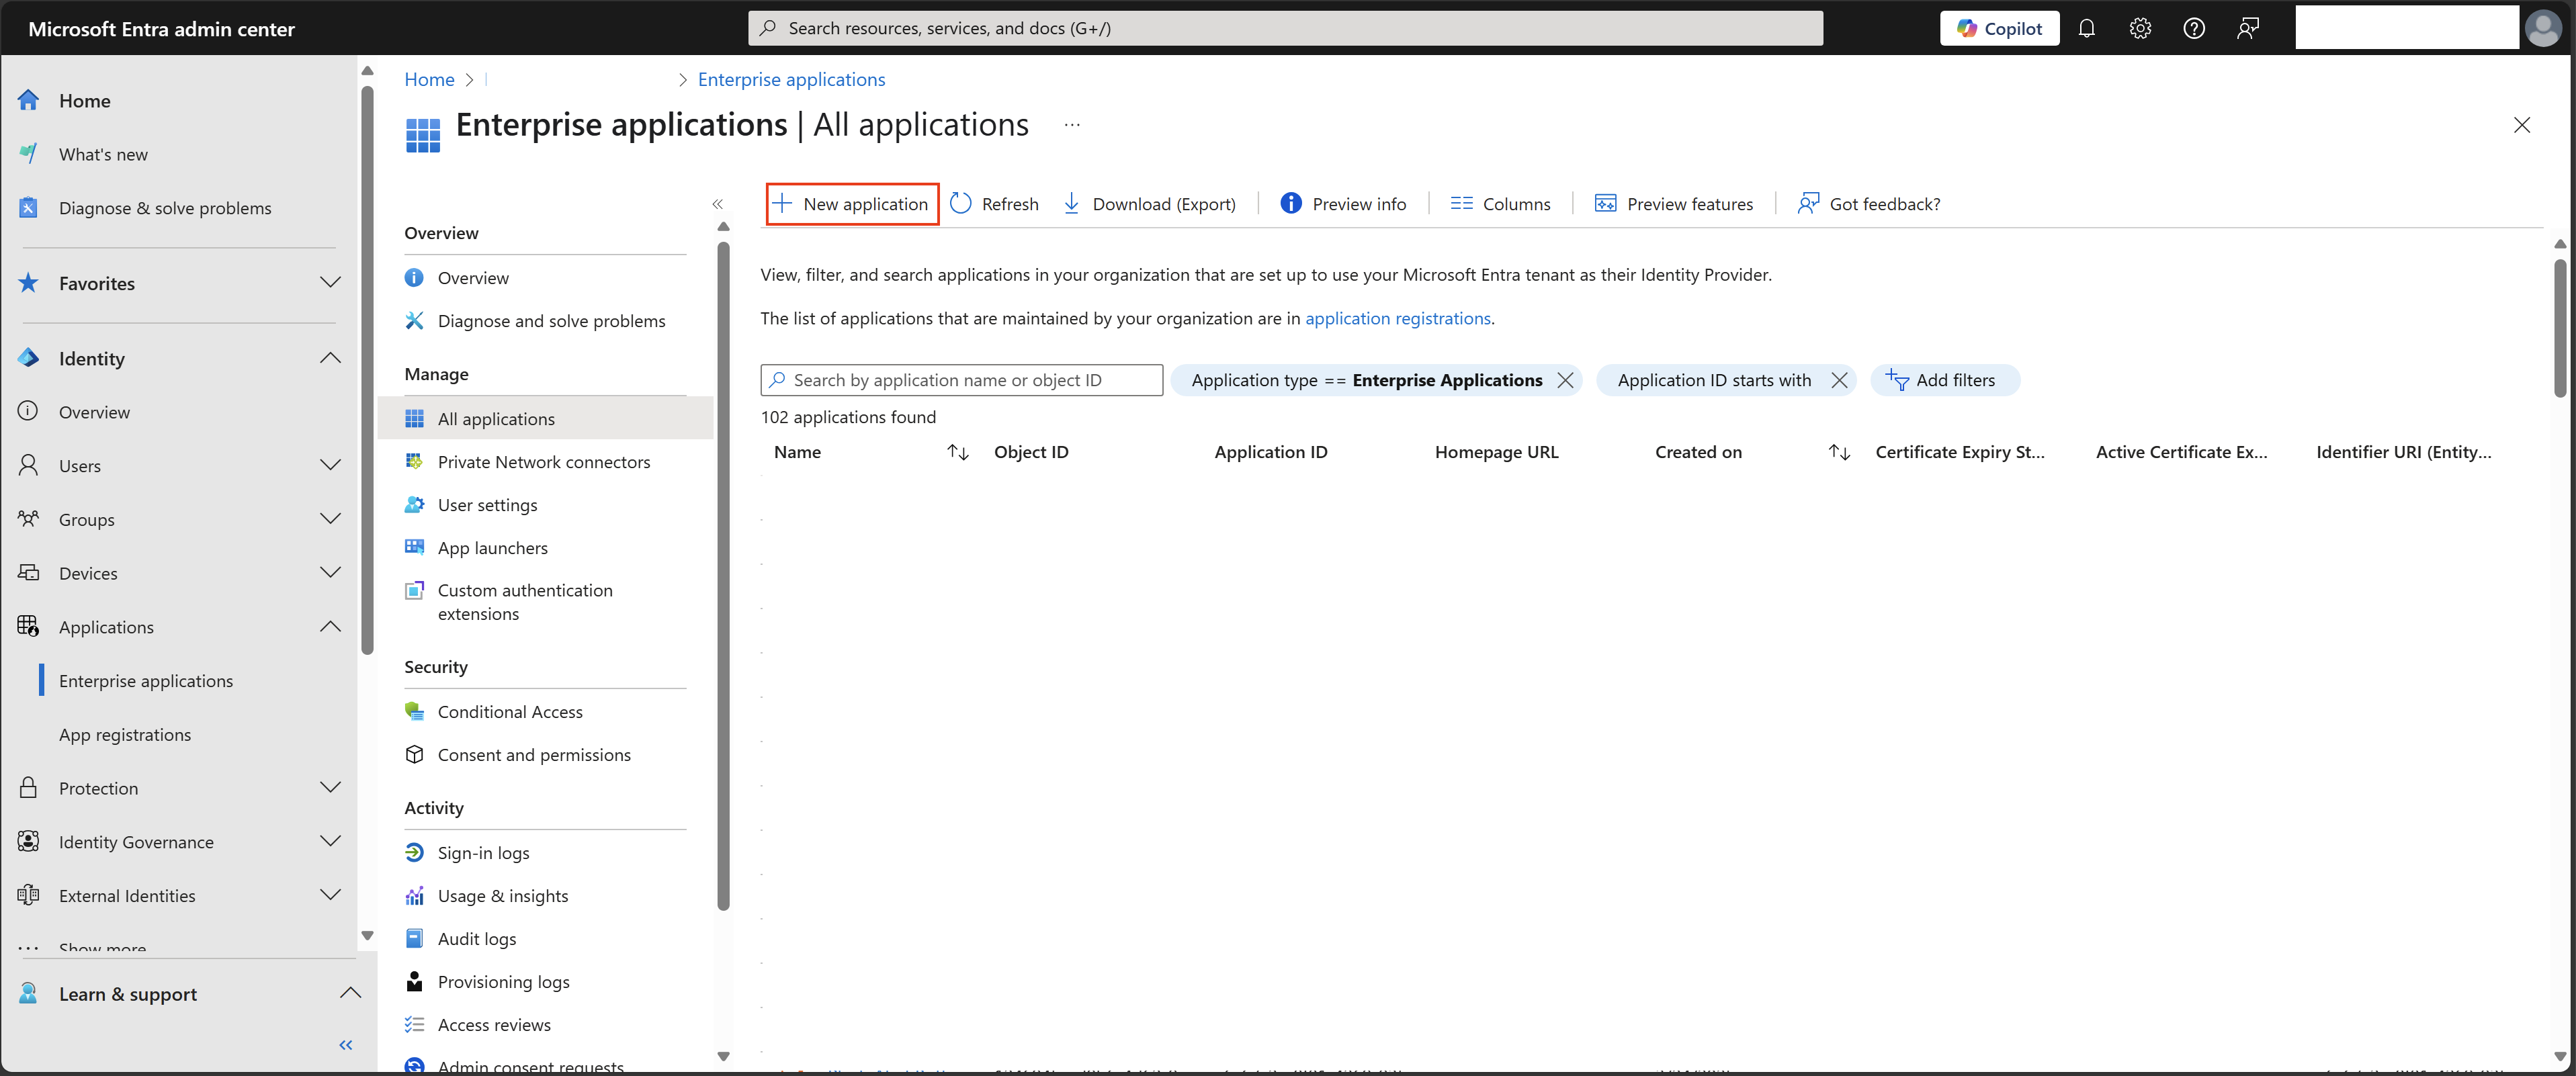
- From the Entra ID admin center, navigate to
Enterprise ApplicationsunderApplicationslocated underIdentity, and then selectNew application:
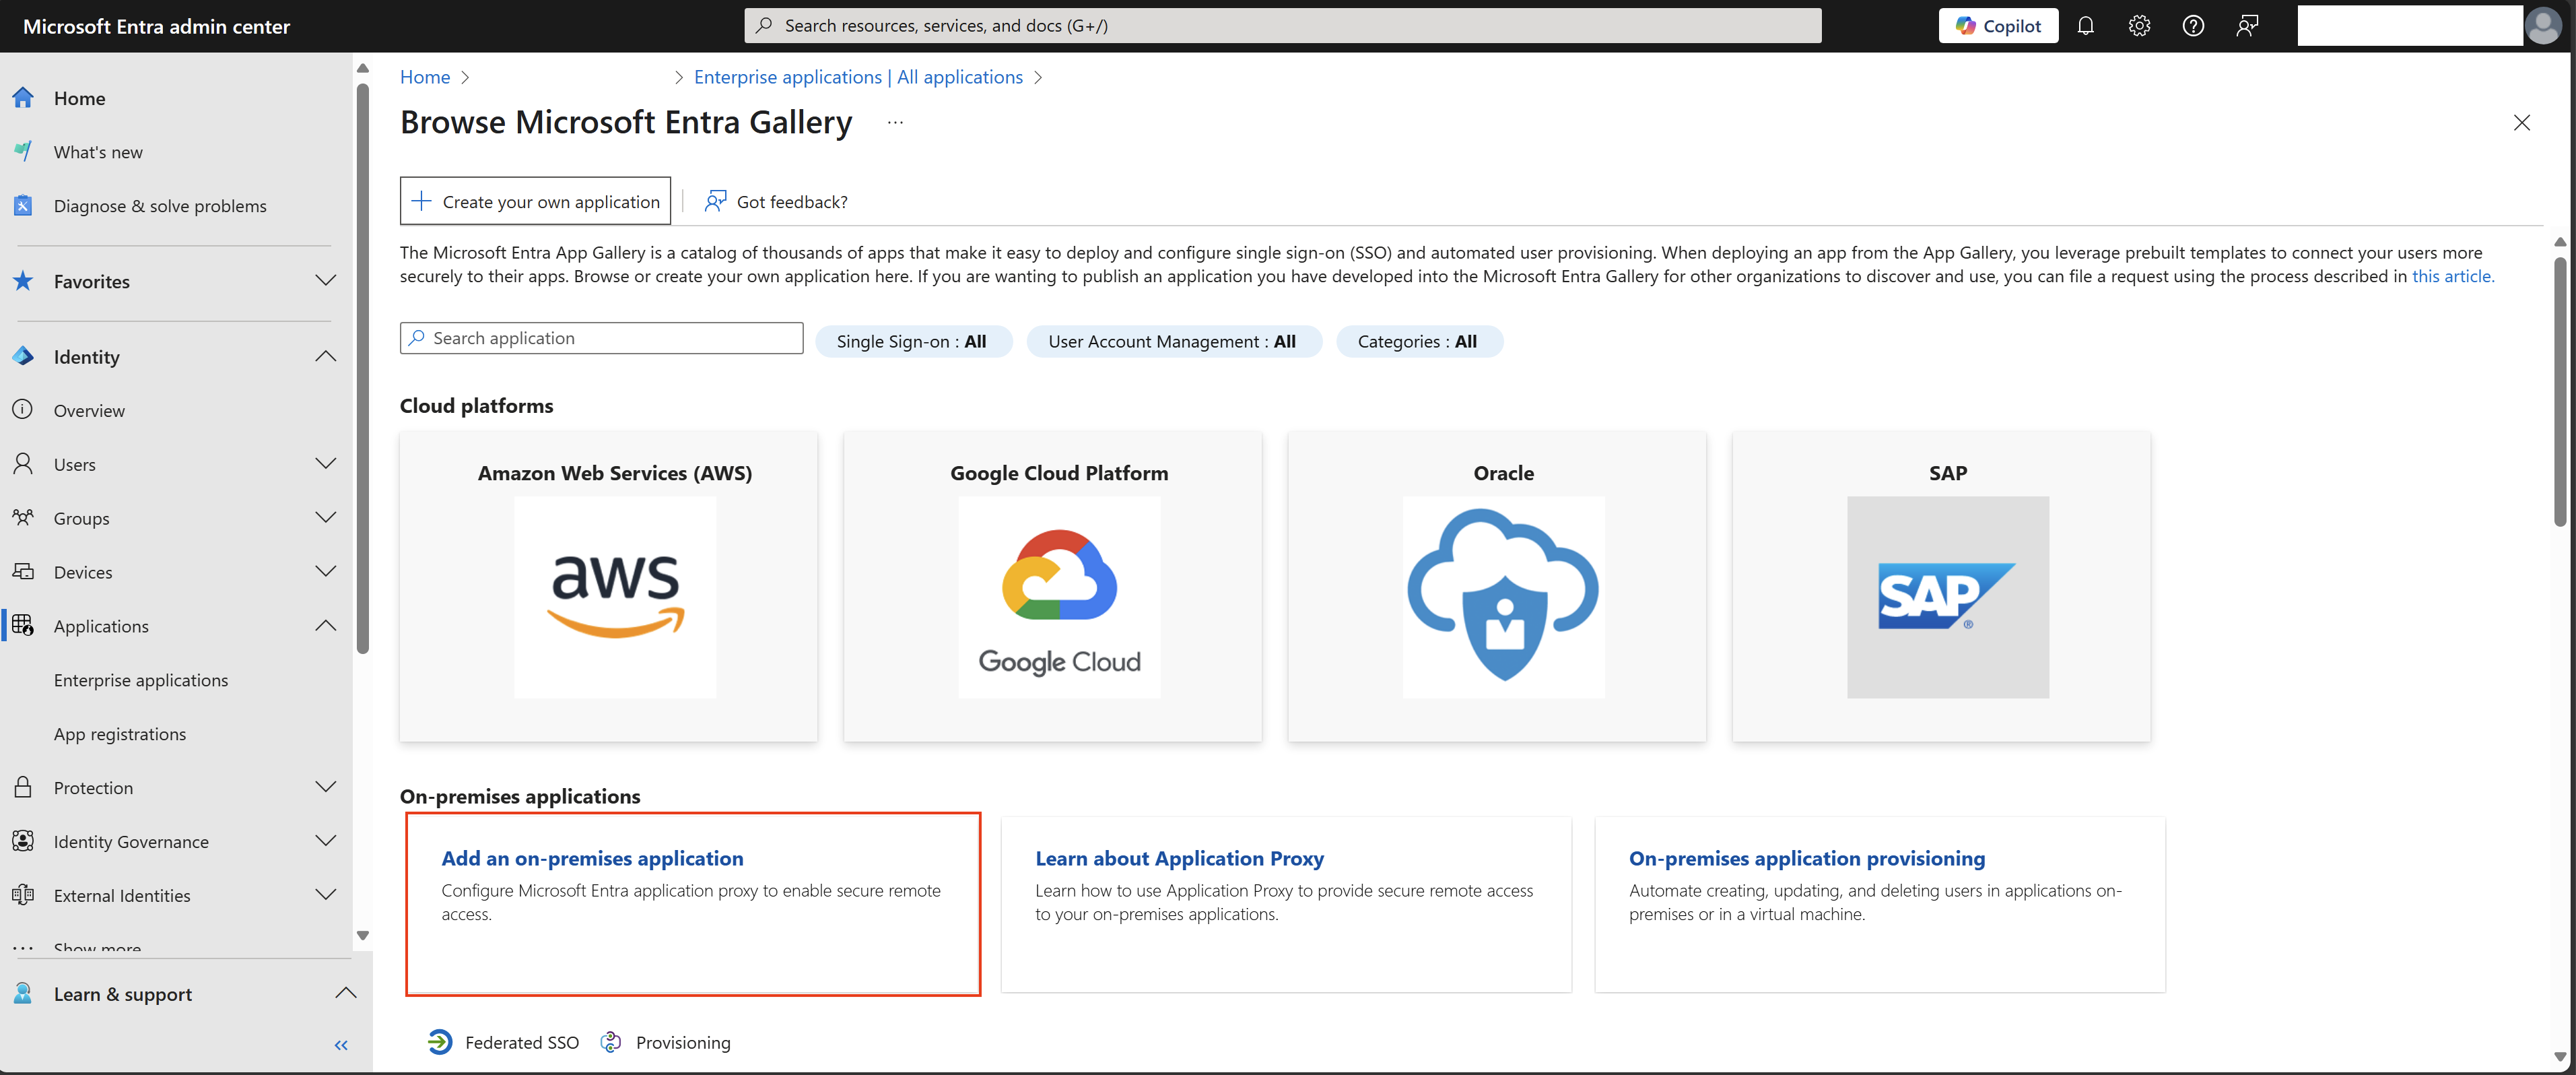
- Next we will select
Add an on-premises applicationand from the next page we will configure the Entra ID App Proxy settings for your Snipe-IT instance:
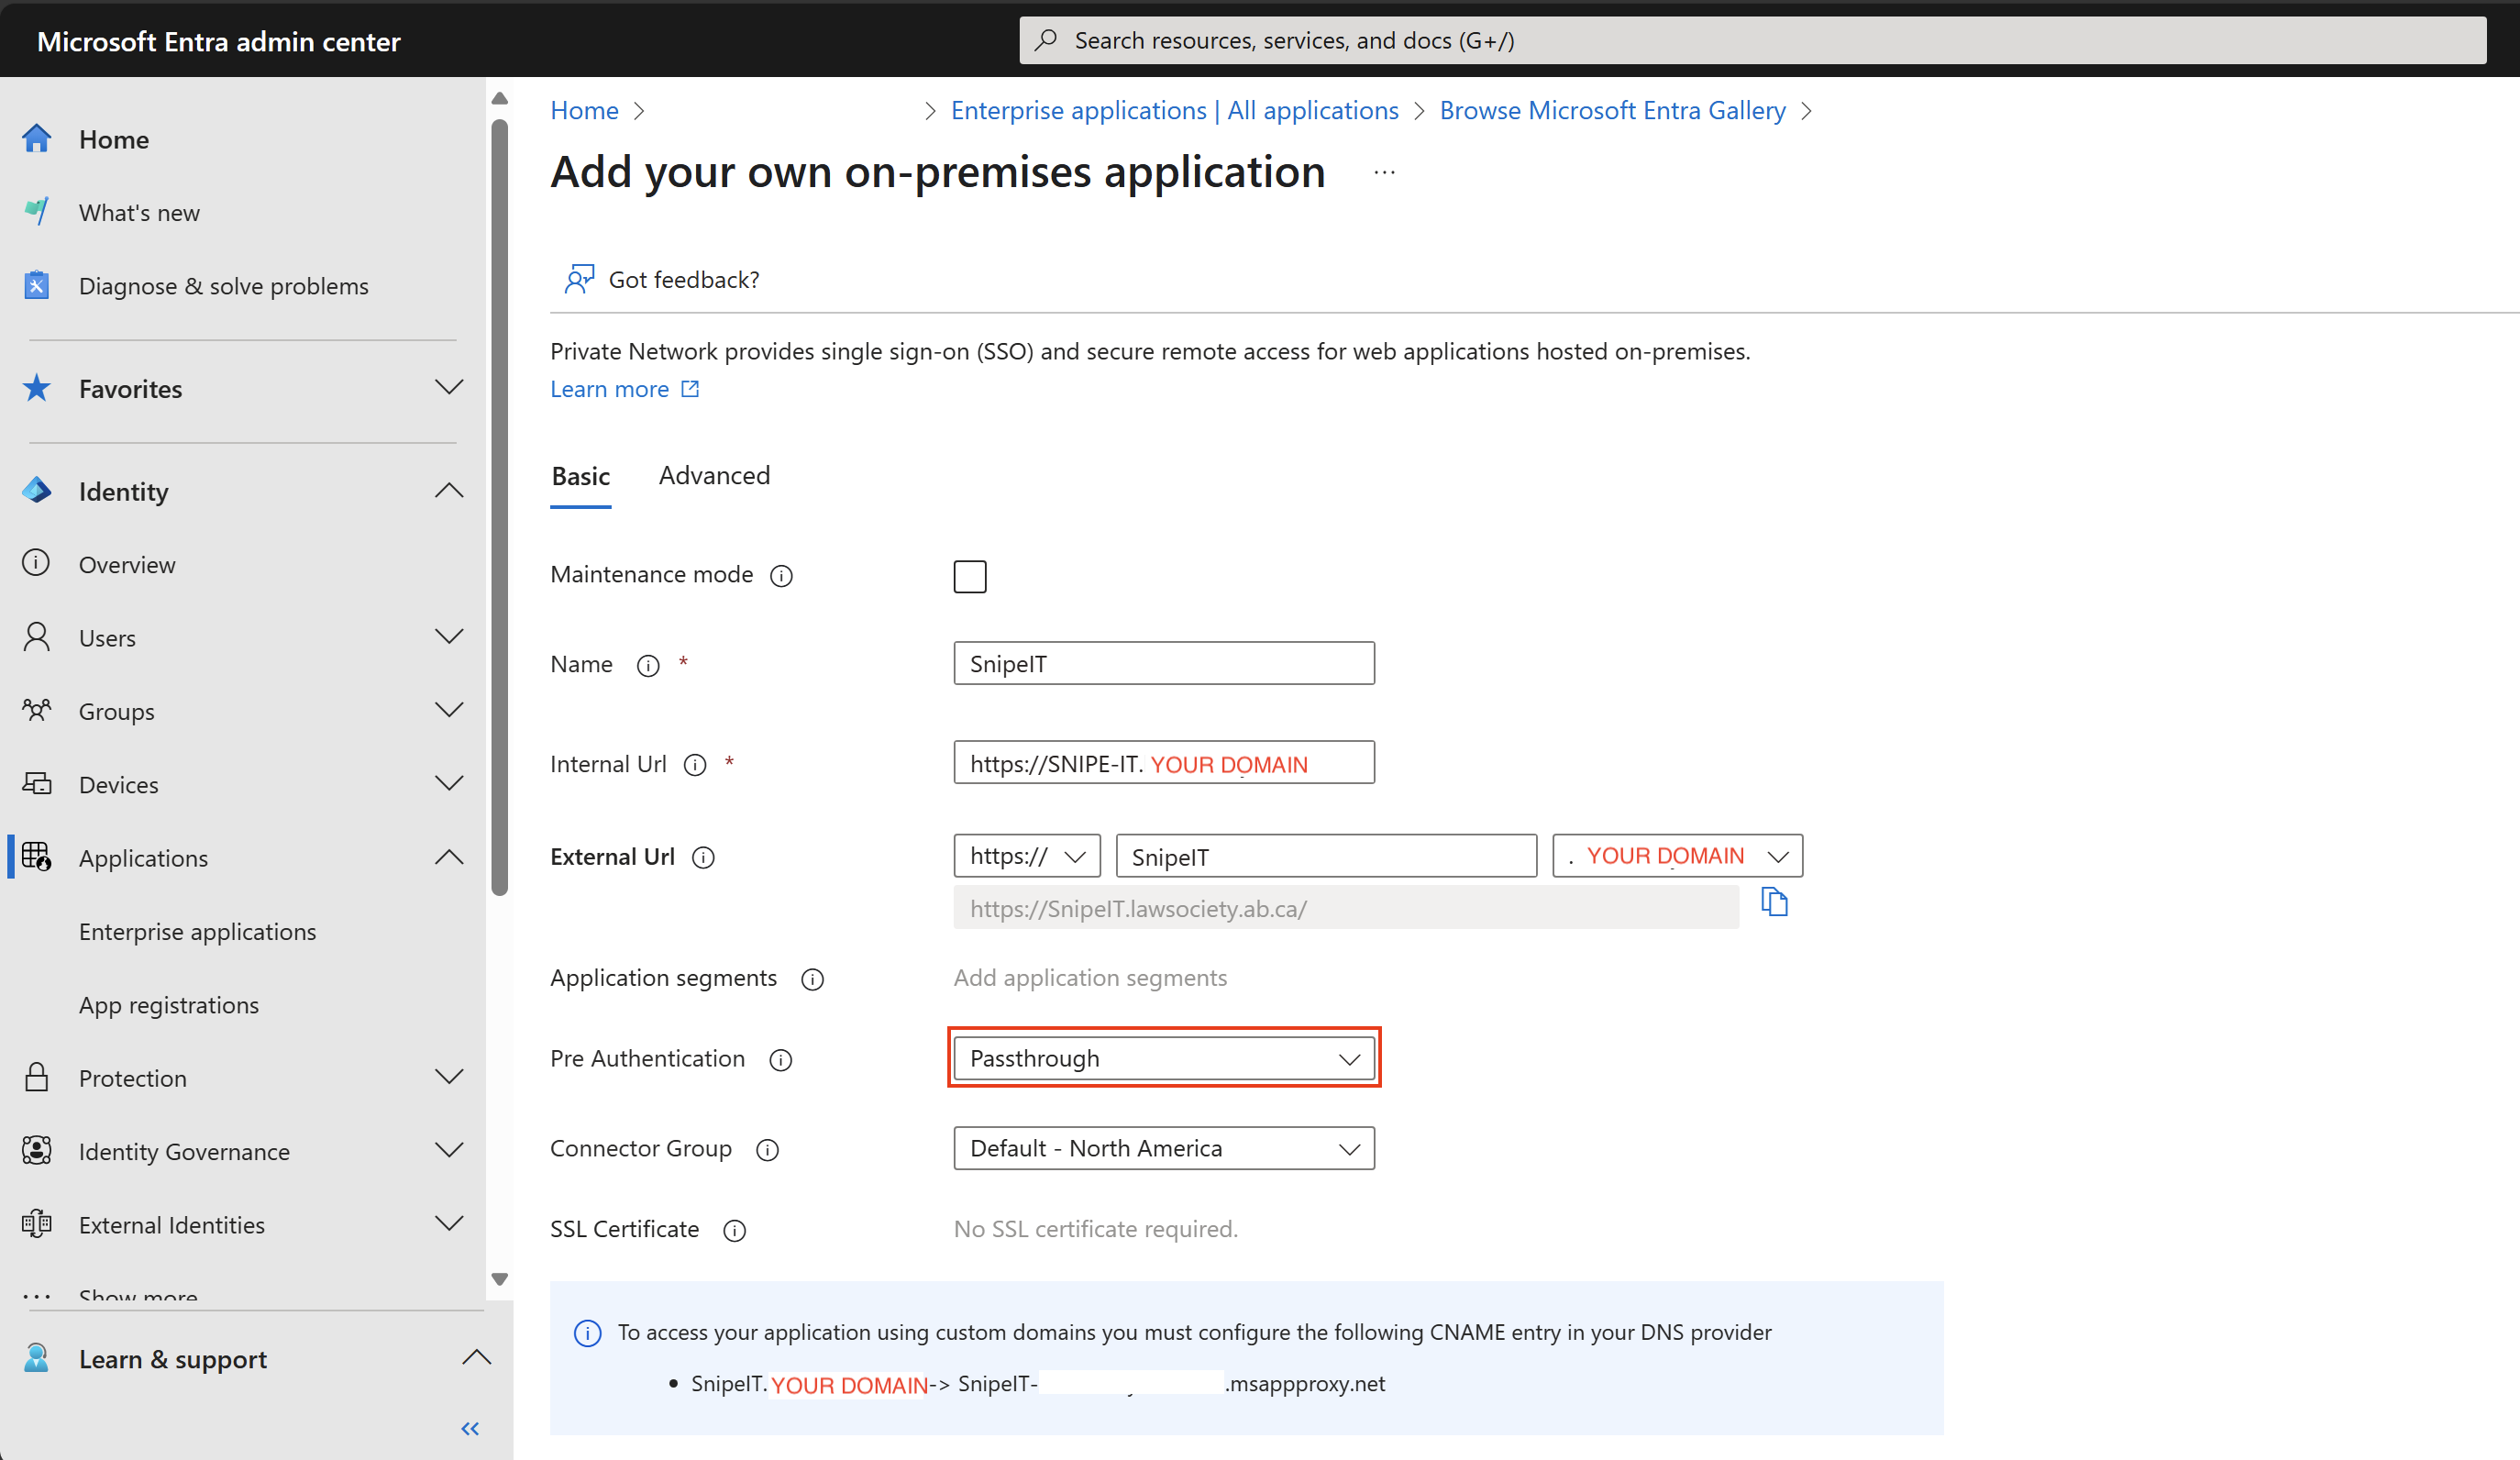
- On the next page, fill out the following details:
Name-> name of the Entra ID Application (can be anything)Internal Url-> the internal URL of your Snipe-IT hostExternal Url-> the external URL of your Snipe-IT host (which should match theInternal Url) and if you have added your external domain to M365, then it will appear here as an optionPre Authentication-> selectpass through- Everything else leave default (including the advanced options)
- Make note of the
CNAMEDNS entry and add theCNAMEentry to your domain registrar
- Once completed, select
createand from here, make sure to assign some test users to the newly created application underUsers and groups:
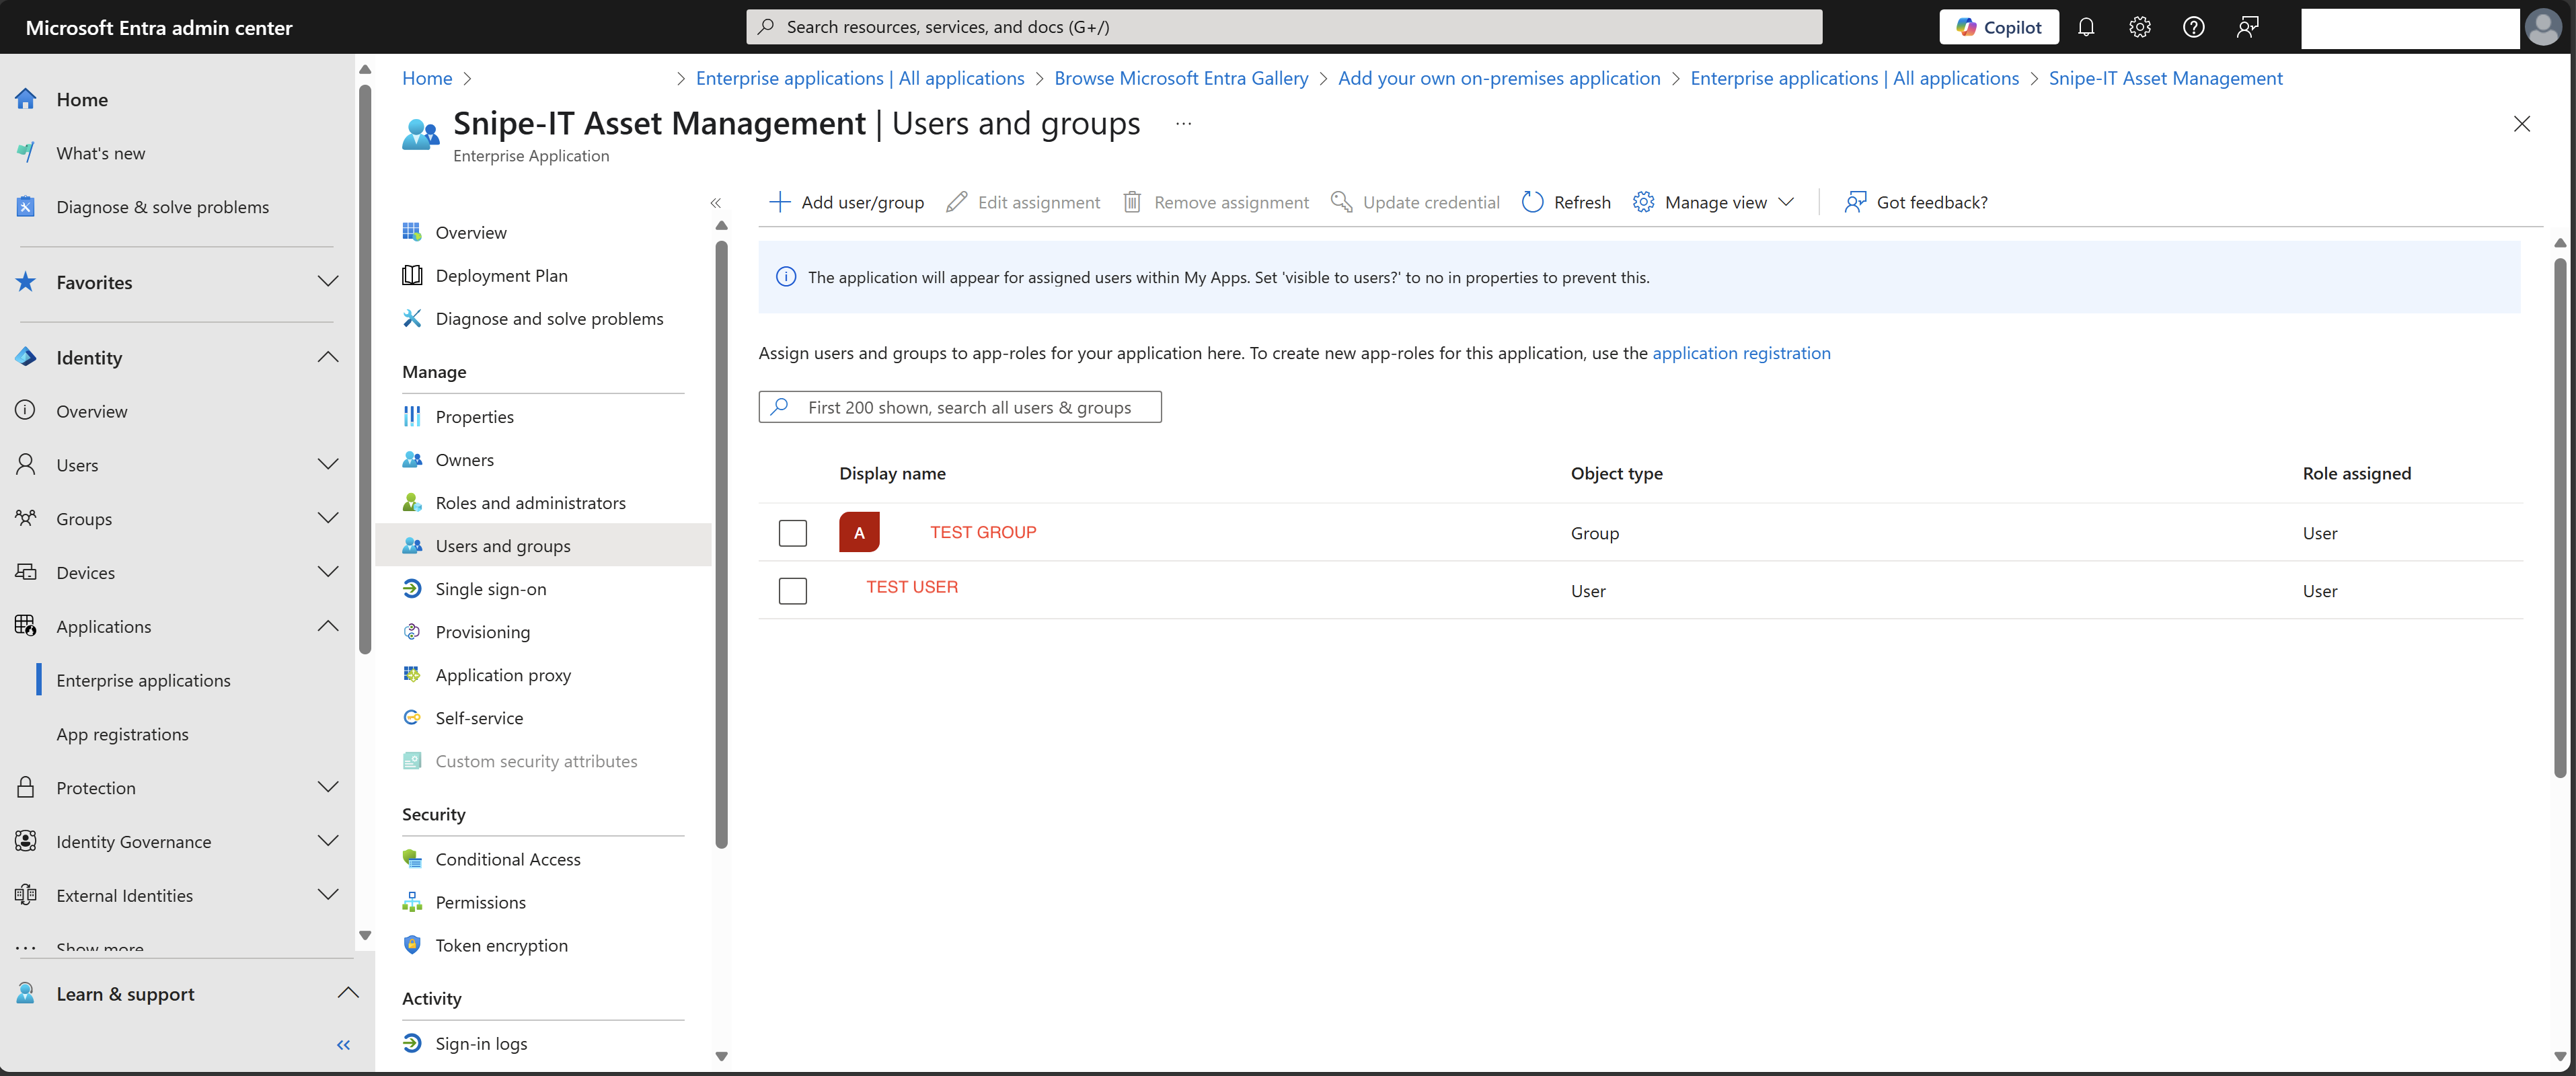
- From here, you can now test if your Entra Application Proxy is working by navigating to Snipe-IT from an external location and using a test account that has access to the application. If successful, M365 will require the user to sign-in with their Microsoft account and then will be greeted to the Snipe-IT sign in page after a quick redirection (however, the user will be unable to sign into Snipe-IT as their account is not currently syncing to Snipe-IT via SCIM).
Provisioning SCIM
The next step will be configuring SCIM so Snipe-IT can sync users from Entra ID:
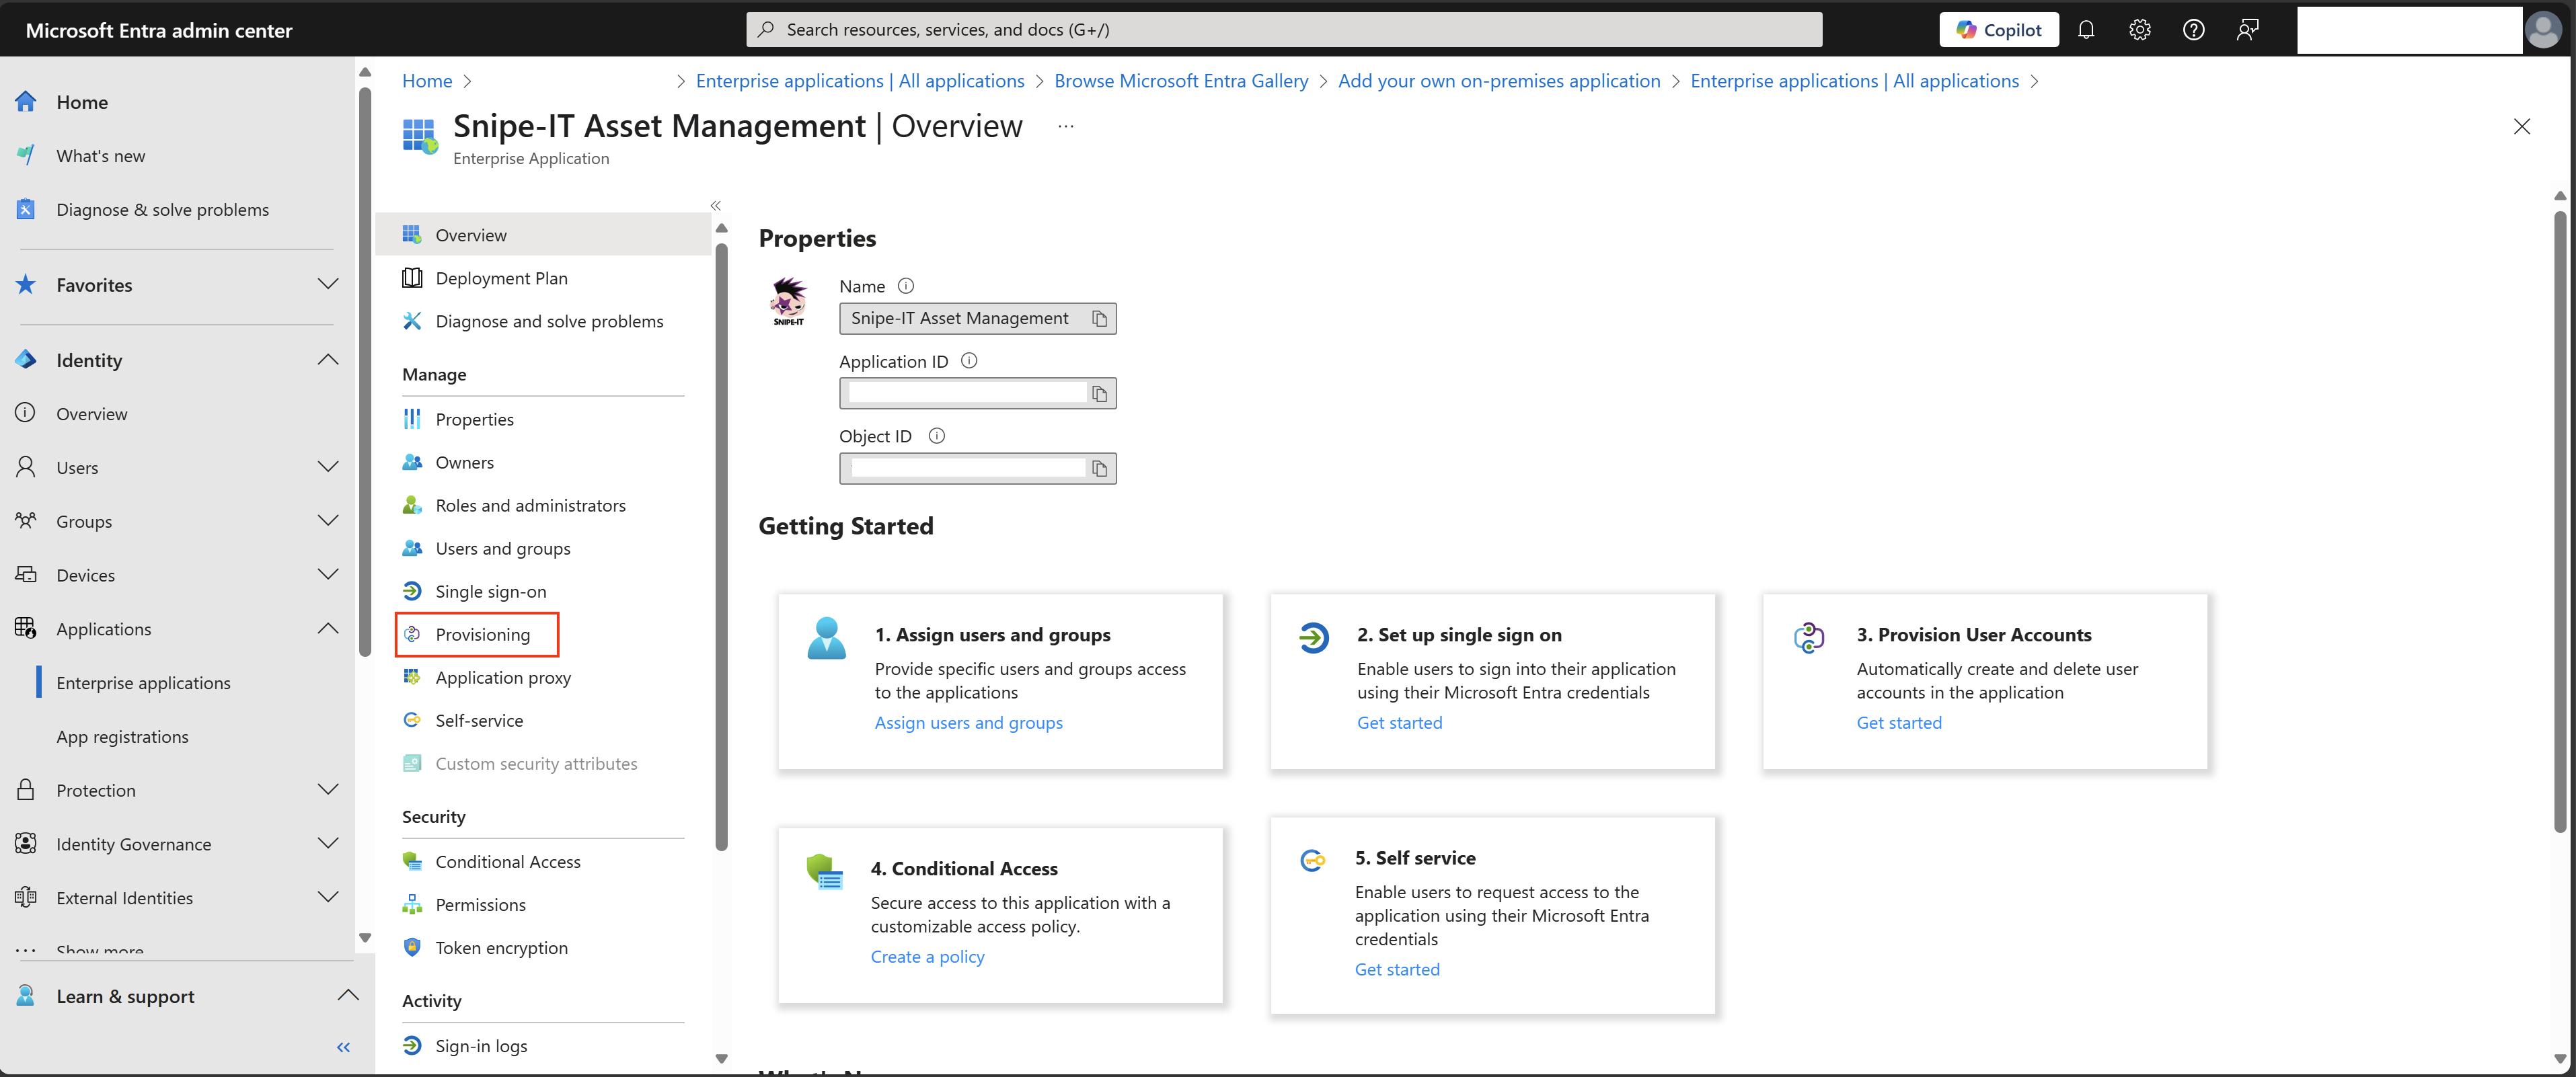
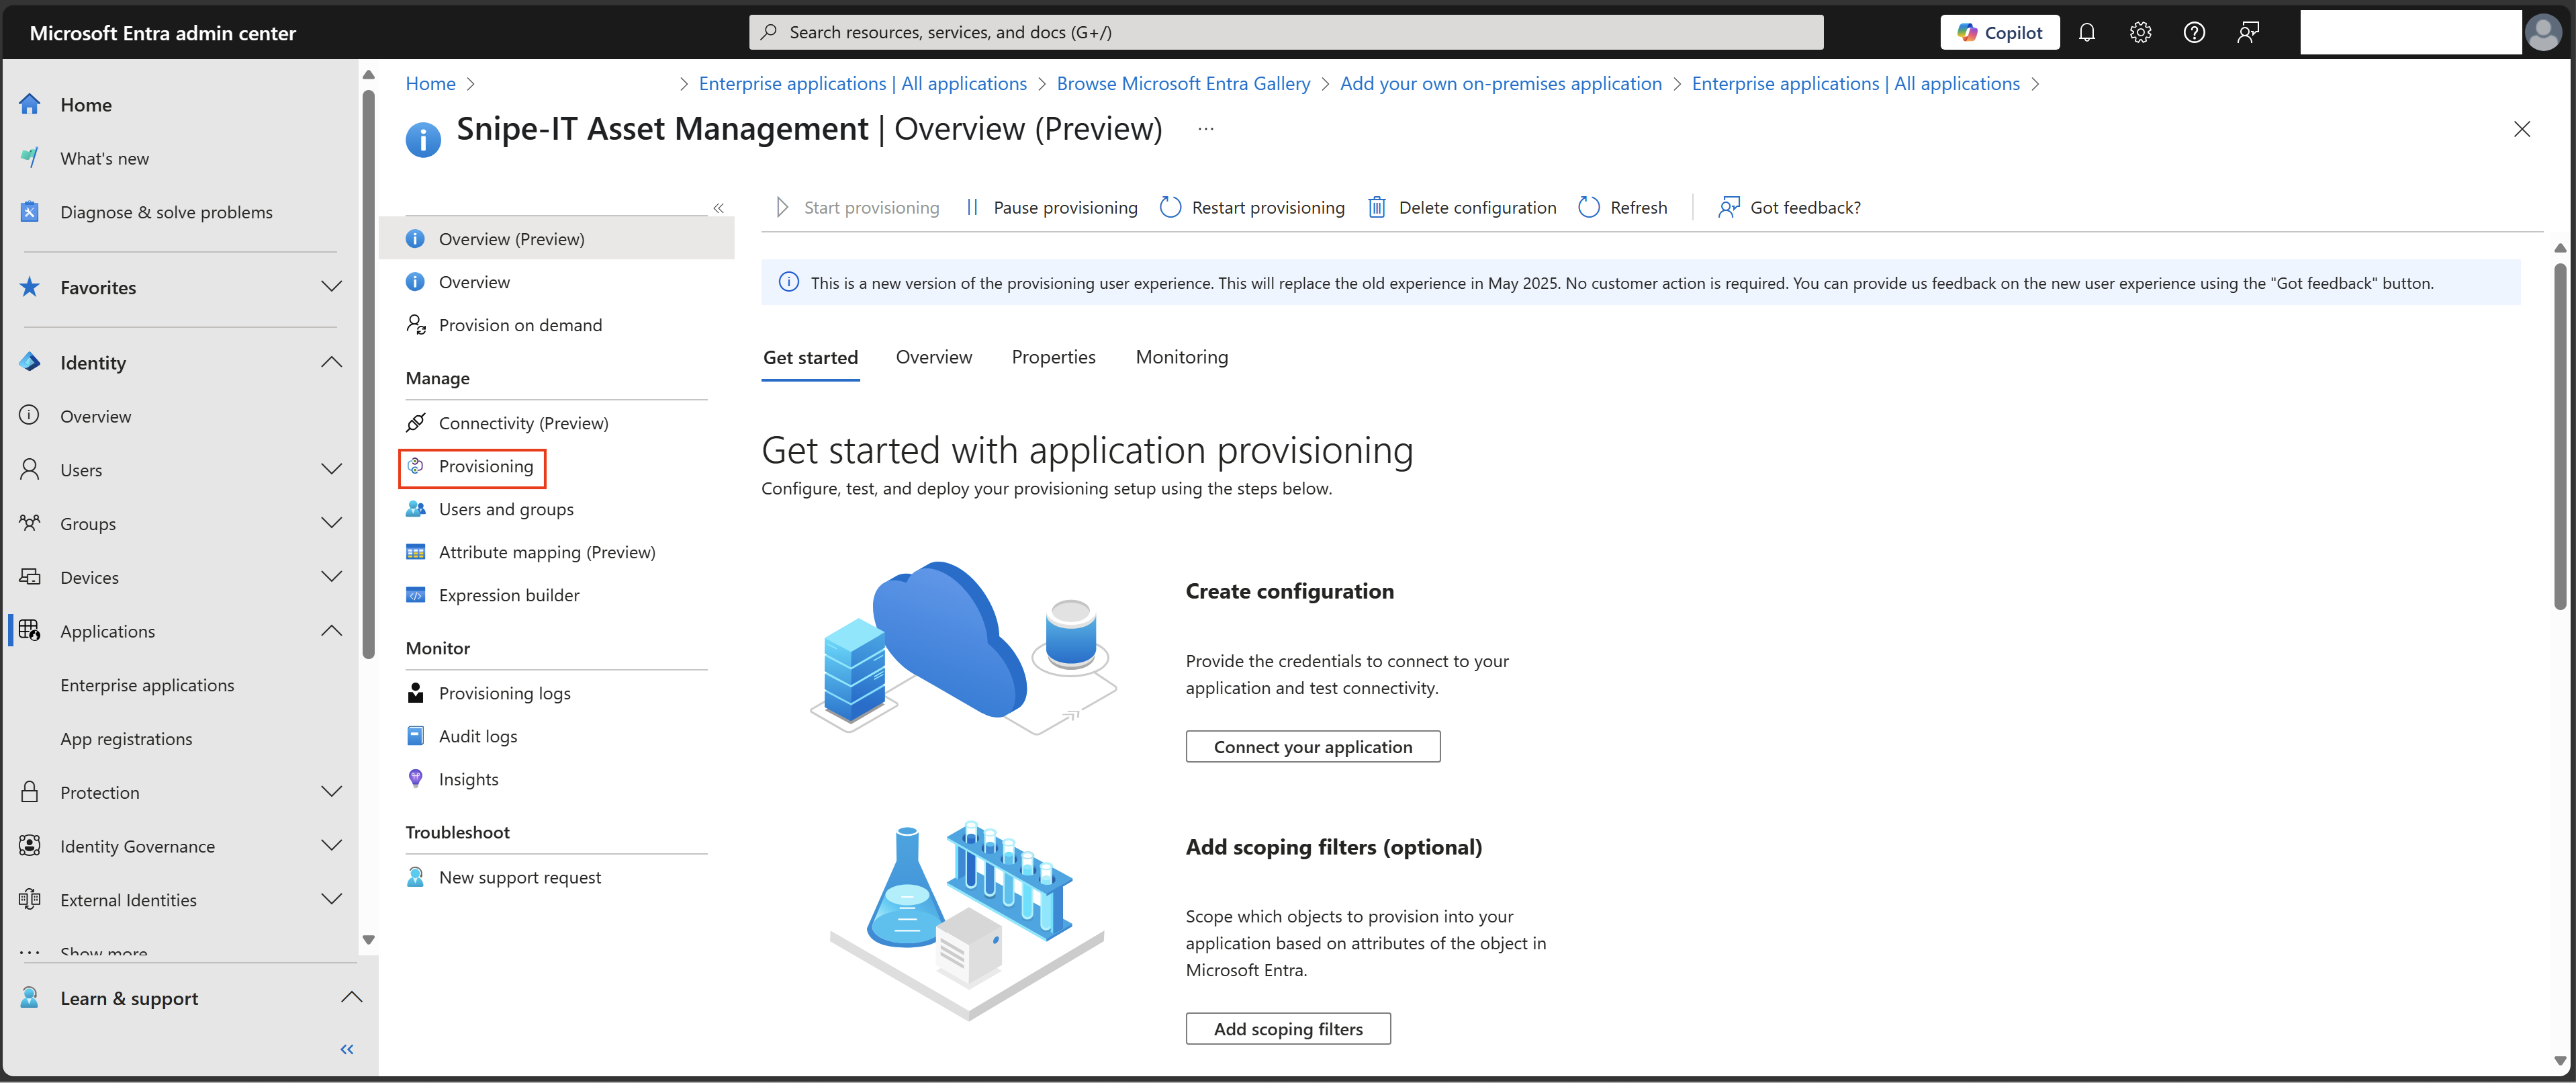
- From the newly created application, select
Provisioning, and then selectProvisioningagain:
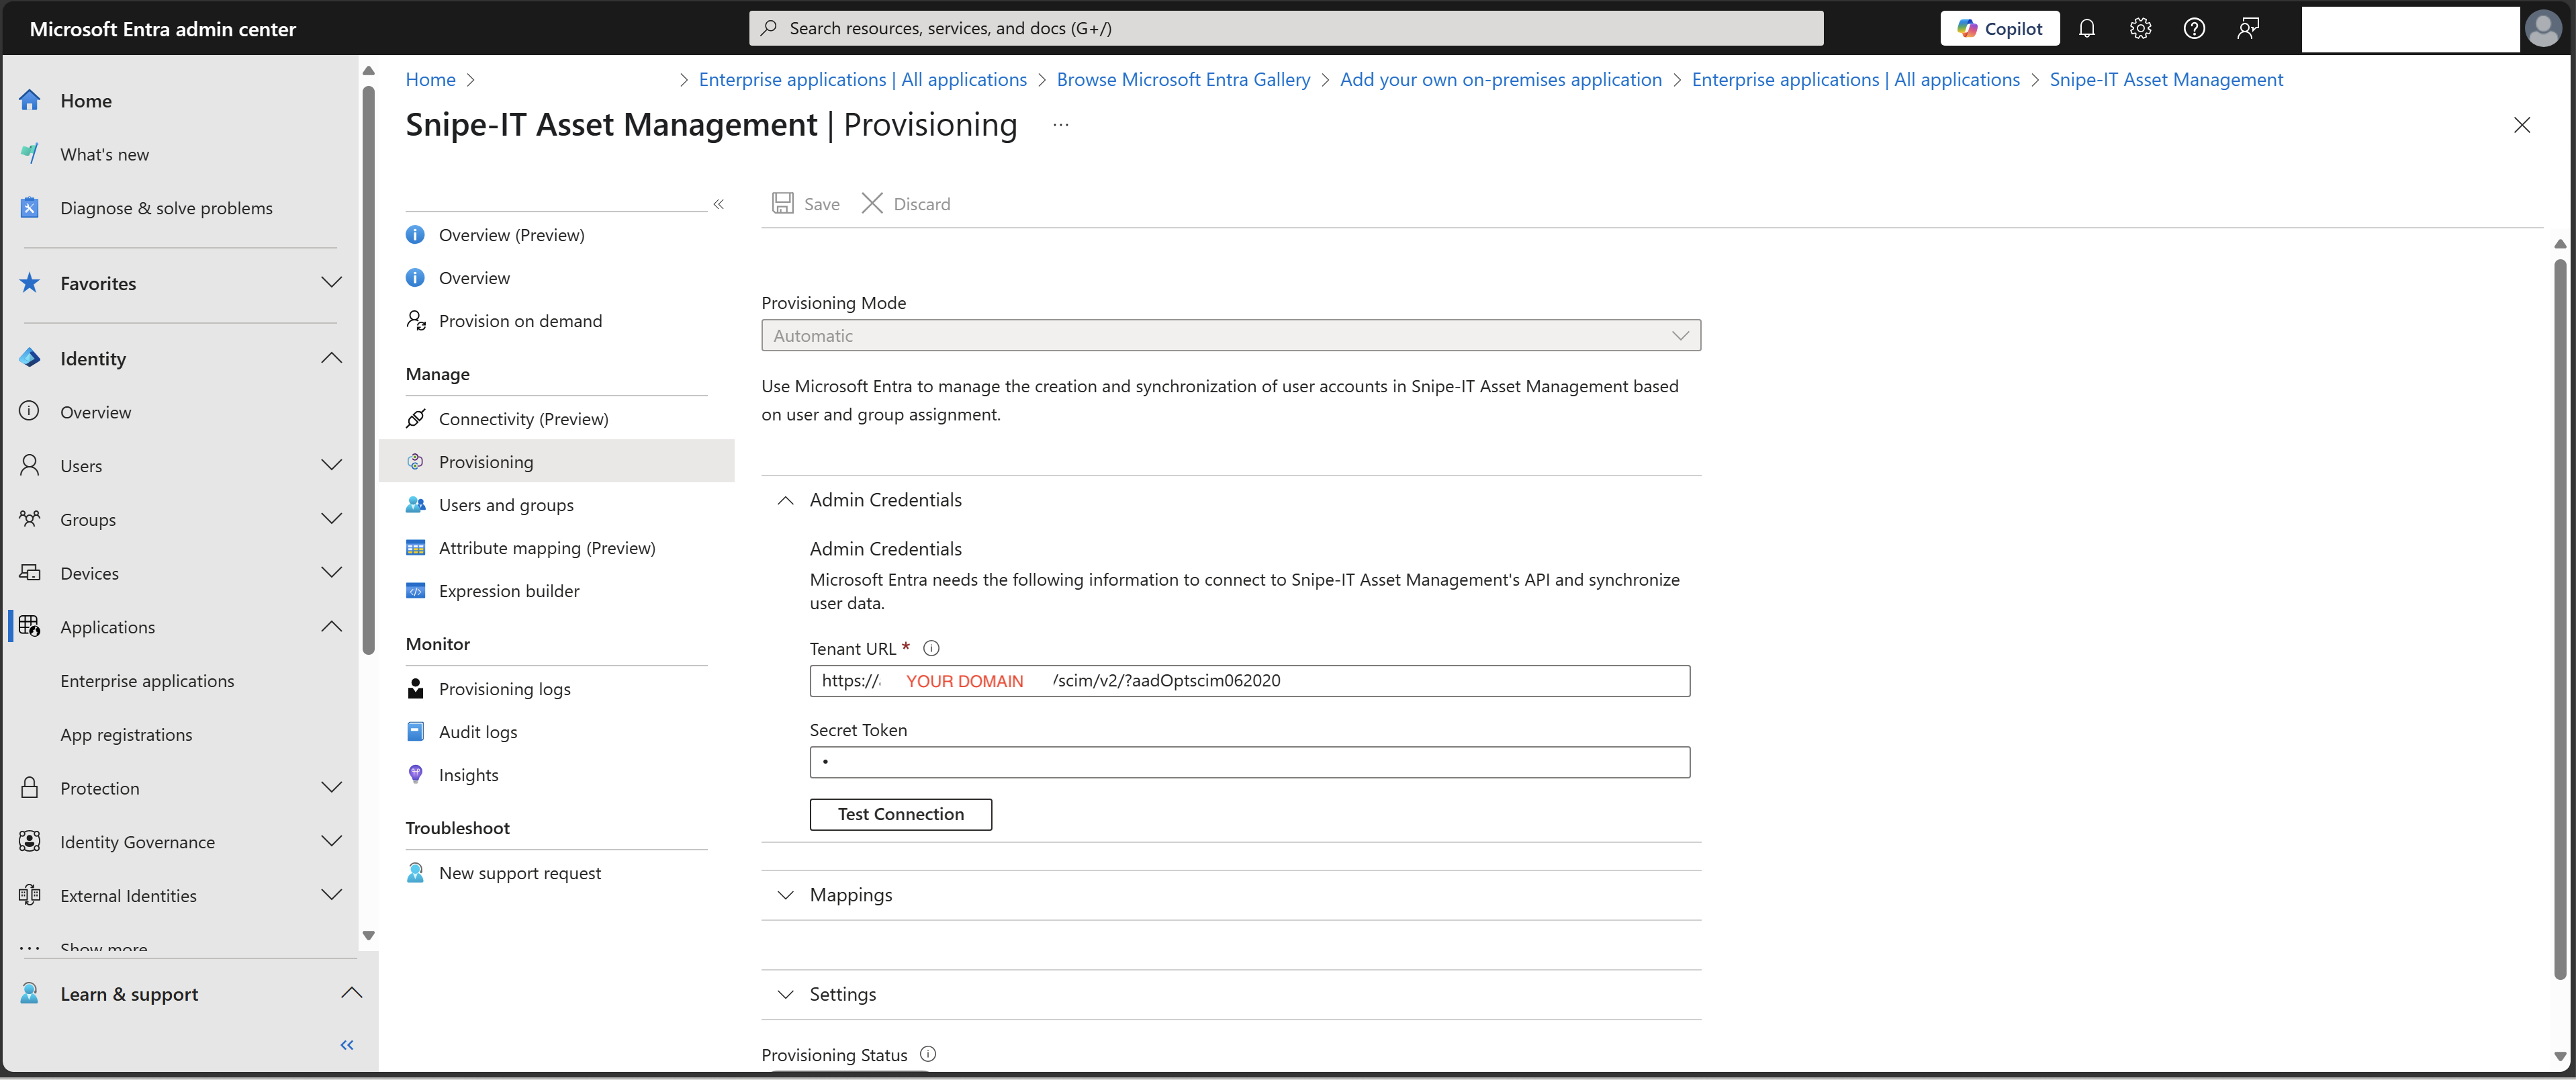
- For provisioning mode we will select
automatic:- Under
Admin Credentialswe will:- Supply your Snipe-IT instance url appended with the following ->
/scim/v2/?aadOptscim062020so the url will look likehttps://SNIPE-IT.YOURDOMAIN.COM/scim/v2/?aadOptscim062020 - For the
Secret Token, supply the previously createdPersonal Access Token(API Key) - Finally, select
Test Connectionand if everything is properly configured, then you will be greeted with a success message
- Supply your Snipe-IT instance url appended with the following ->
- Under
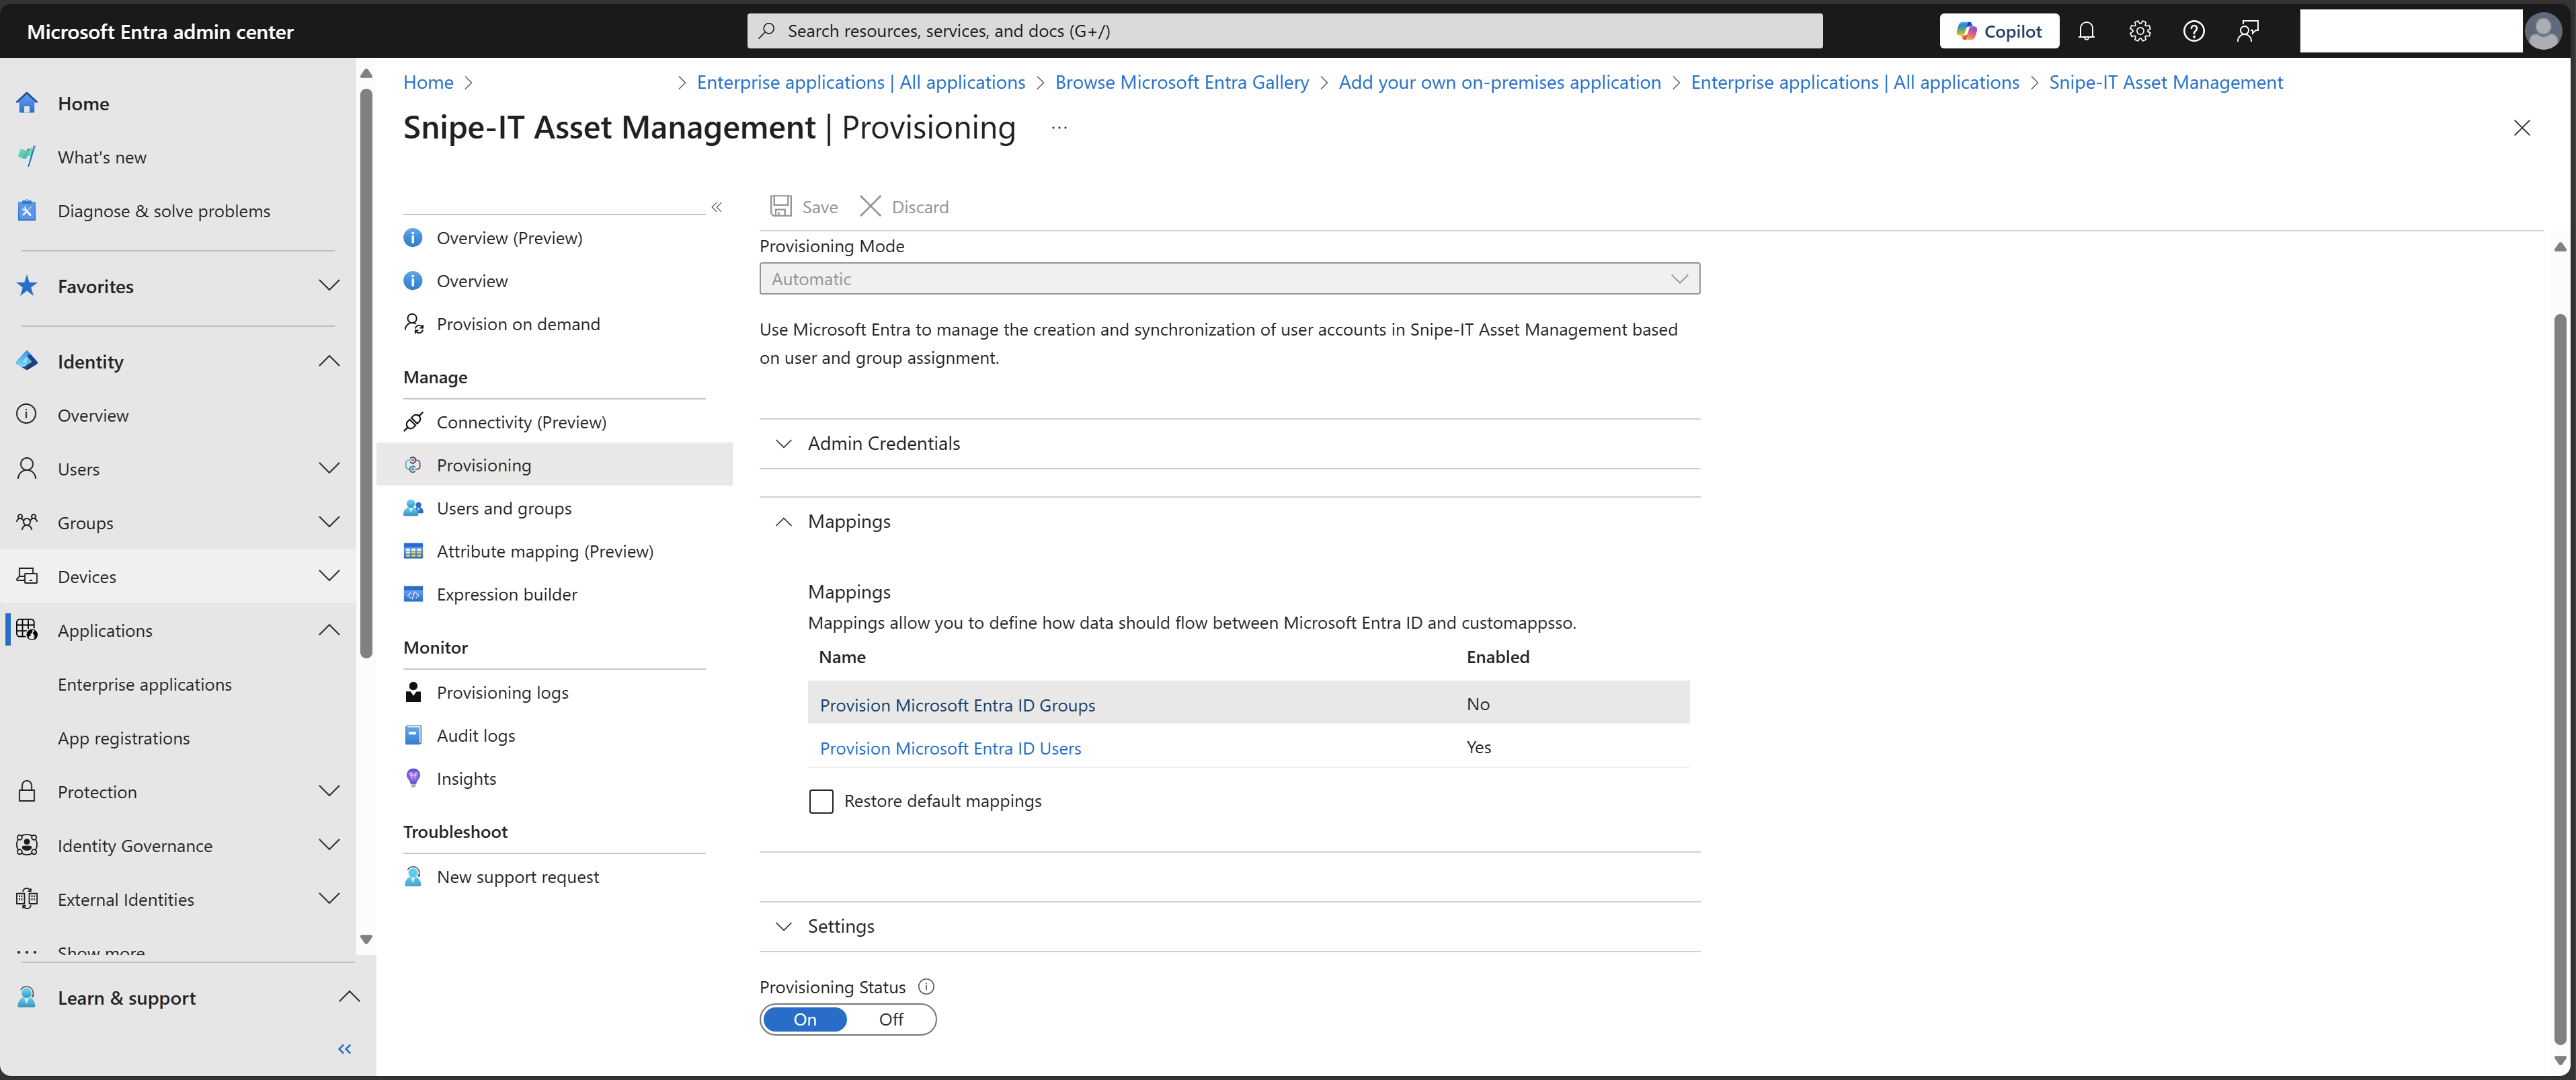
- For group
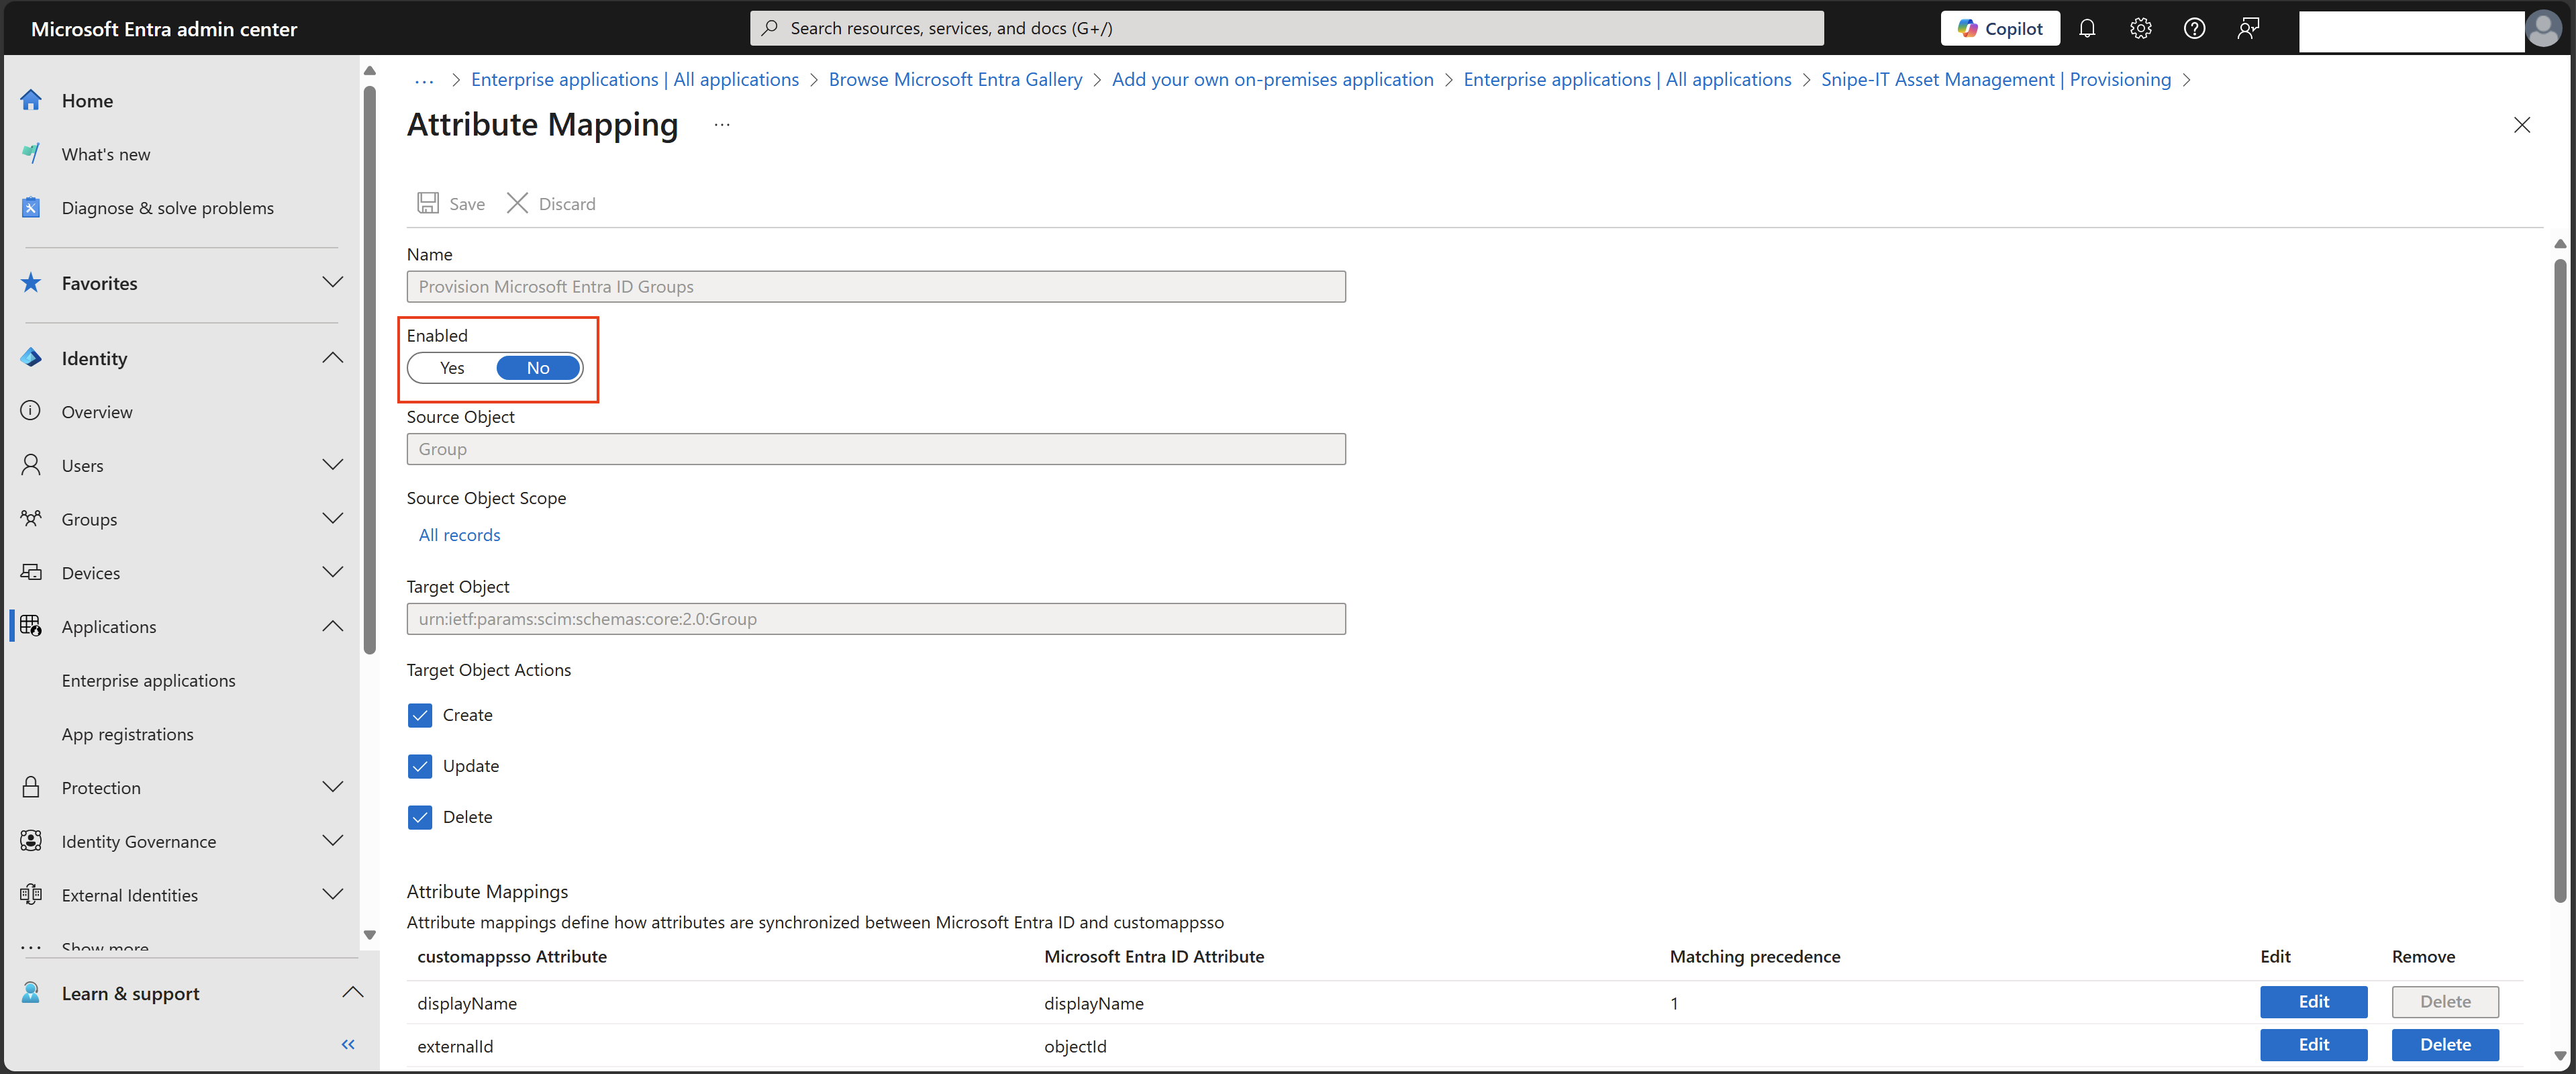
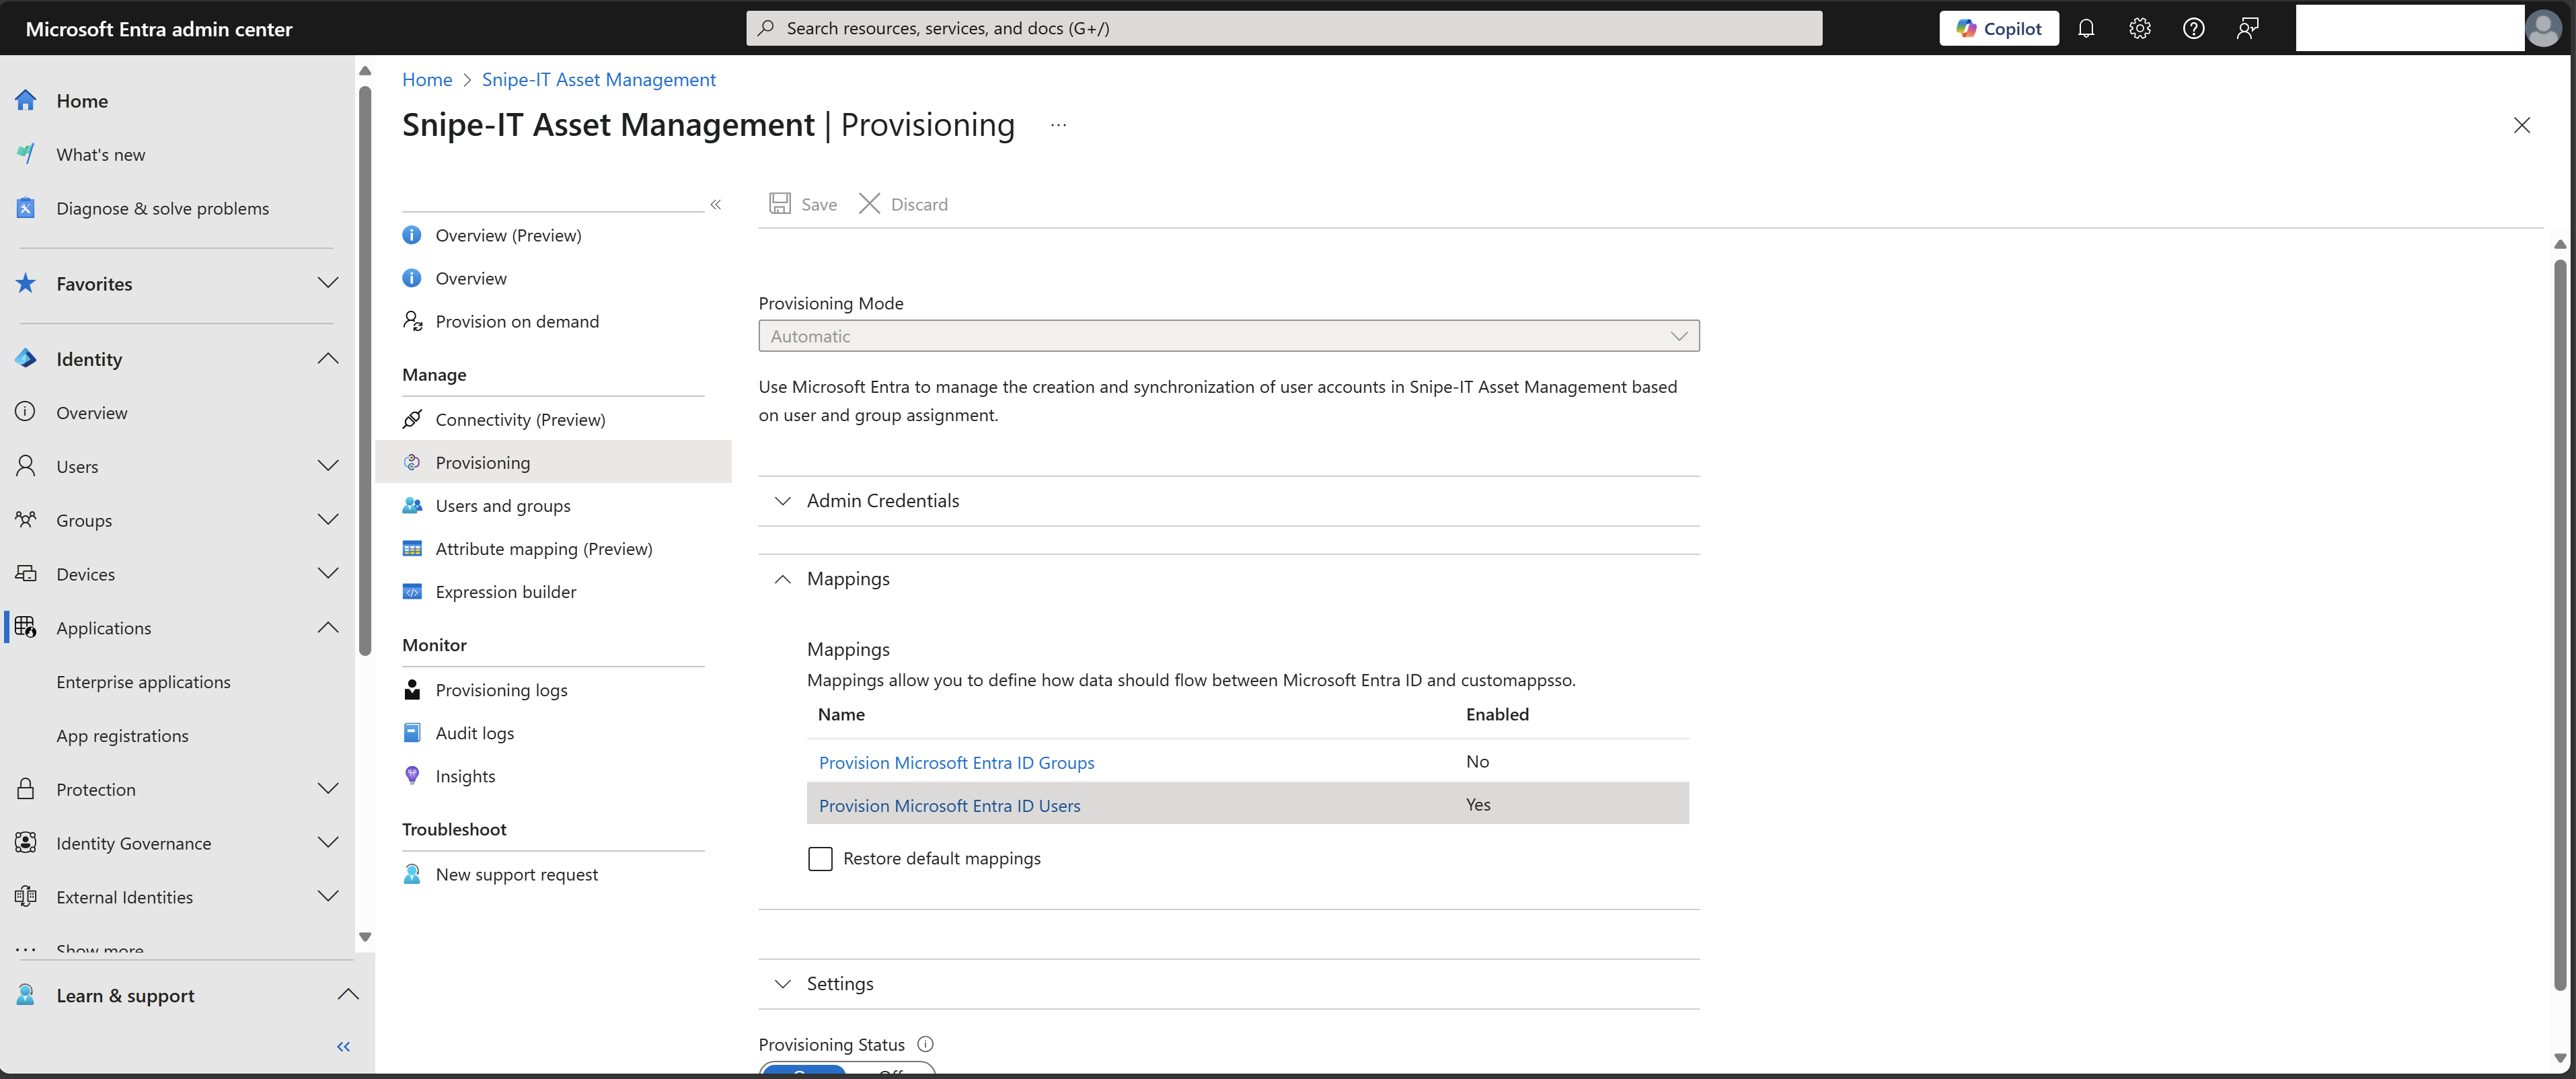
Mappings, you must disable group syncing (otherwise the SCIM sync will fail) -> click onProvision Microsoft Entra ID Groupsand then disable the group sync option:
- For user
Mappings, we must modify the attributes for the users that will be syncing to Snipe-IT as not all of the attributes are supported by Snipe-IT yet:- Select
Provision Microsoft Entra ID Usersand then remove any attributes not supported by Snipe-IT listed in this article (or copy my settings below):
- Select
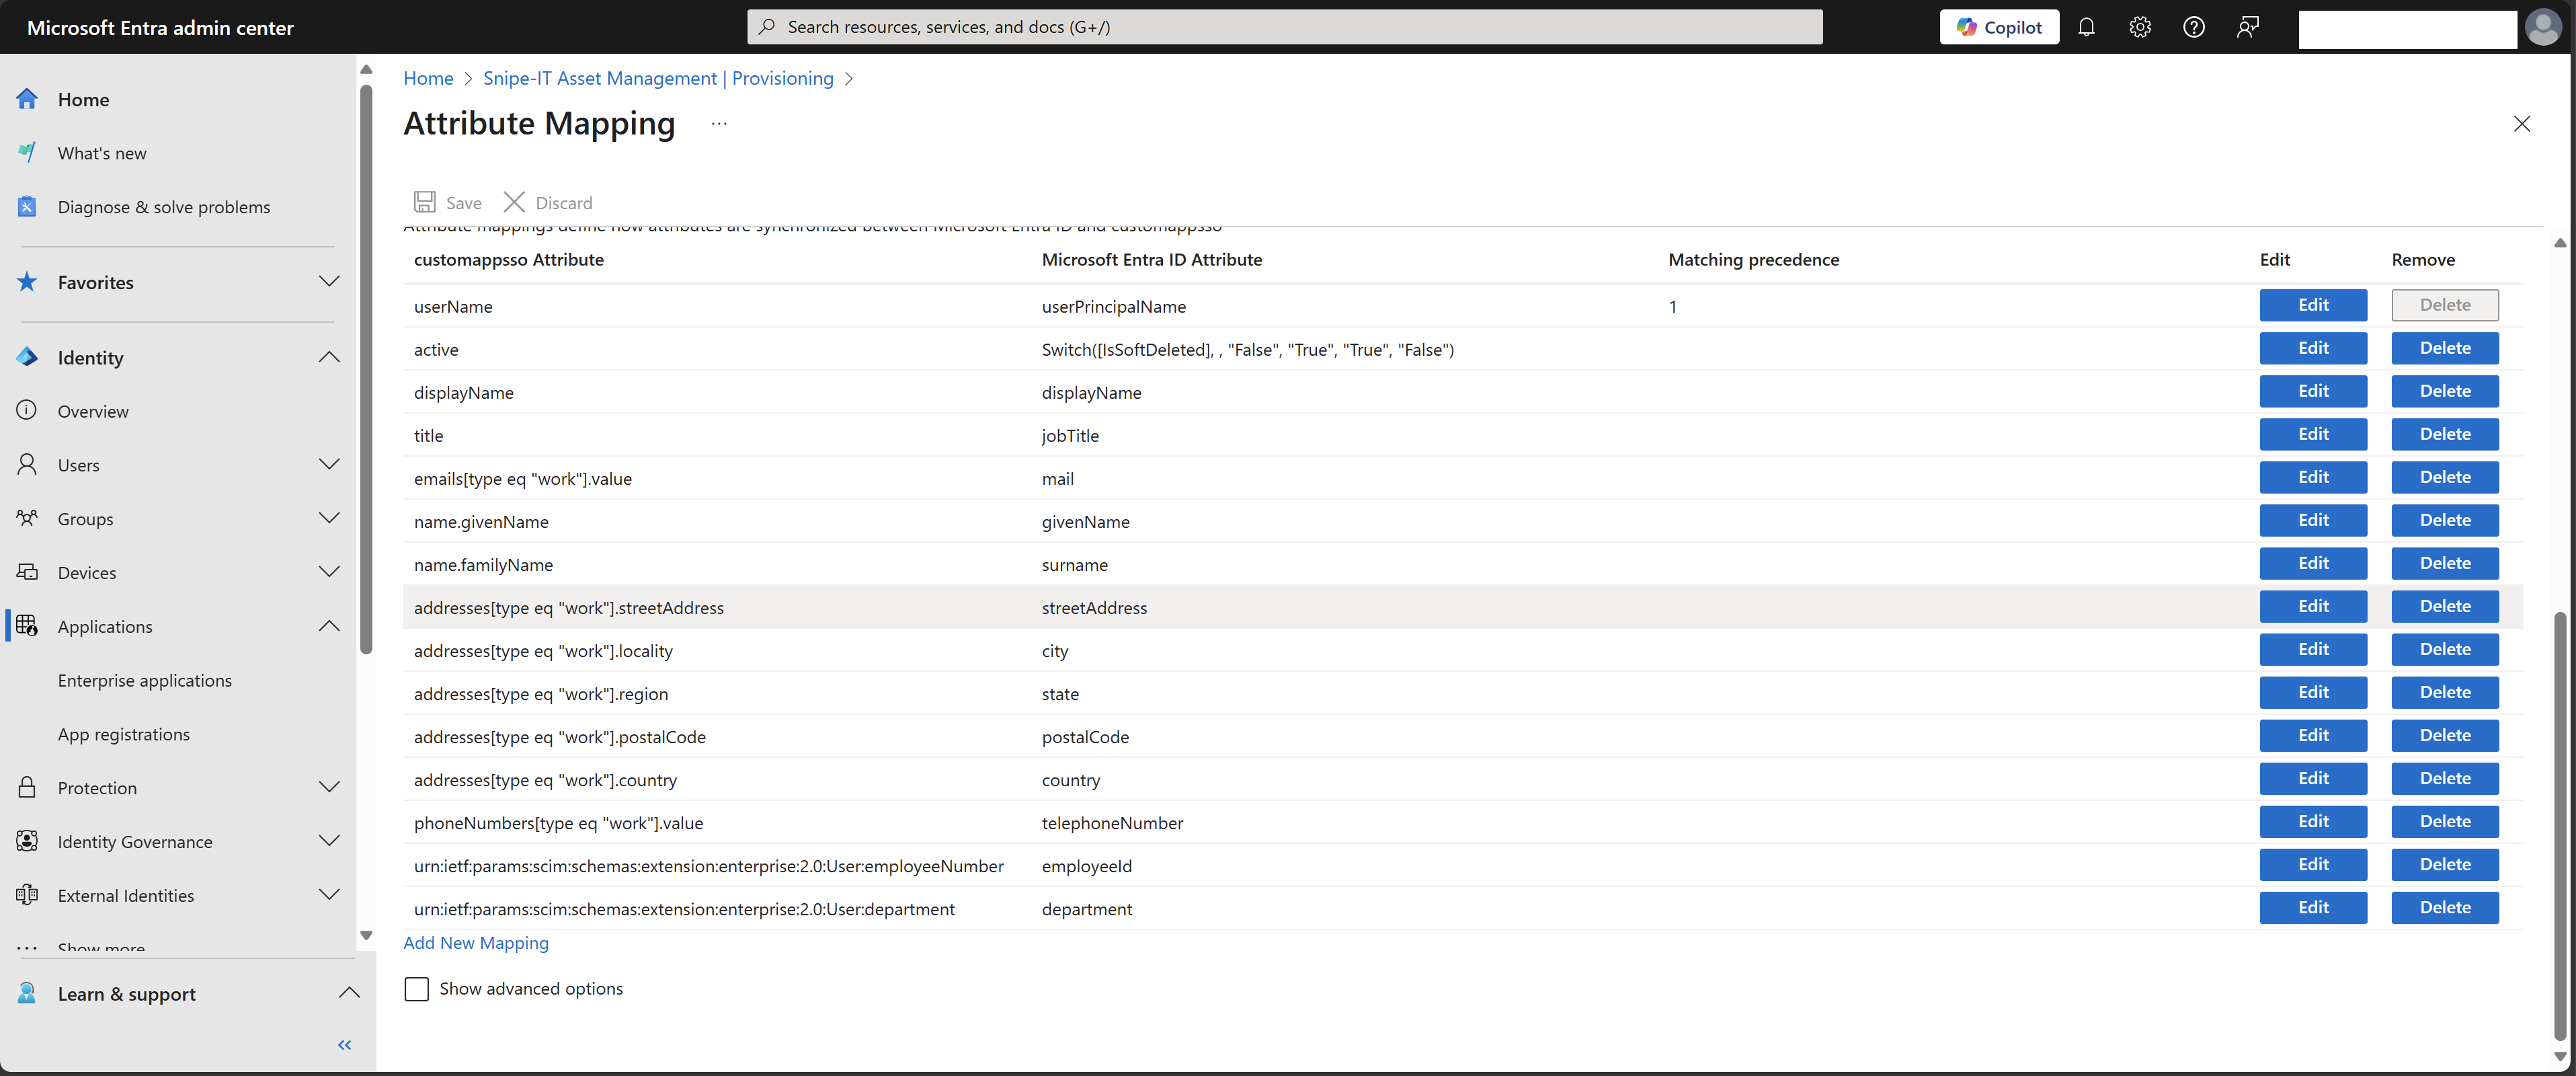
- Finally, you can go back to the provisioning
Overviewand start provisioning users:- You have the option of syncing all groups and users or a select group of users/groups -> in my case I only selected a handful of users and groups (these users and groups are the same from the previous step).
- Then go back to
provisioningpage and then what you can do is test SCIM functionality first before provisioning all users and groups:- Select
Provision on demandthen select a test user/group, and then selectprovision. - Confirm within Snipe-IT that the provisioned user/group has shown up within the console under
users.
- Select
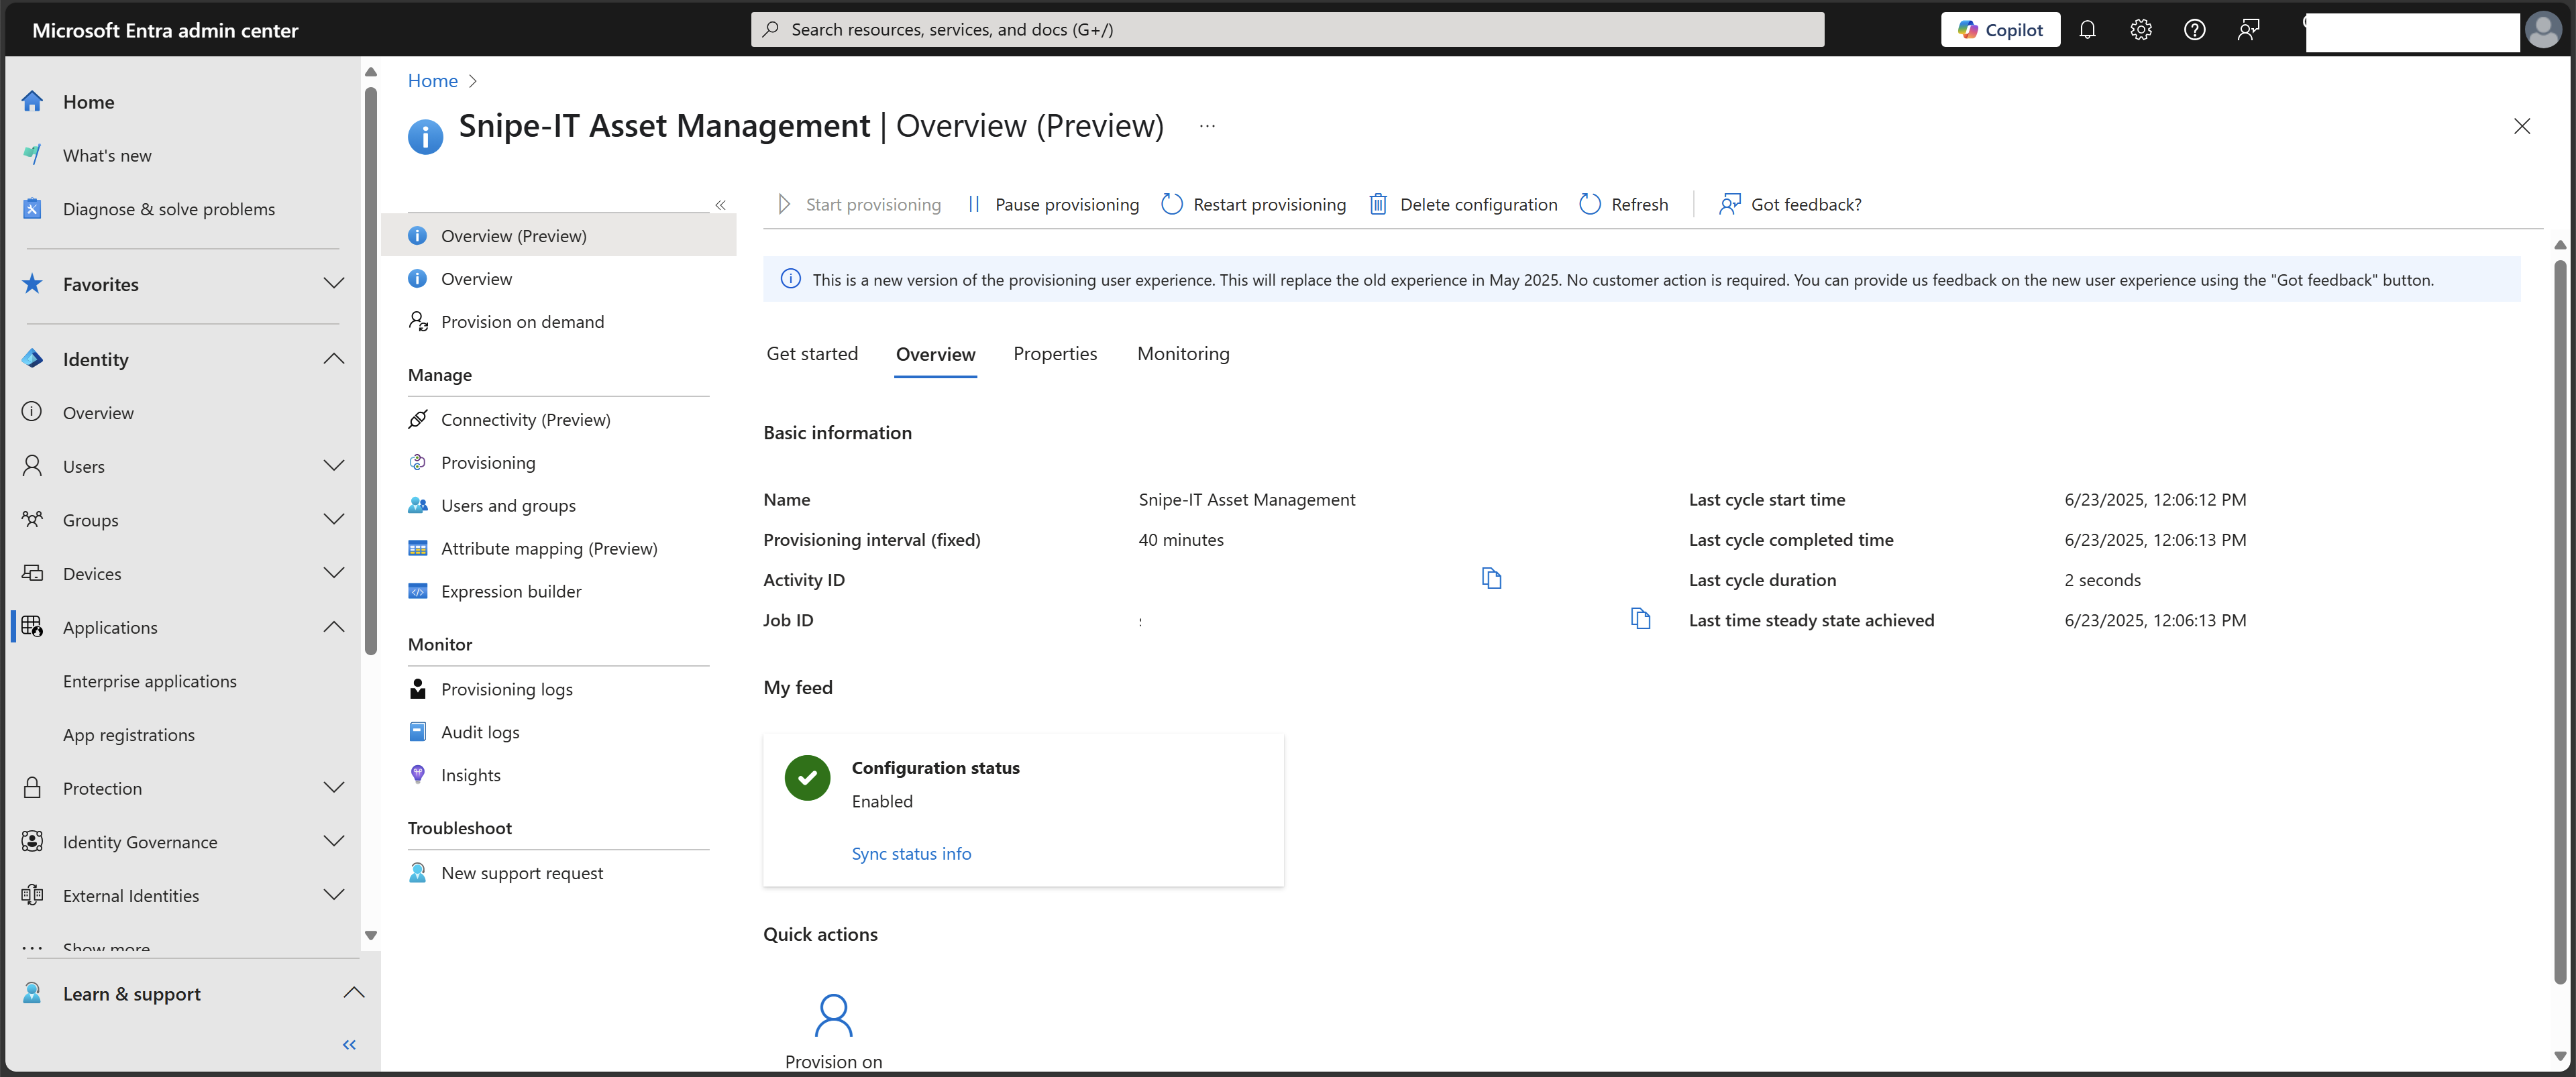
- Go back to
Overviewand selectstart provisionngto provision all of your users and groups -> confirm results within Snipe-IT again:
Provisioning SAML (SSO)
The final step, but also the easiest, is configuring your Snipe-IT instance to work with SAML which means when a Entra ID user attempts to sign into Snipe-IT then their login will be SSO:
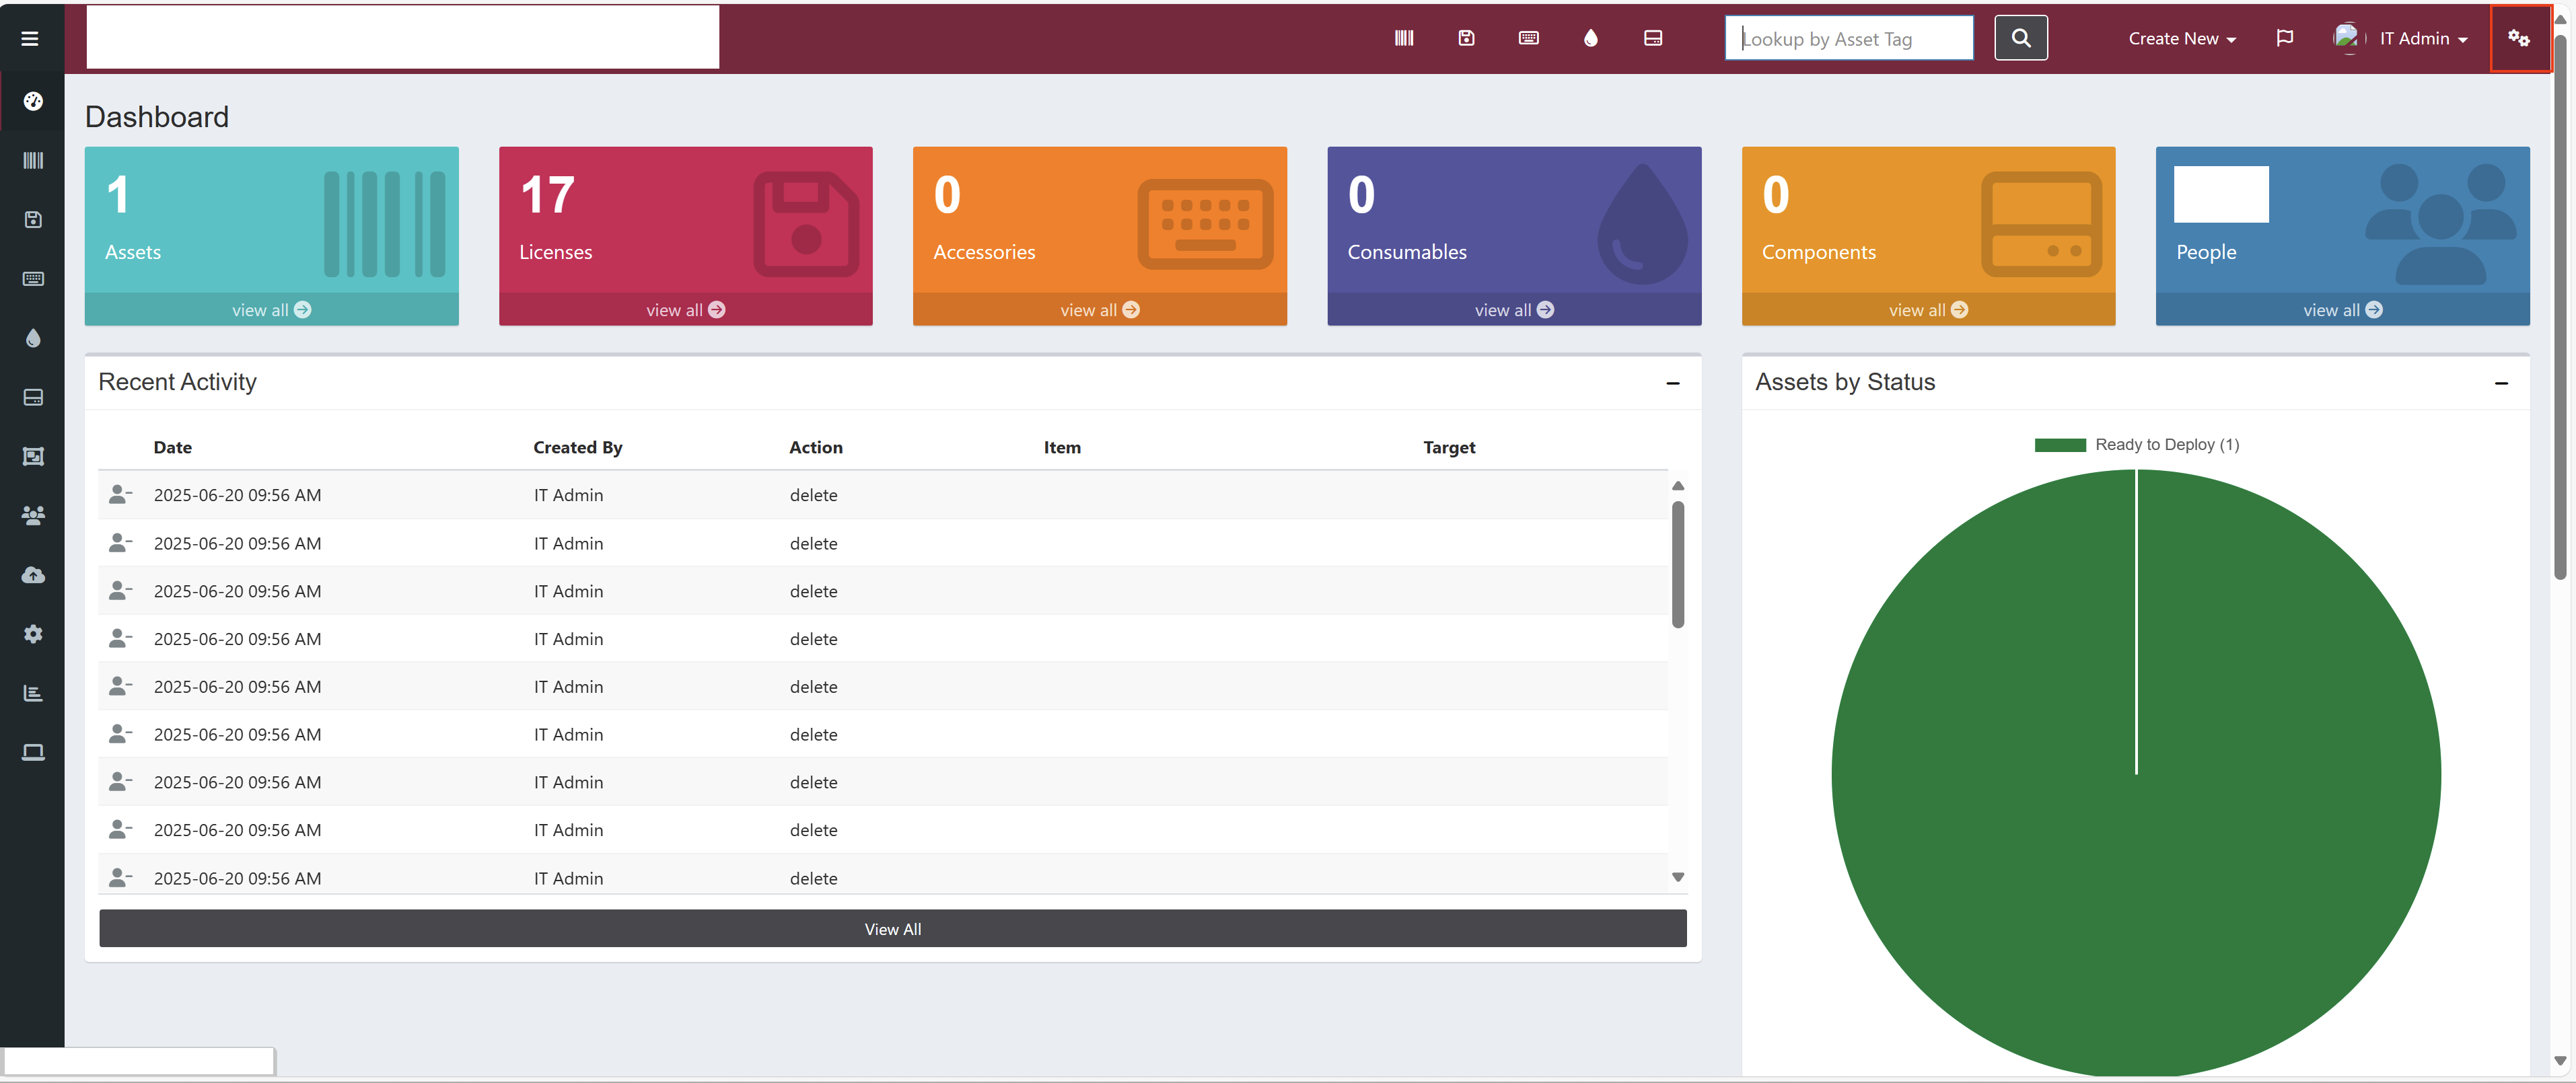
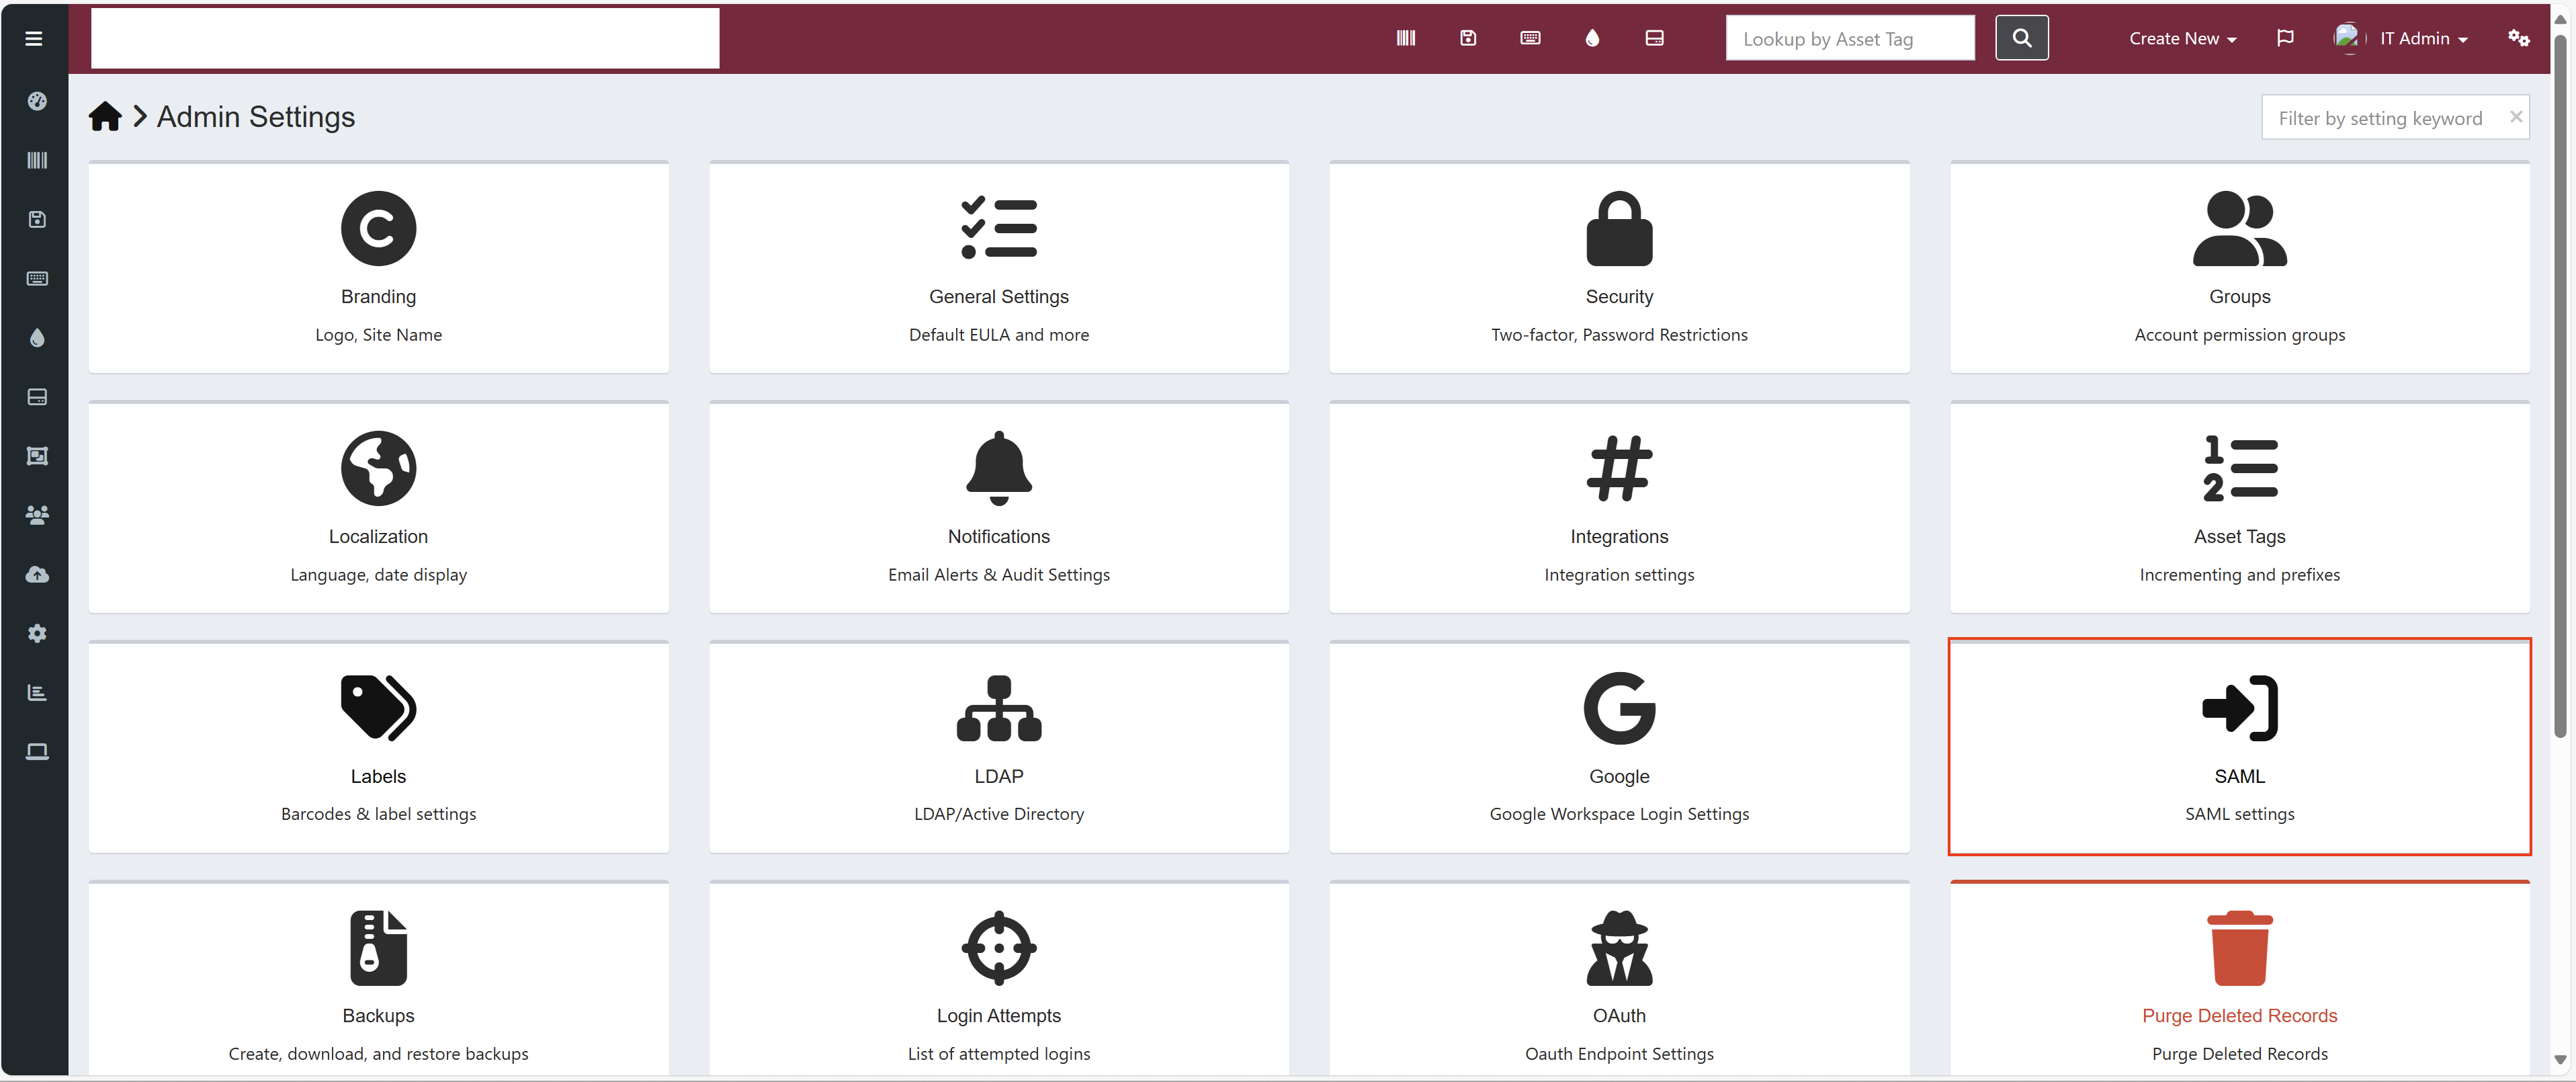
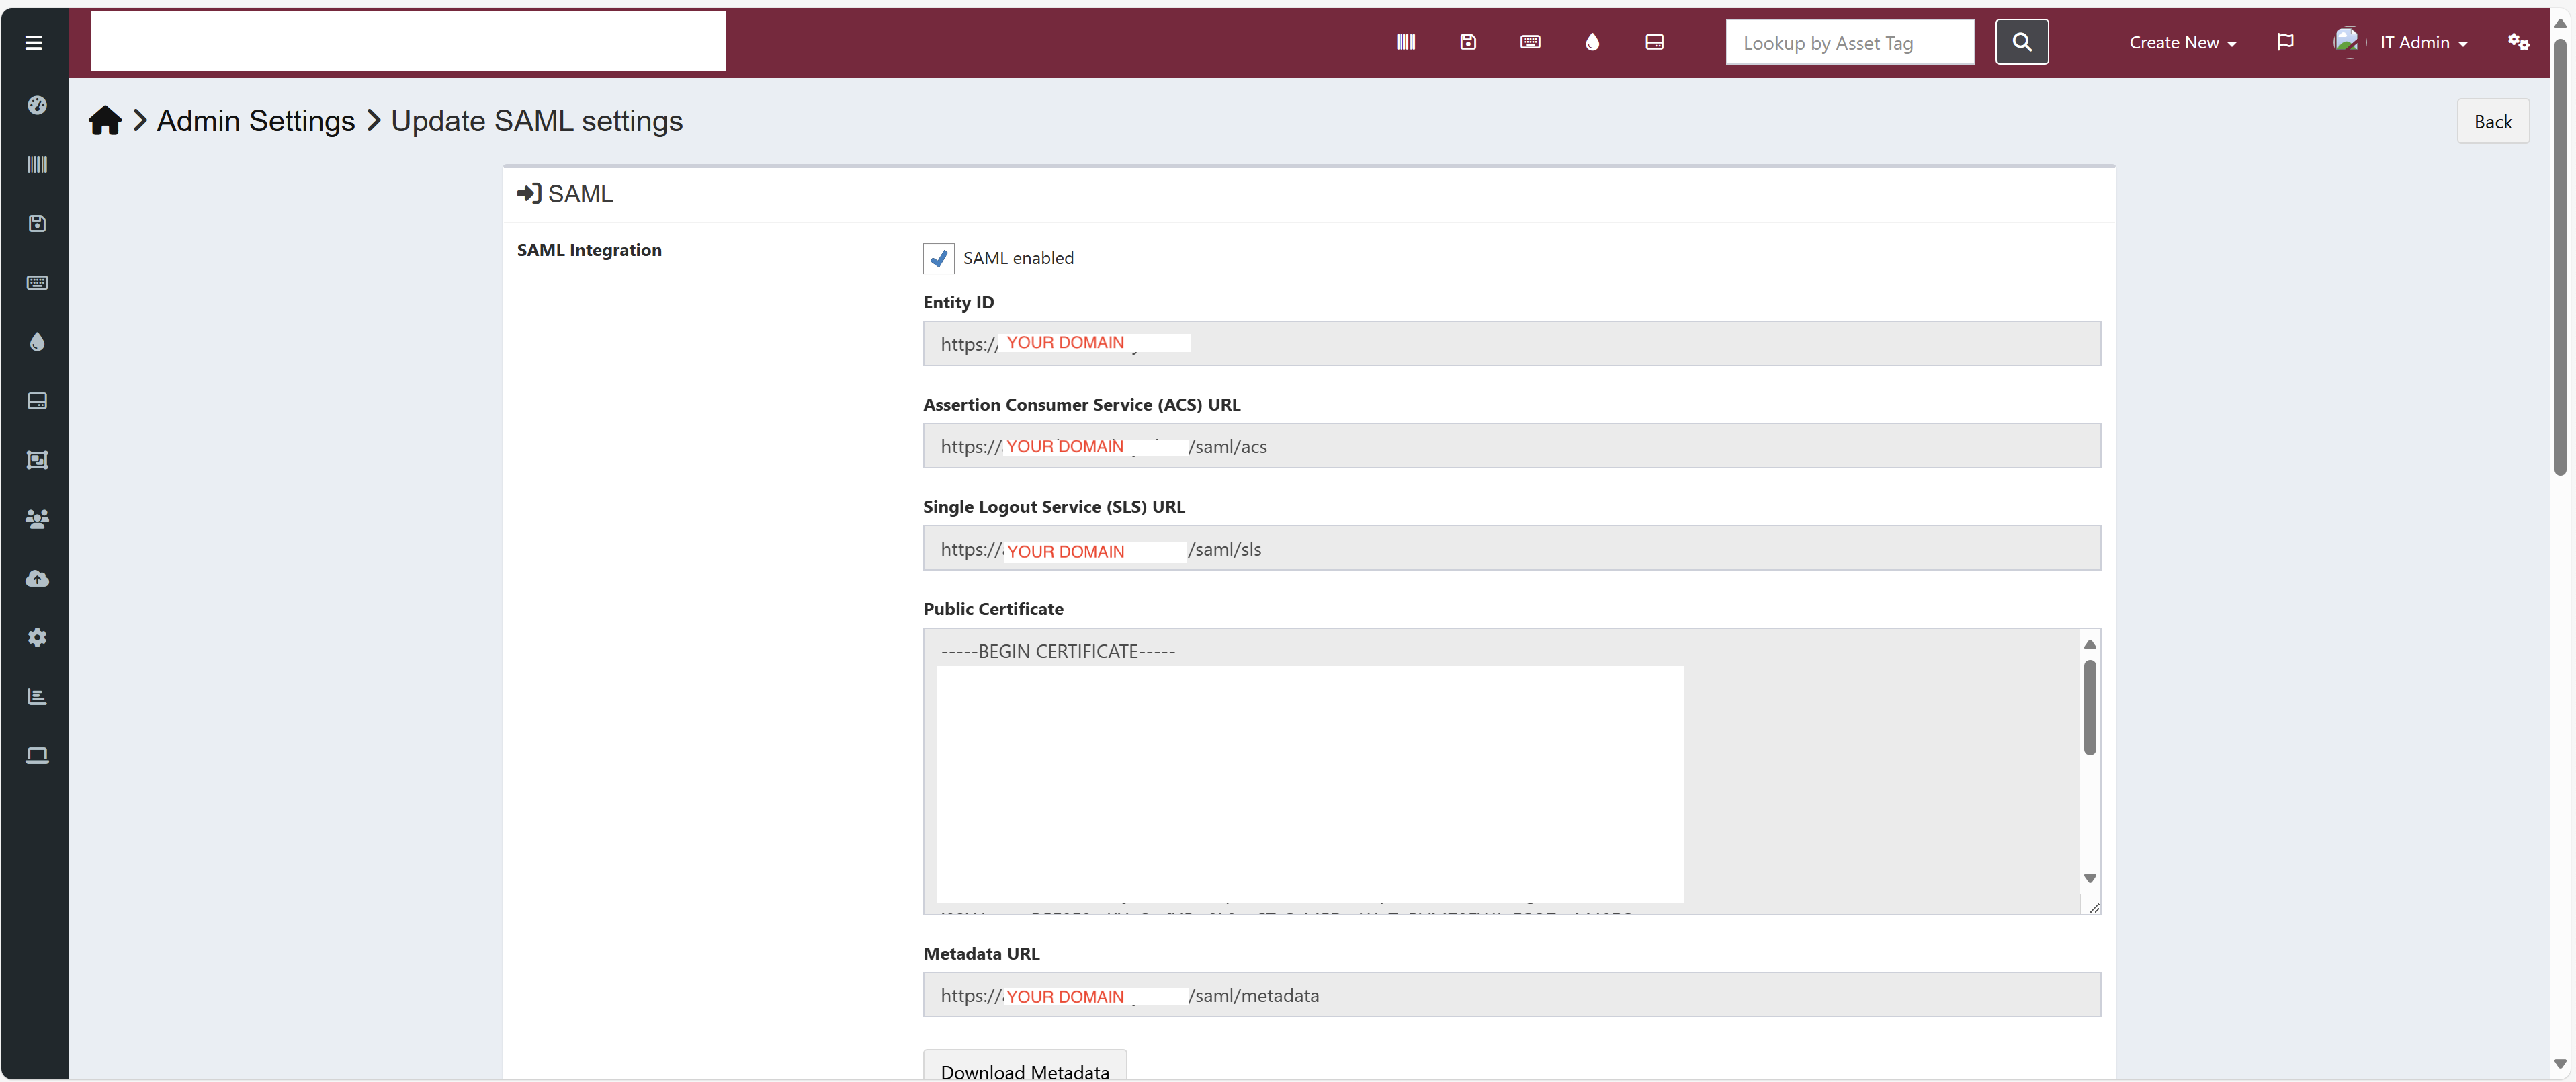
- Sign into your Snipe-IT instance, navigate to the admin section (the gear box) signed as a super user, select
SAML, turn onSAML enabled, and then scroll to the bottom of the page to save:
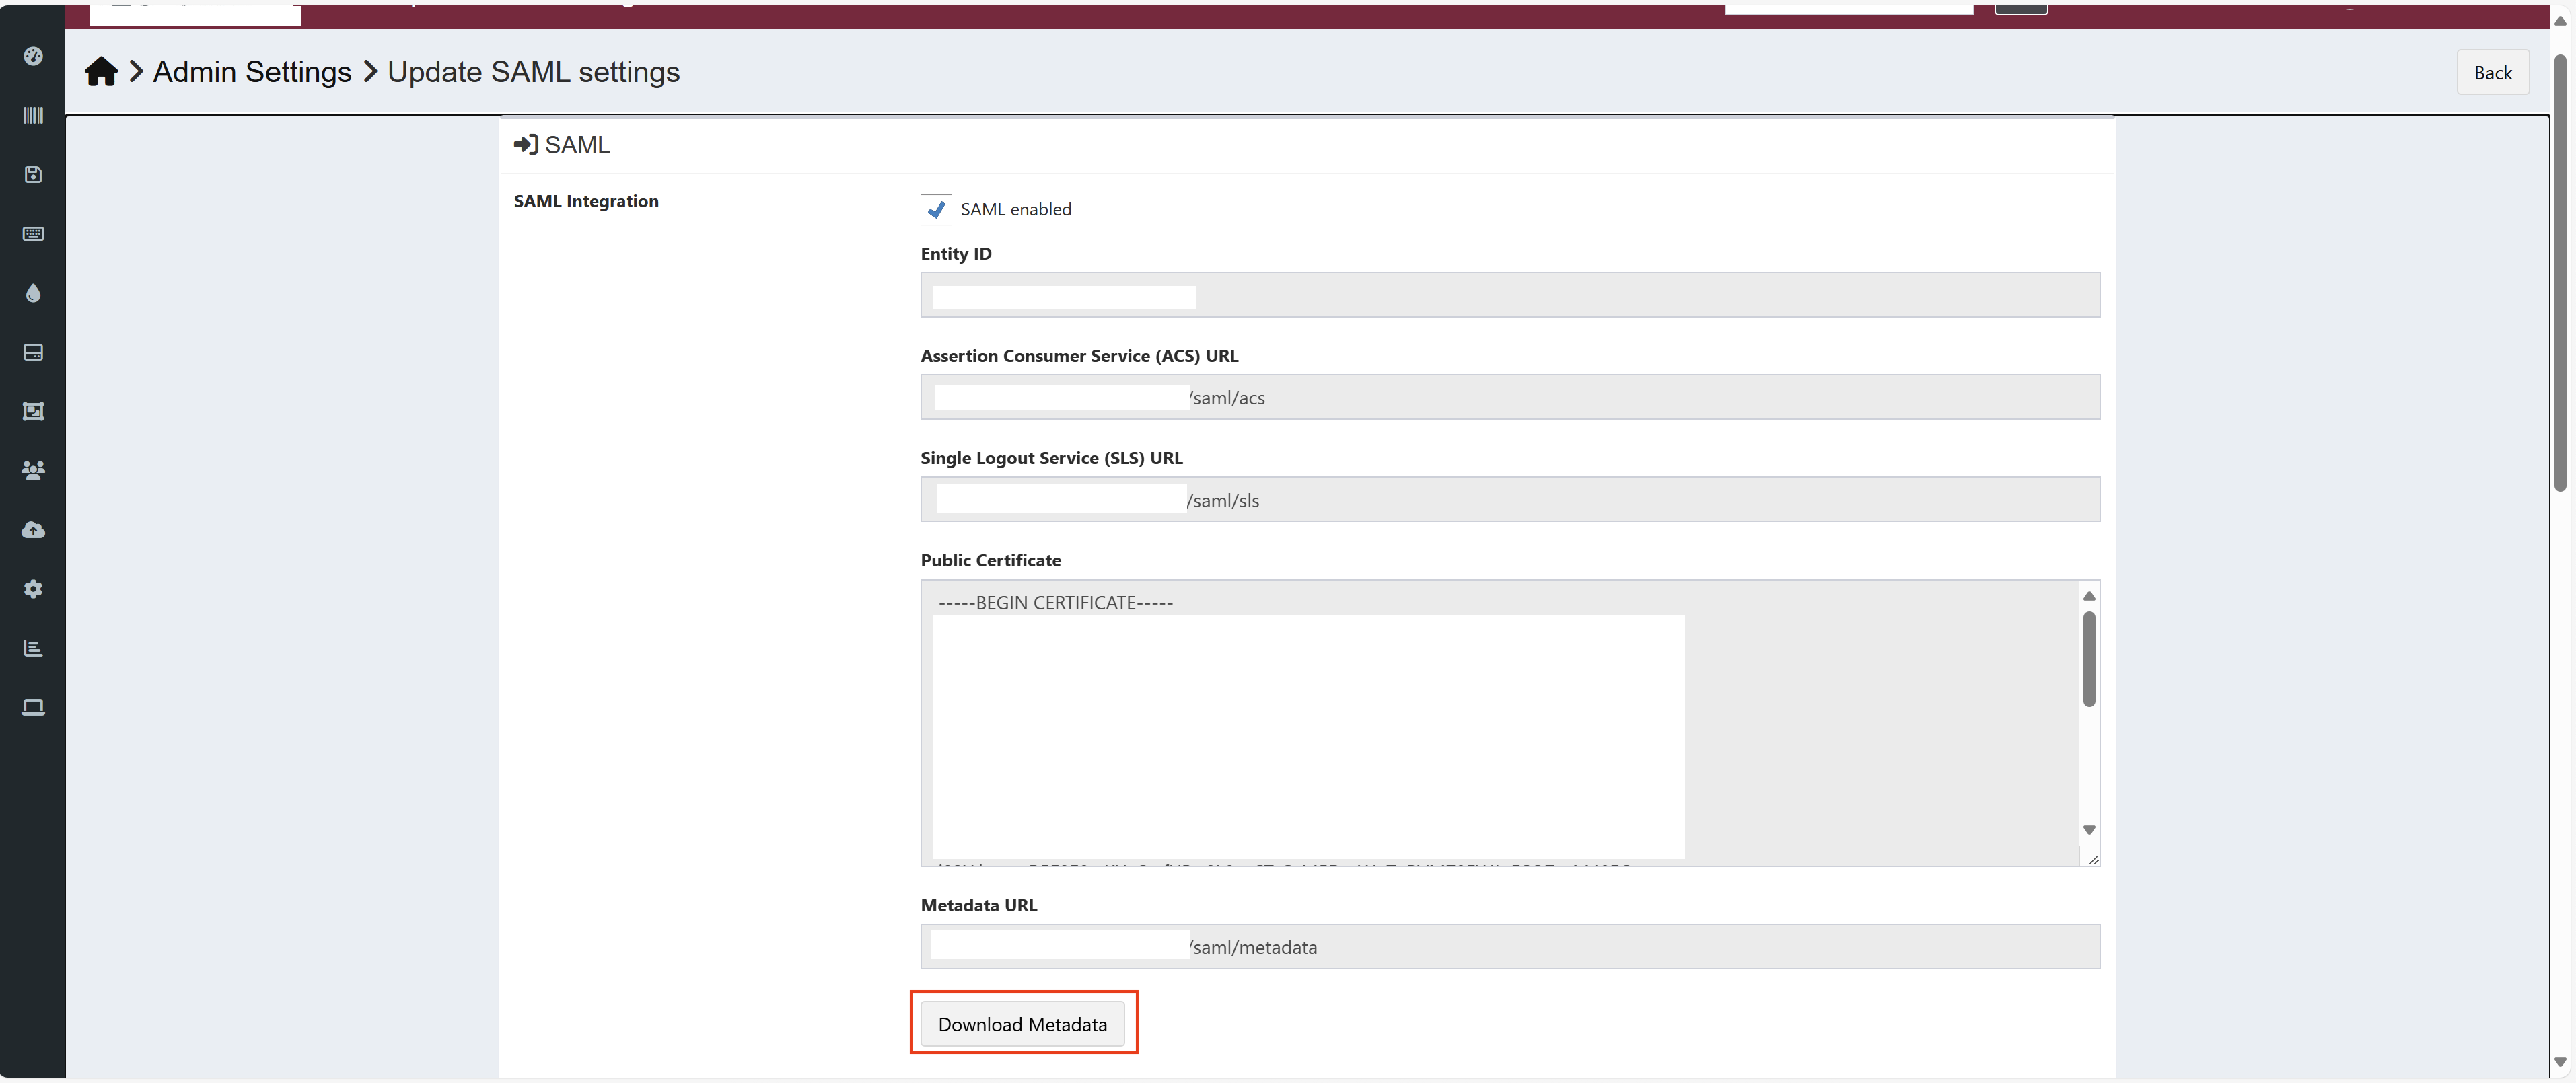
- Next, on the same page, select
Download Metadata, and then save this file for the next step:
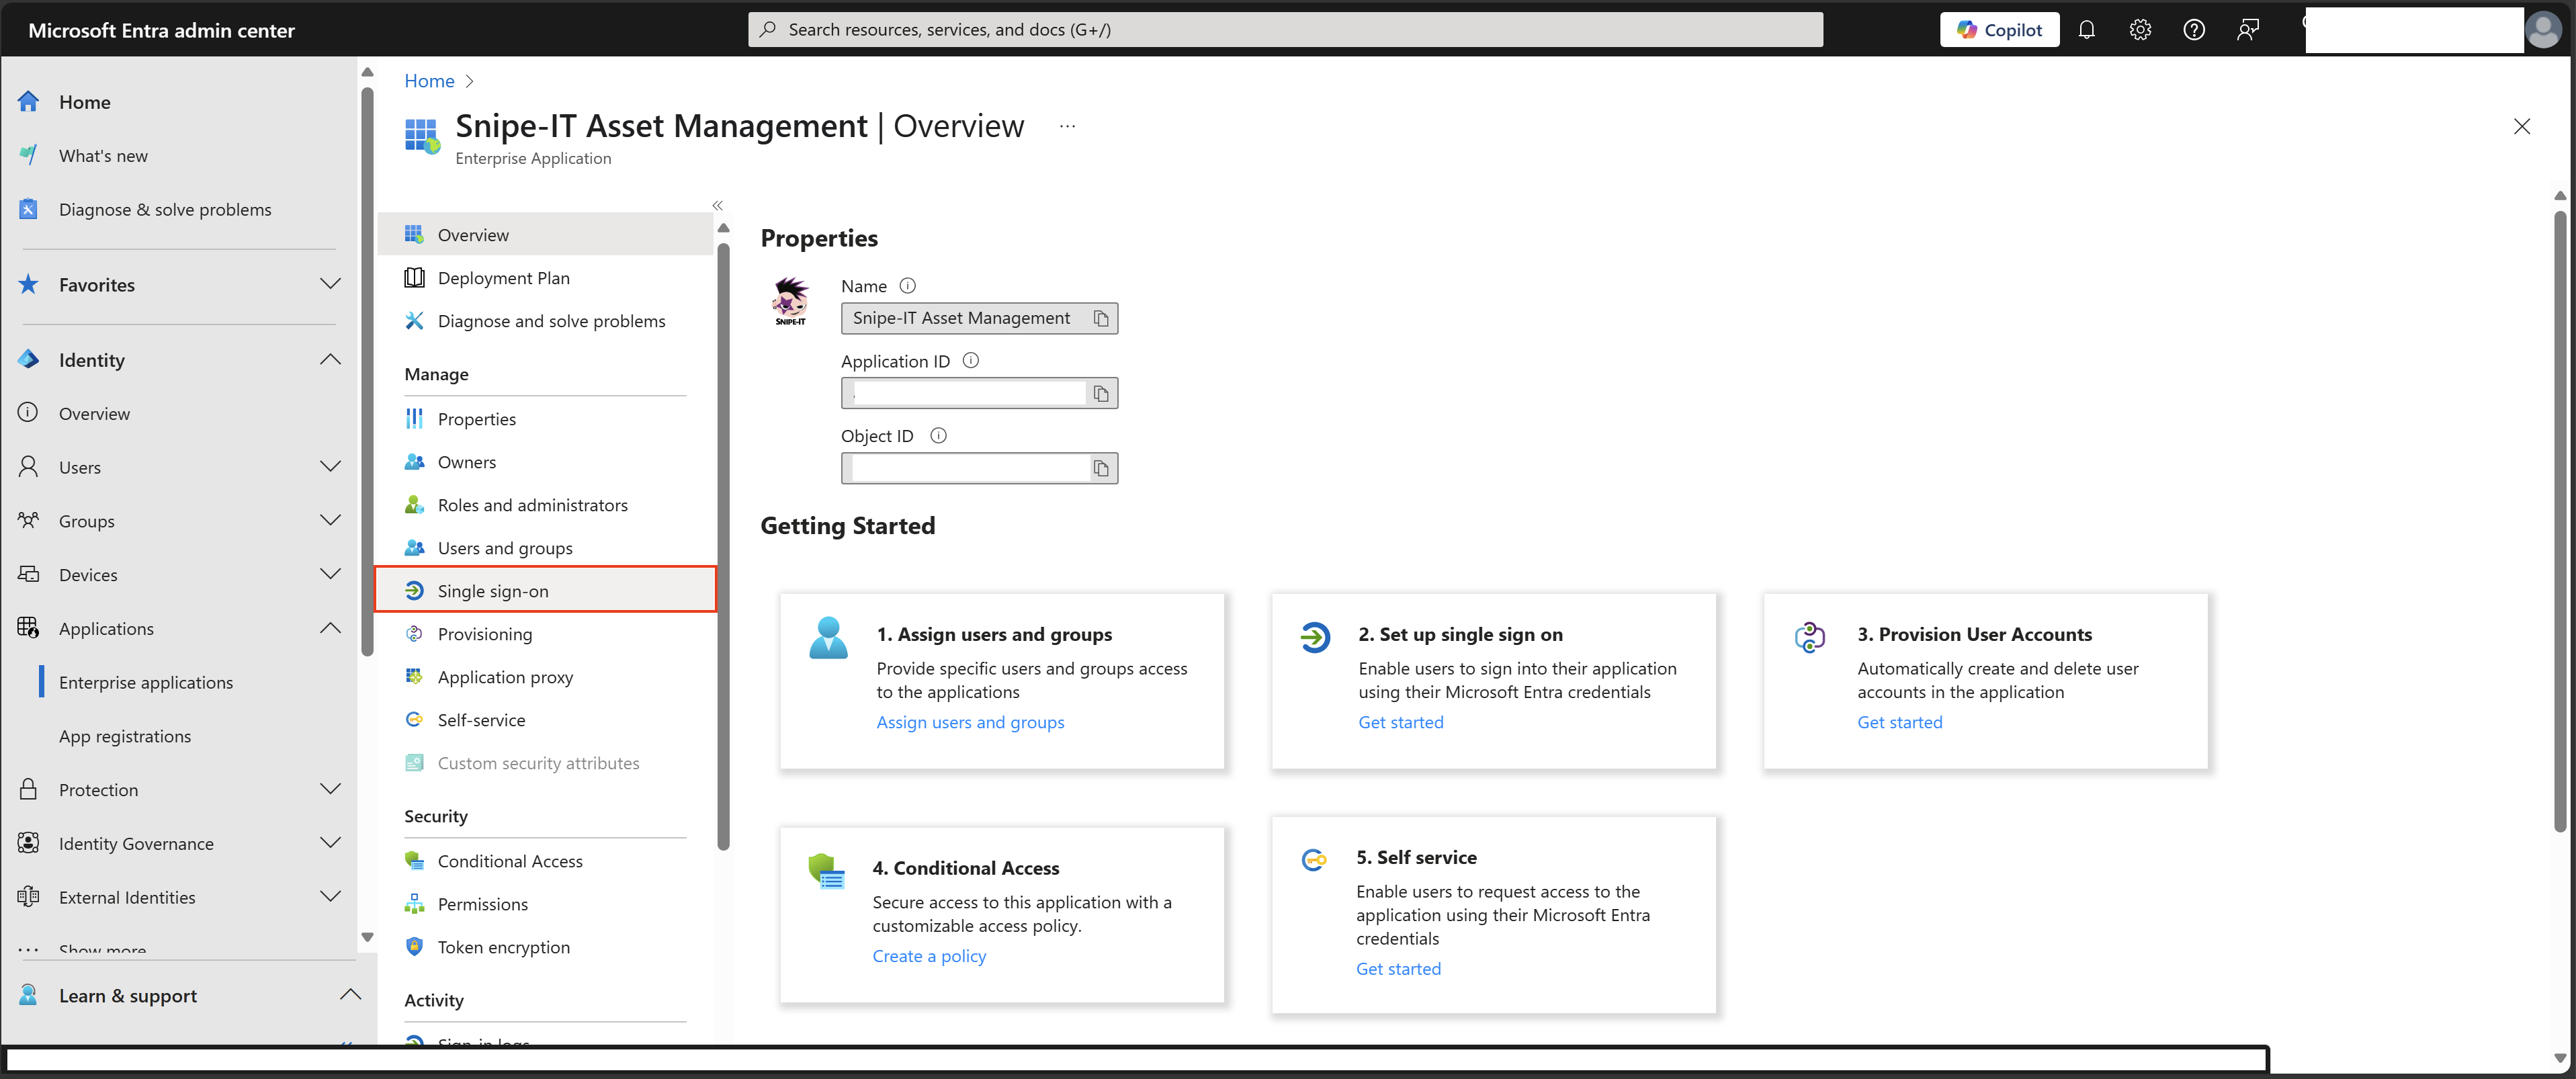
- From here, go back to your Entra ID Snipe-IT application (created from the previous steps), select
Single sign-on, select theSAMLoption, and then from here selectUpload metadata file(supply the file from the previous step):
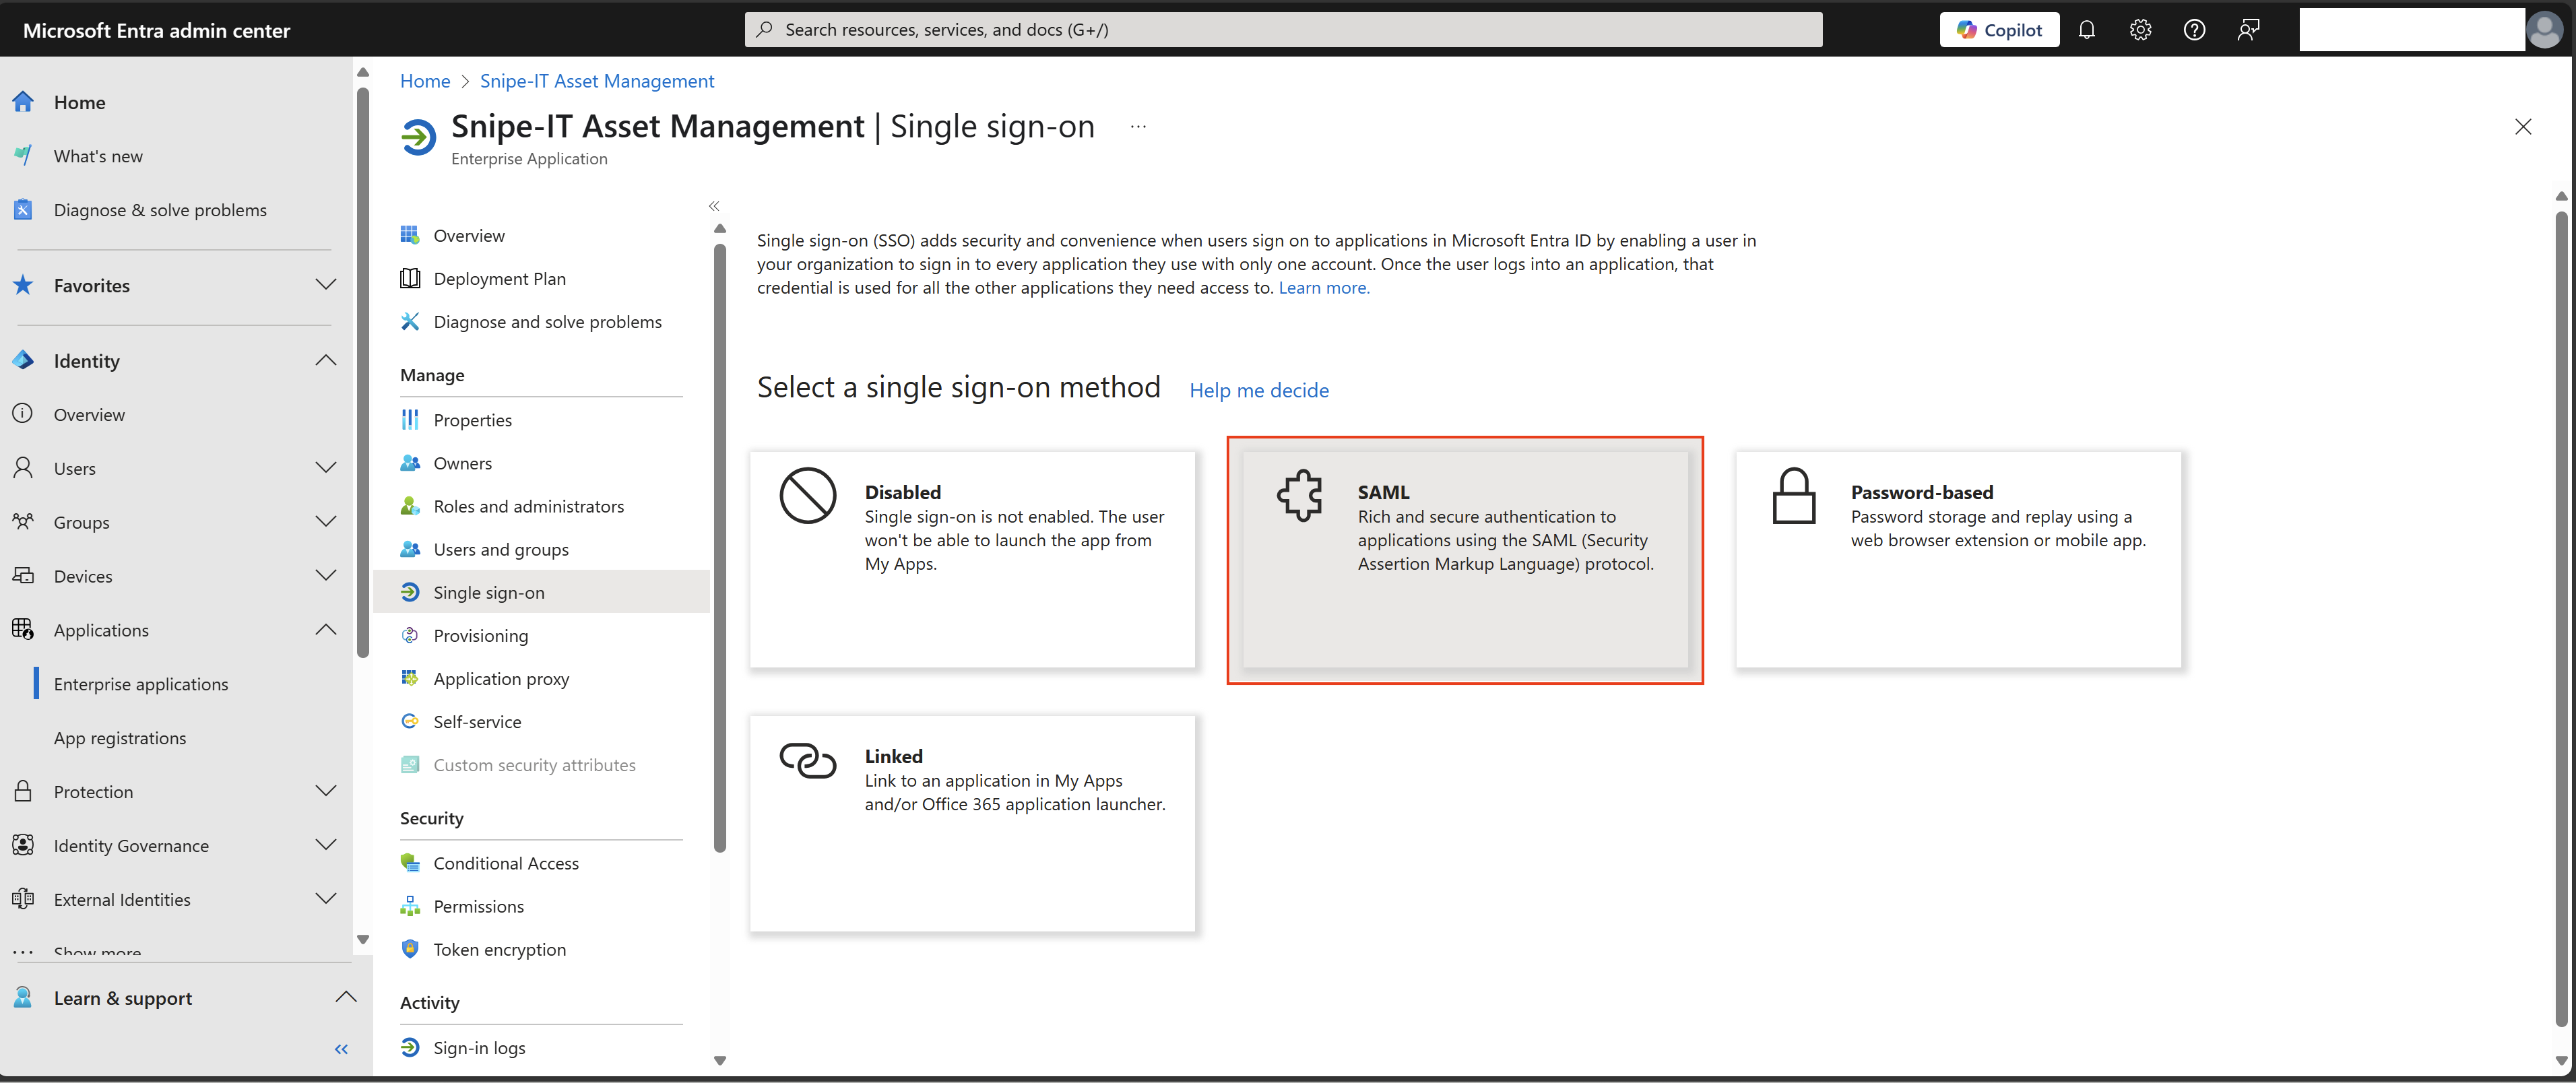
- Before saving, confirm that the SAML information in the
Identifier (Entity ID),Reply URL (Assertion Consumer Service URL), andLogout Url (Optional)fields matches what is found in your Snipe-IT instance on theUpdate SAML settingspage:
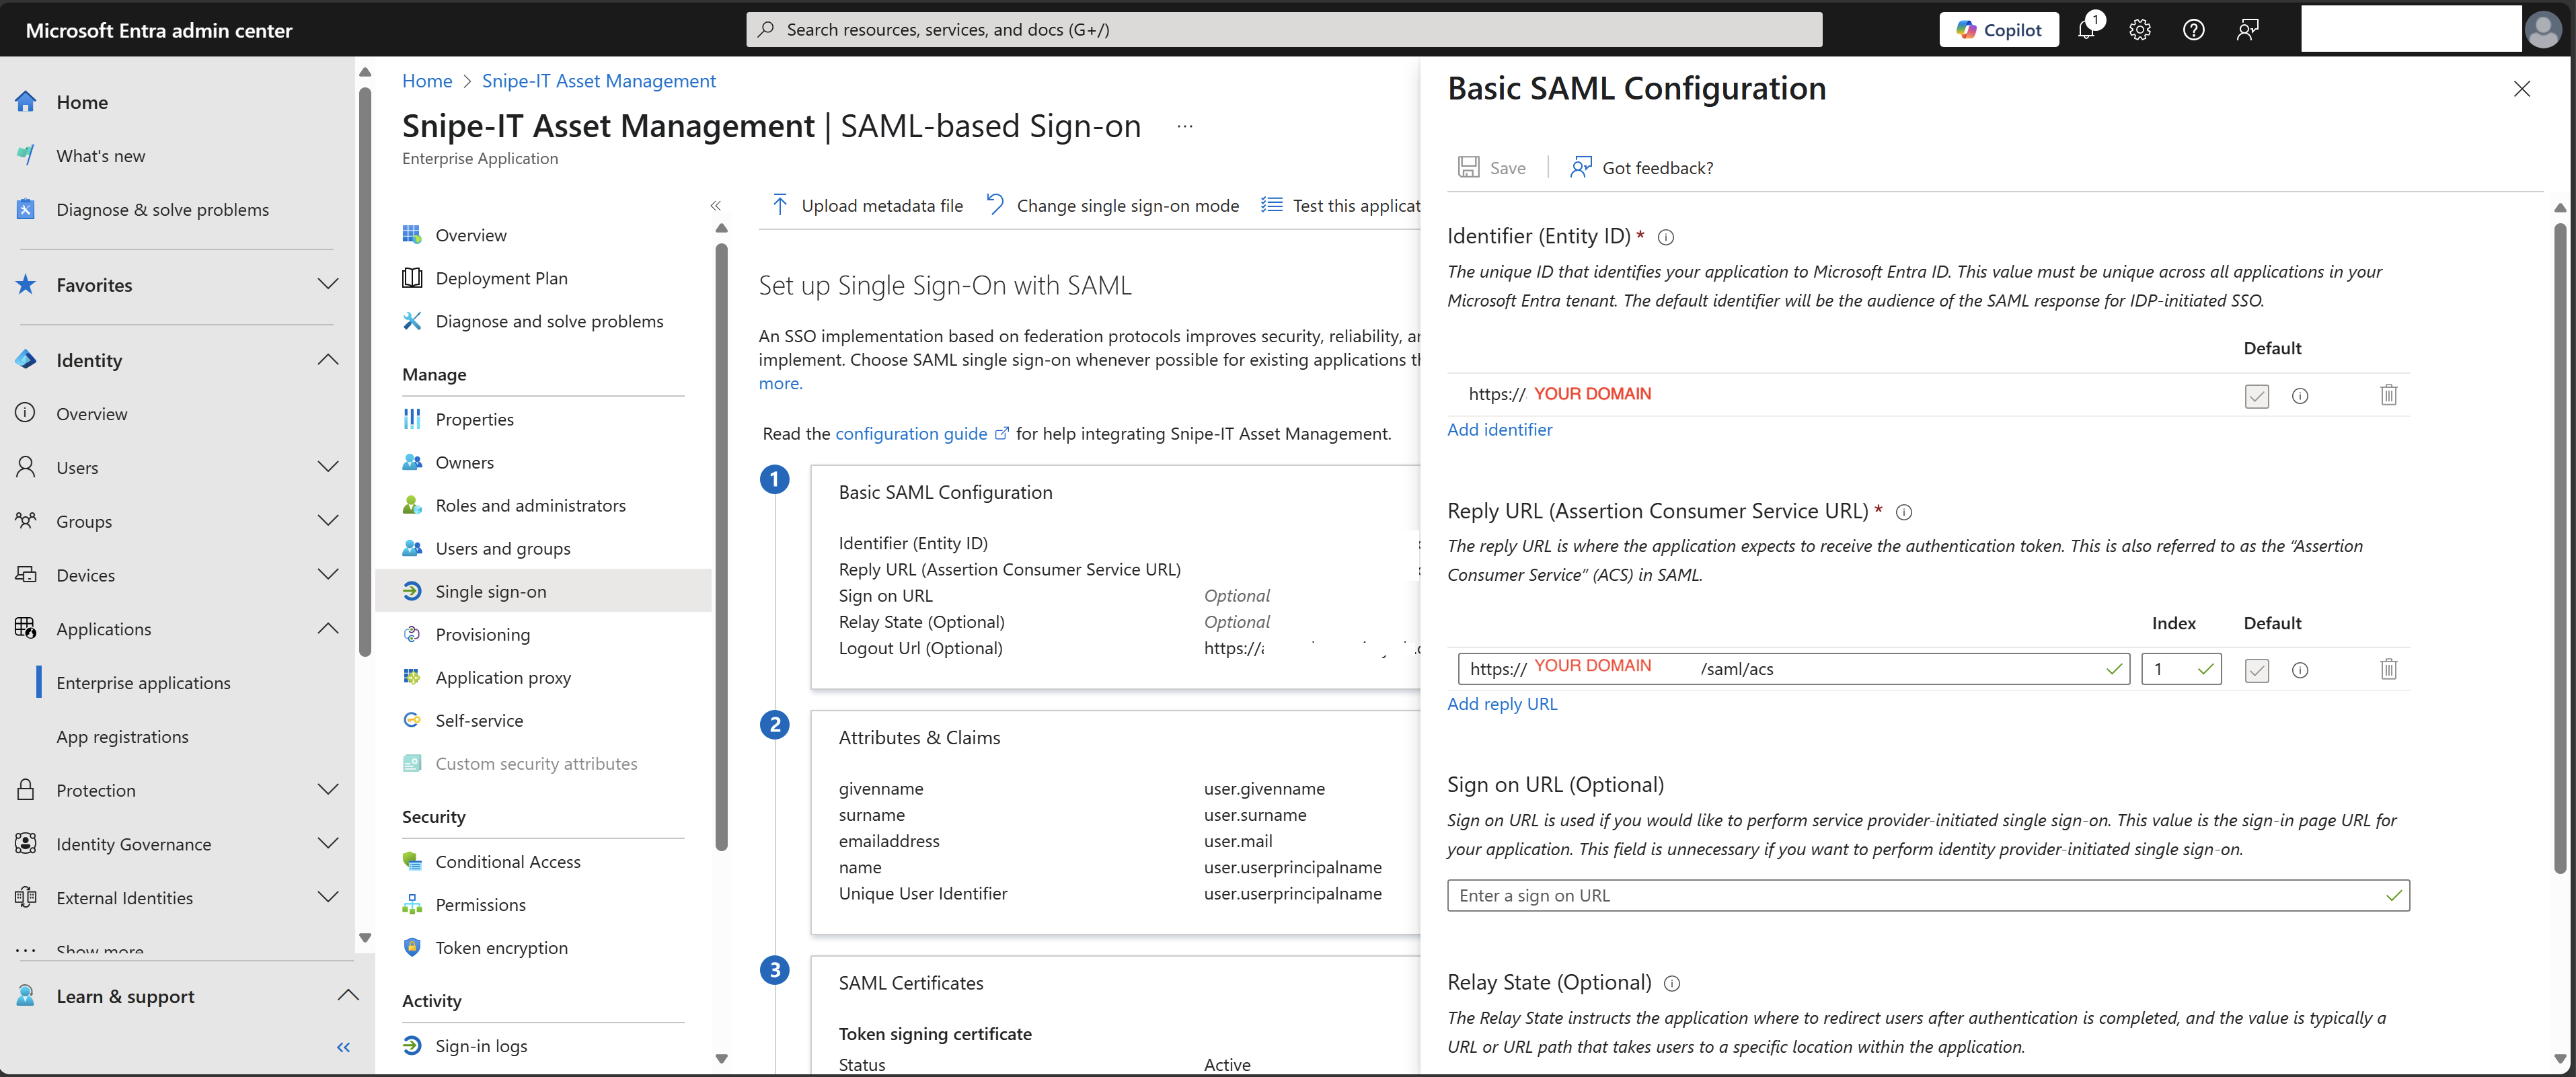
- Save the SAML configuration in your Entra ID application, scroll down to the
App Federation Metadata Urlsection, copy the URL, and then paste it into theSAML IdP Metadatafield within theUpdate SAML settingsin your Snipe-IT instance before saving the configuration:
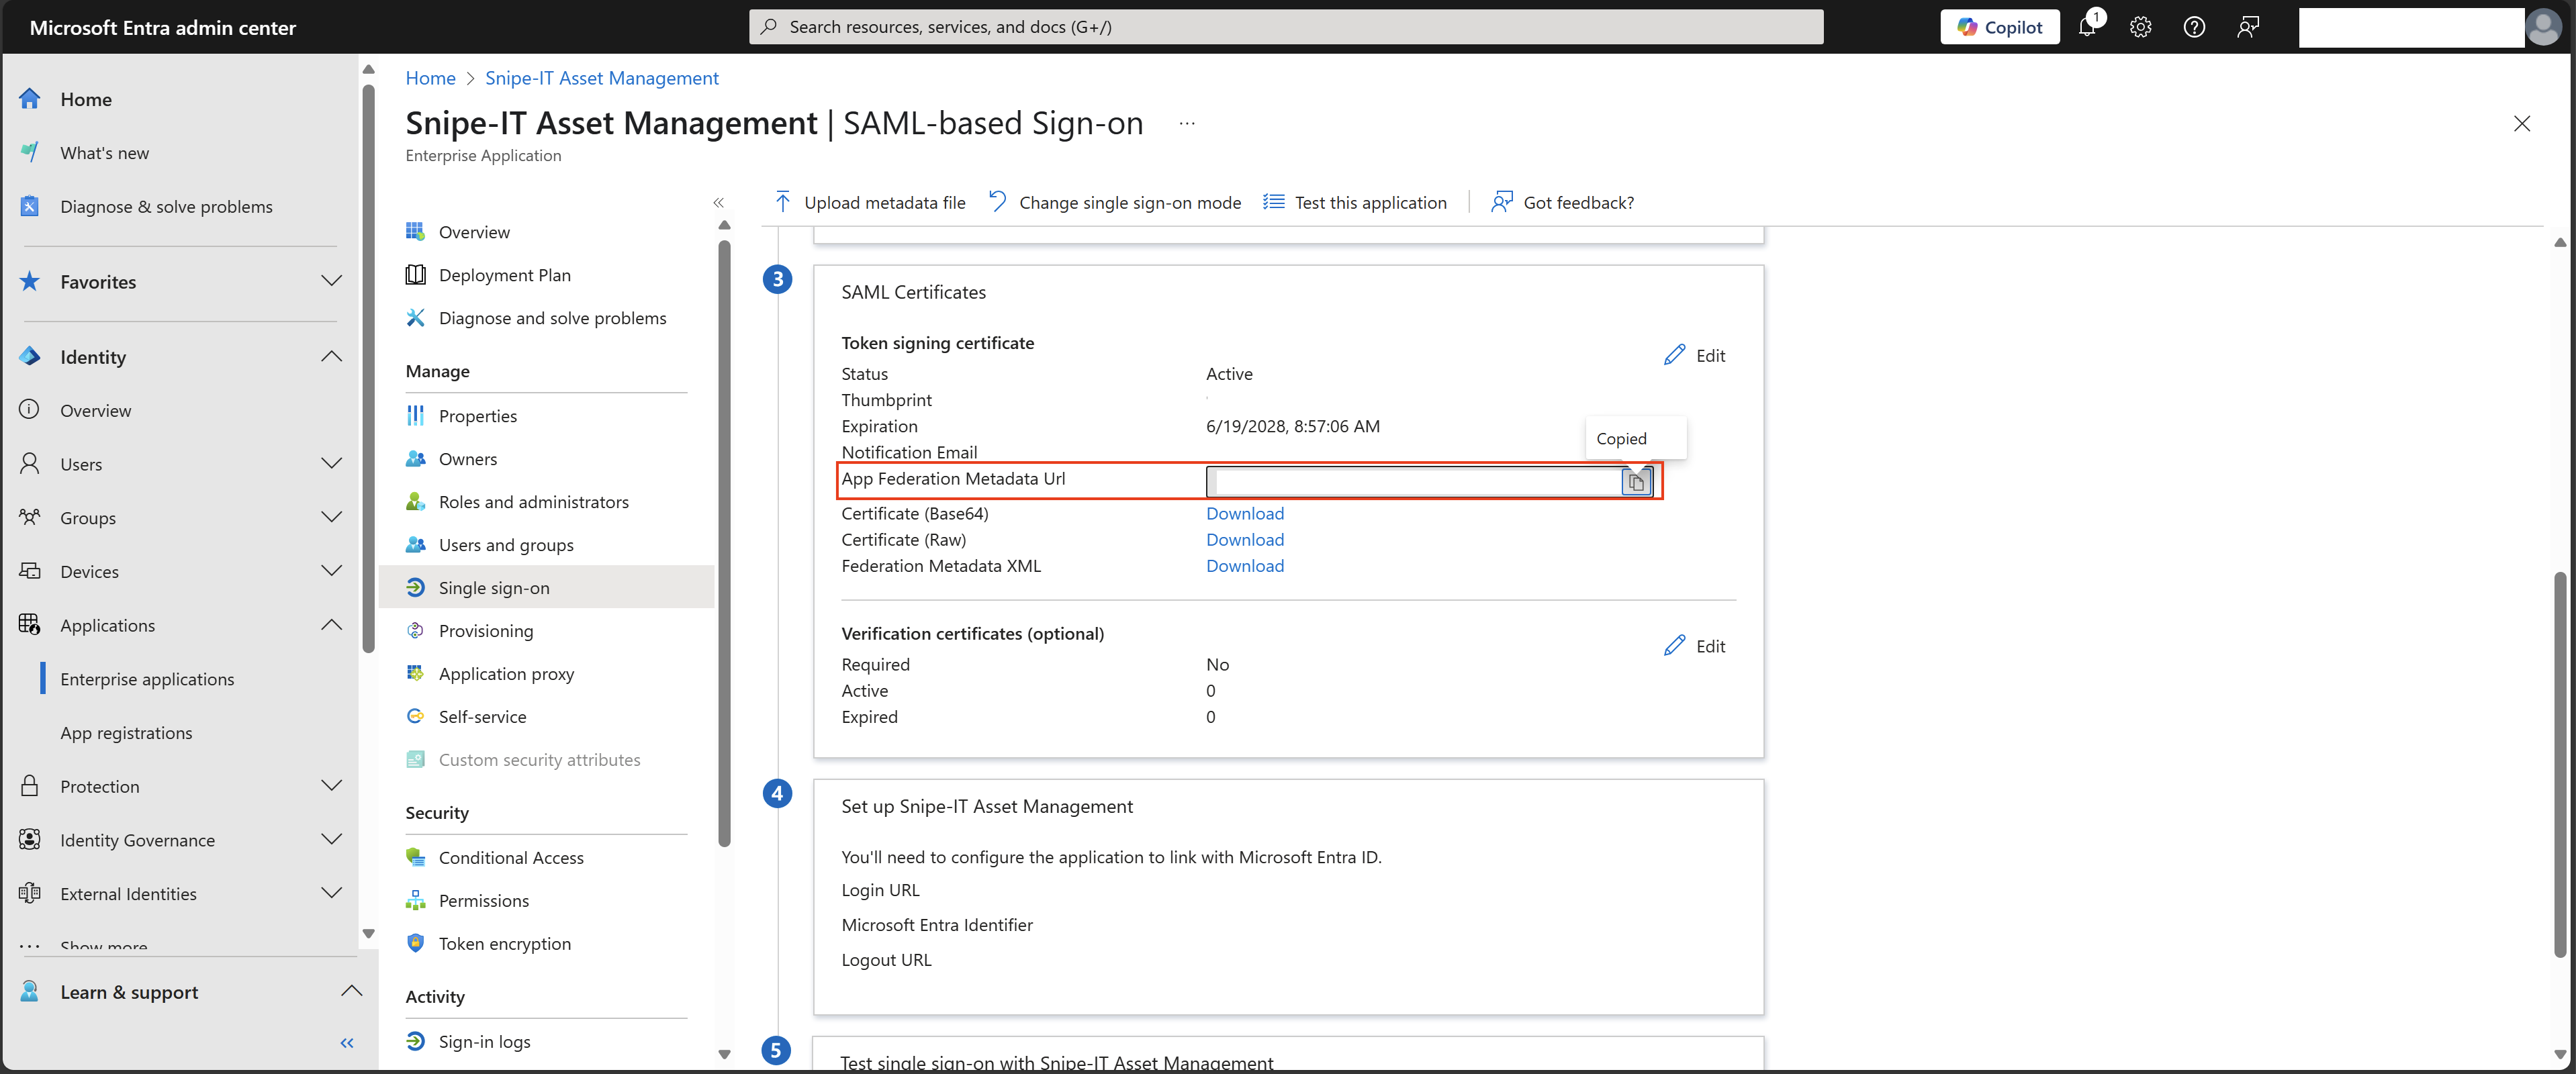
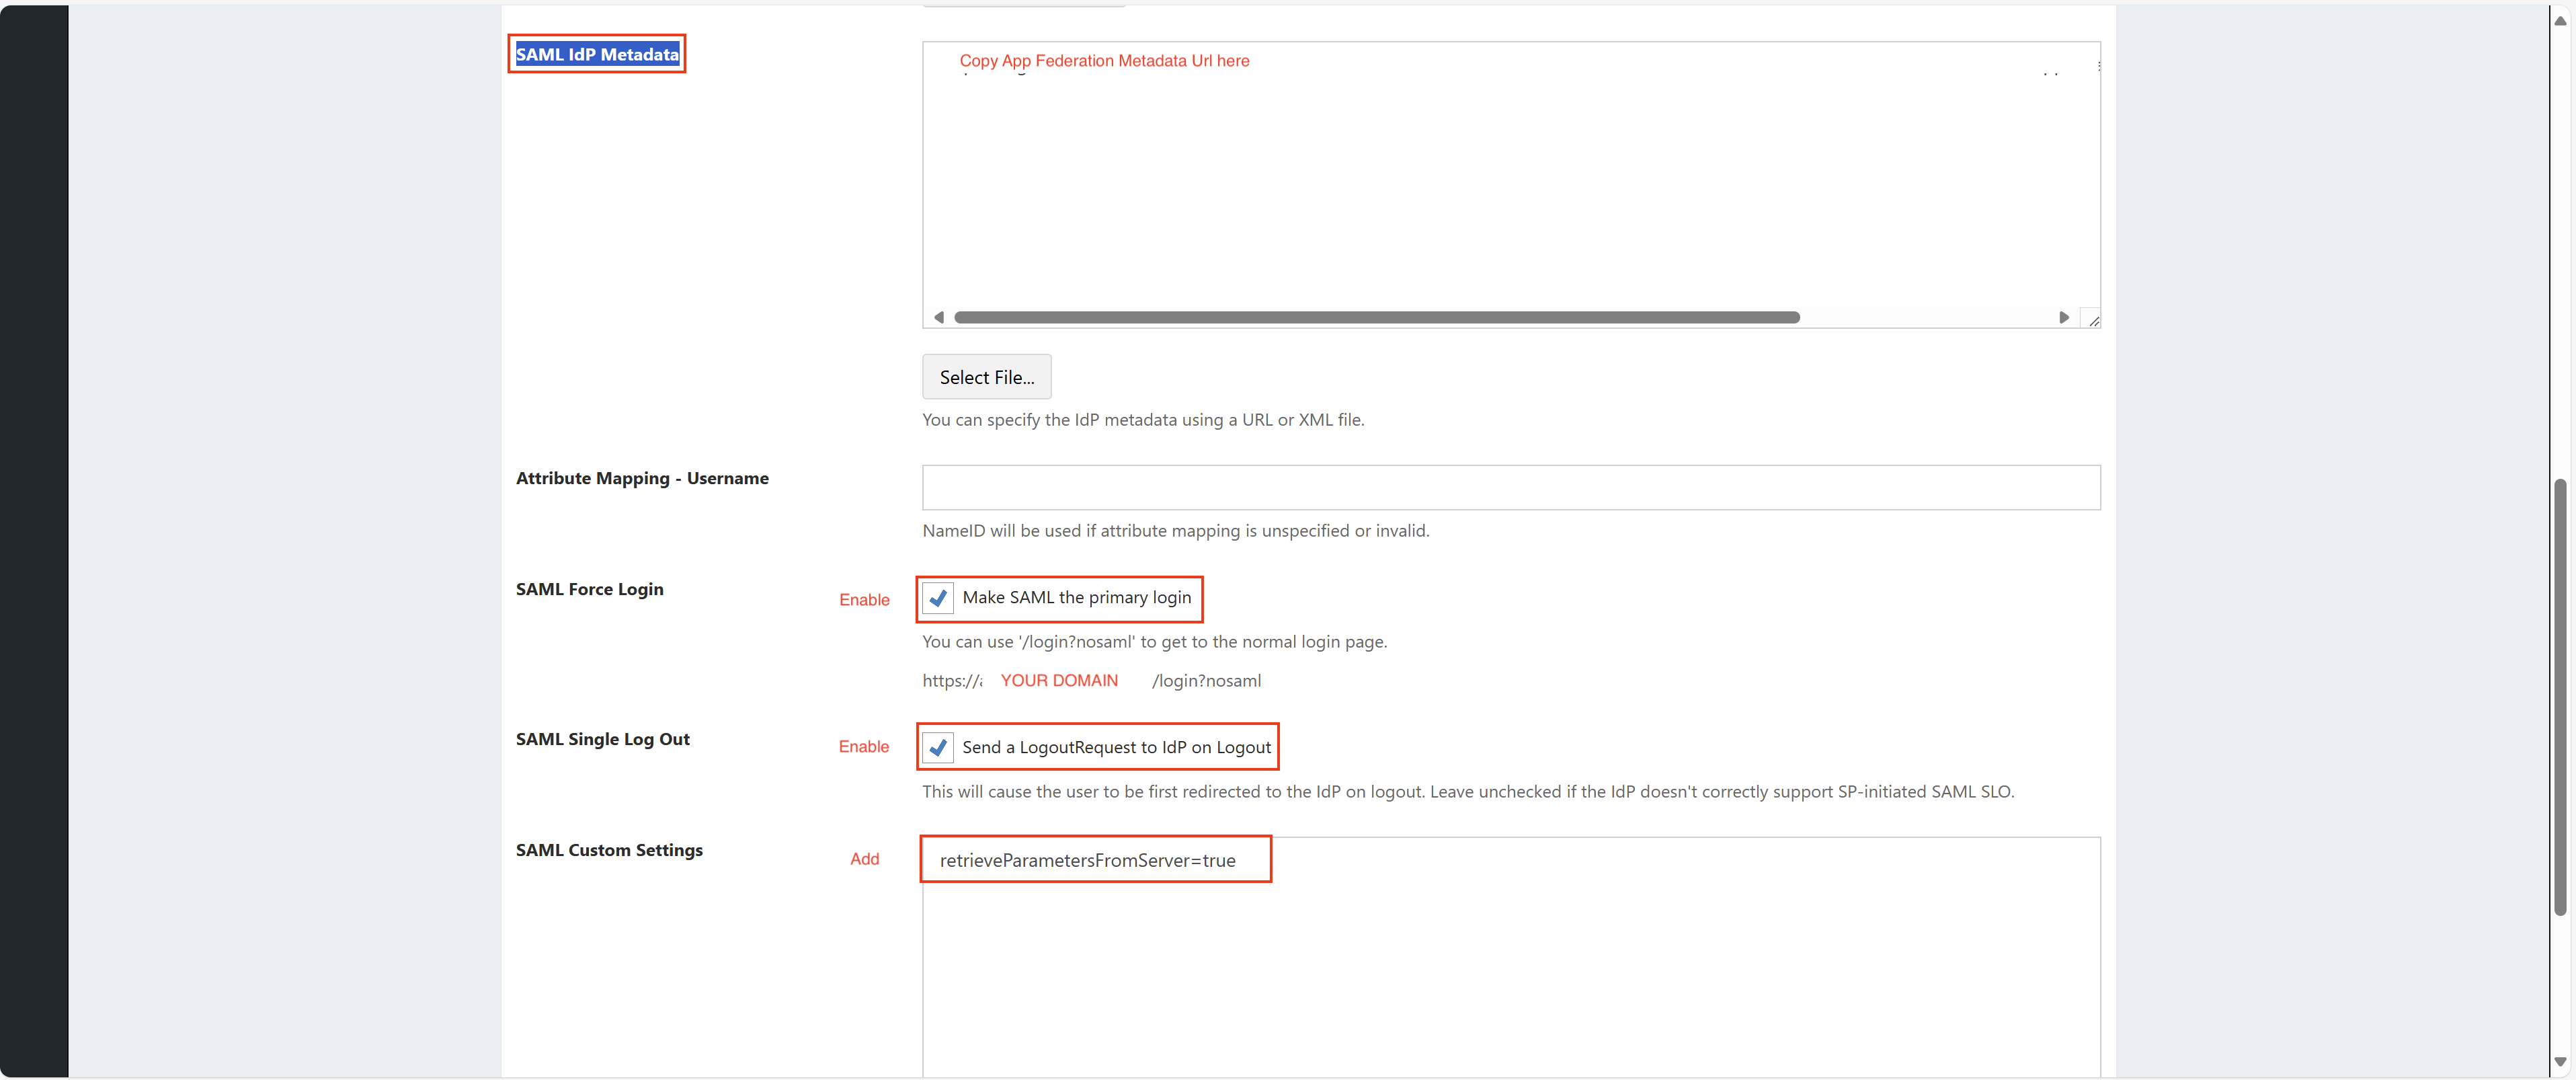
* Add the following value under `SAML Custom Settings`:
	* `retrieveParametersFromServer=true` (required to enable SAML SLO Service for Entra ID).
* And finally, enable the following two settings before saving the page:
	* `SAML Single Log Out` and `SAML Force Login`.
- If properly configured, you can test SSO functionality by navigating to your Snipe-IT's URL with a user that has access to the application (and has been provisioned to it via SCIM). How it will work is that the user navigates to the Snipe-IT url, then the user account will automatically sign into the application via SSO if configured correctly.
Conclusion
By following this guide, you now have a Snipe-IT instance that is:
- Integrated with Entra ID via SCIM
- Allows for SSO (via SAML) for users
- Is externally accessible via M365
The practical impacts of these changes is now Snipe-IT is easily accessible within your environment which should lead to a greater adoption of the application from users and technicians alike. The best way to make people actually use an application is to make it easy as possible to use which was the intended goal of this article. Now that Snipe-IT has been properly configured, your company can finally migrate away from that messy spreadsheet!